Video: Children's Bench
In this video, Chris Salomone challenges himself to make a child-sized bench out of to 2x4 pieces of lumber.
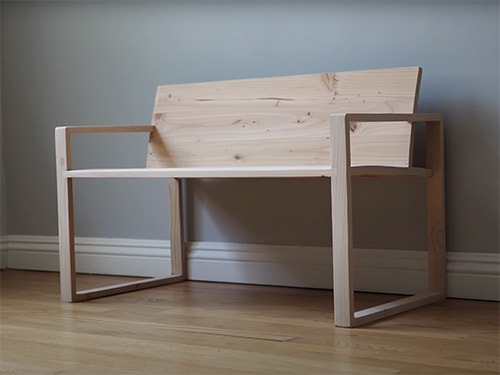
Chris Salomone builds this small, clean and attractive seating project out of two two-by-fours. It turned out to be an interesting challenge even if the project wasn't perfect.
You can find more great projects and techniques from Chris Salamone at his website.
Please Note: The contest mentioned in this video has ended.
Featured Tools:


Chris Salomone: This bench was made using only two two-by-fours, just $6 in material and about $6,000 in equipment. A couple of months ago, Ben Uyeda, Mike Montgomery, and I started a podcast. It's called The Modern Maker podcast. A couple of times each week, we hang out, talk shop, answer questions, and crack wise for a few hours. In one of those sessions, we came up with the idea to do challenge builds. In short, these would be builds for our whole community with a set of rules to use as a starting point. Everybody is welcome to participate, and we'll share the results, and even give away some prizes.
This was the first of those challenges, the two two-by-four challenge. Basically, we limit ourselves to two two-by-fours as the main component, and that was pretty much it. It was fair game otherwise. This is what I chose to build, a kid's bench. When I was thinking of projects, I looked at the two-by-fours as a fork in the road. I could either fully embrace them, or I could try to disguise them. I chose the latter. Part of me feels like that was a mistake, but more on that later.
So far, in all the shots that you've seen, I'm just breaking the material down into rough pieces. Every piece that I used was at the very least re-sawed to a bit less than three-quarters of an inch thick, and a lot of the pieces were cut in half width-wise as well so that the two-by-four would yield either double or quadruple the amount of material, well, lengthwise anyway. In the end, it felt like it was a Native American honoring the buffalo because I used just about every single grain of these sticks.
Once I had all of my material broken down into rough pieces, I started by gluing up two large panels, one for the seat rest and another for the backrest. While those were setting up, I started working on the two square frames that act as legs/armrests/structure for the bench. This was really just a matter of setting my gauge to 45 degrees and then going at it until each of the eight pieces had a miter on either edge and measured 16 inches in length. Next, I glued up the pair using some strap clamps.
This was actually the first time that I'd ever tried building furniture using two-by-fours. Because of that, part of my objective was experimenting with if it was feasible that somebody could experiment with furniture using two-by-fours. That's a confusing sentence, so let me explain it a little better. Over the course of the next few shots, I'm cutting and installing splines into the frames to help reinforce the joints and make them stronger, a technique that's normally reserved for hardwood furniture. Basically, I'm testing out the idea of designing and building the type of furniture I'm used to making only using two-by-fours as a standard.
I think this is something that a lot of beginners would probably be interested in because two-by-fours are a lot easier to get and usually quite a bit cheaper. In spite of those facts, though, I would actually not recommend doing this. We'll talk about it on the podcast soon, but in short, I think working with this kind of material can actually hurt your confidence and probably delay and discourage future growth. Make sure to check out our challenge wrap-up episode of the podcast because I'm sure we're going to get a lot more into it.
To finish off the seat rest and backrest, I used my cross-cut sled to square up things on one end. Then I could set the fence on my table saw and cut the remaining edge to ensure that both pieces were the exact same length. The last thing to do was to cut three dados in each of the frames. These are where the seat and the backrest will insert to attach the two together. The only real trick here was making sure that the dados were angled properly and in the right place. If you made the seat rest parallel to the ground and the backrest 90 degrees vertical, this would be really easy, but I gave my seat a five-degree lean and the backrest is tilted back 10 degrees so that it forms a 100-degree angle with the seat. I think this makes the design more comfortable and aesthetically interesting.
With all the pieces ready to go, I did my final assembly. When the pieces in this stage with only the seat rest installed, the whole thing is still really wobbly and weak. A design for a bench or a coffee table that was just like this wouldn't really be very practical, but as soon as you get the backrest in and you have three points of contact on each side, the whole thing immediately becomes rock solid. That was the end of my two two-by-four challenge.
I'm not really in love with this build in particular, but I'm really liking the concept of the challenge in general. It's really interesting to take a bunch of people and give them the same starting point, and then see the variety of outcomes that that yields.


Keep the inspiration coming!
Subscribe to our newsletter for more woodworking tips and tricks