Video: How to Make a Paint Booth

When it comes to finishing your projects, one of the most efficient ways is using a paint sprayer. Creating a dedicated paint booth in your workshop can significantly enhance the quality of your finishes by providing a controlled environment that minimizes dust and debris. While professional spray booths can be expensive, setting up a simple and effective paint booth at home is achievable with the right materials and approach.
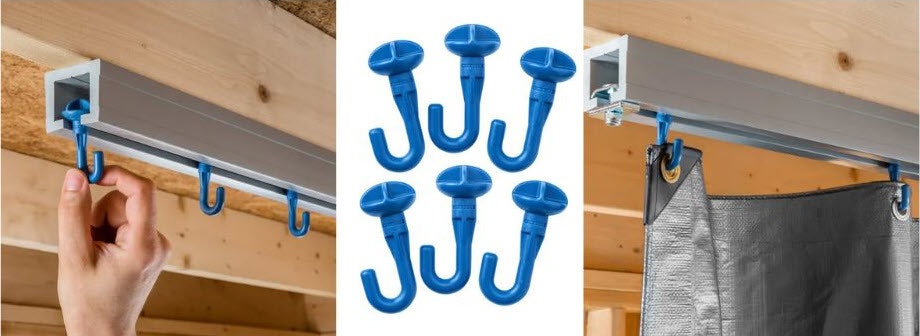
Getting the Right Materials for Your DIY Paint BoothBefore diving into the process of setting up your own paint booth, it's important to gather the right materials to ensure an efficient and safe workspace. From creating a sturdy structure to managing ventilation, each component plays a key role in the success of your booth. A ceiling track system serves as the backbone, allowing you to easily hang and adjust the walls of the booth. Rockler offers a versatile ceiling track system that can be configured to fit your space.
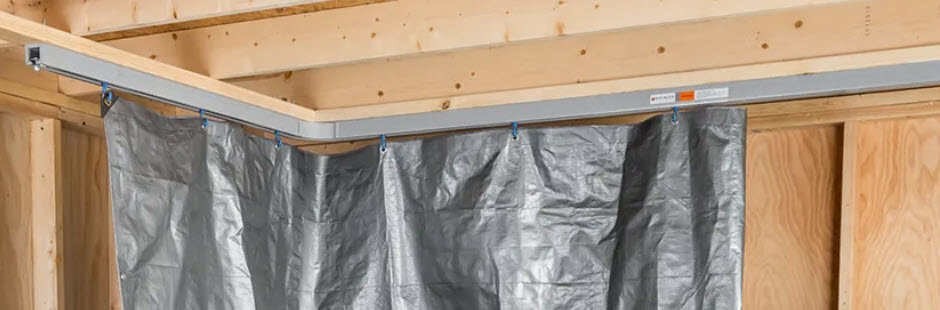
Durable tarps or plastic sheeting will form the enclosure, containing overspray and keeping out dust. Proper ventilation equipment ensures a steady flow of fresh air, while hooks or curtain gliders securely hold everything in place. Rockler offers curtain gliders for the ceiling track system in a 6-Pack. With these materials on hand, you're ready to build a functional paint booth that meets your needs.
Setting Up Your Paint Booth:
Install the Ceiling Track:Determine the dimensions of your paint booth based on the size of the items you'll be painting and mount the ceiling track system accordingly, ensuring it's securely attached to support the weight of the tarps.
Hang the Tarps:
Attach tarps or plastic sheeting to the ceiling track using clamps or hooks, creating enclosed walls for your booth. Ensure there are no gaps to prevent dust from entering and overspray from escaping.
Set Up Ventilation:
Position exhaust fans or filters to facilitate proper airflow, drawing fumes out and bringing fresh air in. Ensure the ventilation system is adequate for the size of your booth and the type of paint you're using.
Prepare the Workspace:
Place a drop cloth or additional tarp on the floor to catch any drips or overspray. Organize your painting tools and materials within the booth for easy access.
Test the Booth:
Before starting your project, test the booth's airflow and containment to ensure it's functioning effectively.
Video: See How One Creator Set Up His DIY Paint Booth
Alternative Solutions
If constructing a custom paint booth isn't feasible, consider portable options like the Rockler Dual-Access Spray Booth. This easy-to-set-up booth provides a controlled environment for spray finishing and stows compactly when not in use. For smaller projects, the Wagner Spray Shelter is a collapsible option that helps reduce overspray drift, protecting your workspace and surrounding items.
Safety FirstWhen working with paints, particularly sprays or finishes that involve solvents, safety should always be your top priority. Remember to always wear appropriate personal protective equipment, such as masks and goggles, ensure your workspace is well-ventilated to avoid the buildup of harmful fumes and keep flammable materials away from the painting area.
By setting up a DIY paint booth in your workshop or garage, you can achieve professional-quality finishes while maintaining a clean and safe environment.


Keep the inspiration coming!
Subscribe to our newsletter for more woodworking tips and tricks