Five Fixes Used by Finishing Pros
Amateurs and pros alike can create high quality finishes, but there are some tricks of the trade more common to professional shops. Here are five useful ones to make life easier for all of us.
During glue-up and handling, you’ll often get dents or gouges in the wood. Gouges are areas where wood fibers are torn or removed, and must generally be filled (or, if they are really small, sanded out). Dents consist only of crushed, unbroken wood fibers, and can almost always be raised up without sanding or filling.
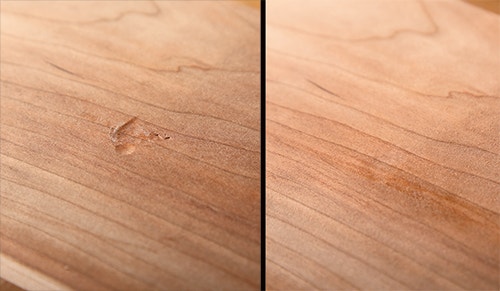
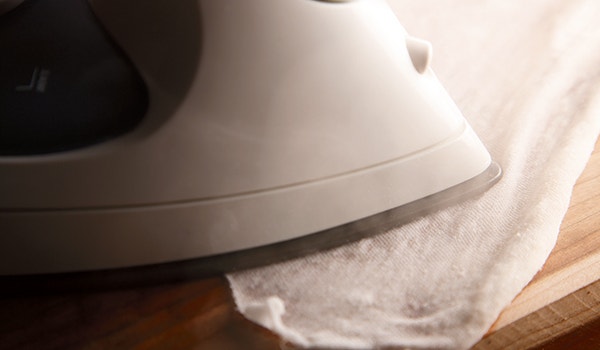
Put a couple of drops of water into the dent, and let it soak in for a few seconds. Add another drop or two, just enough to fill the dent with water. Take either a damp cloth or a thin piece of cardboard, place it over the spot, and press the area with a clothes iron set on high.
Before You Get Started
The water will seep into the crushed fibers and the hot iron will turn the water to steam. As the steam expands, it will push open the crushed fibers and leave the surface level. The damp cloth or thin cardboard is simply to prevent the iron from leaving scorch marks on the wood.
Steam dents as soon as you see them, before sanding the area. If you are not sure whether it’s a dent or a gouge, try steaming it first. You won’t do any harm, and you may make the gouge smaller. Once you’re sure it’s a gouge, reach for the putty, but first read the next section.
Hiding Putty
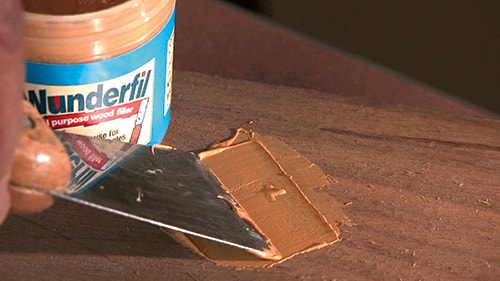
The key to hiding putty starts with choosing the right color. I’ll tell you upfront that almost everyone goes too dark. Look at the wood carefully and find the very lightest color value in it. Match your putty to that, or go a shade or two lighter, but never darker. When the putty is dry, sand it level so that the original outline of the gouge is visible. Don’t worry; I know it looks far too light now, but we’re going to fix that.
Planning to stain the wood? First, test the dried, sanded putty with the stain you intend to use to see how it absorbs kit and blend the putty patch to the surrounding area. Need some help with that? Read on.
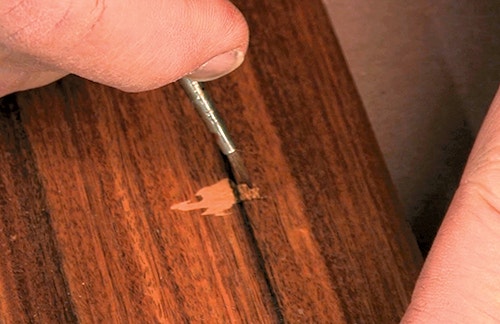
Touchup to Fool Them All
It’s easy to touch up darker, but almost impossible to touch up lighter, since that will leave an opaque shadow. Since we chose our putty wisely, we have a spot that only needs to go darker.
I use dry pigment powders in a wide range of colors, and mix them with dewaxed shellac using a piece of glass or mirror as my mixing board. Very fine #1 or #0 round, red sable brushes that end in a sharp tip provide both springy fibers and a controllable point, allowing me to create fine grain lines.
The goal is to paint a picture of that particular wood onto the putty patch. Start by painting in the largest, darkest grain lines, then move on to the finer ones, remixing colors on the glass palette as needed. Often the grain lines alone will hide the spot. If you need to darken the background, apply a thin, semitransparent "wash," made by mixing only a tiny amount of color into the shellac.
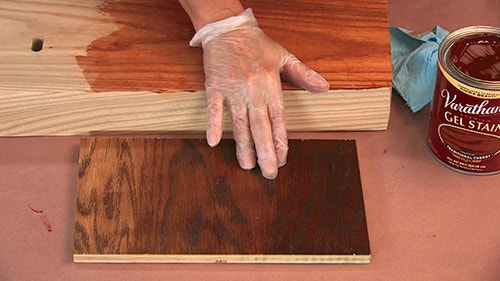
Custom Color Stain
While you can mix several stains together to make a custom color, not everyone wants to keep a shelf full of basic colors on hand. Besides, we’re not all adept at mixing colors by sight. Here’s a quick trick for easy custom color stain.
At your local paint or home store you’ll see a wall of color chips covering every hue imaginable. Choose the color you want the stain to be, and have the clerk make up a sample jar in latex paint. Most companies now offer four-ounce sample jars, but if you need a lot of stain, buy a quart.
Thin the paint with an equal amount of water — more for a weaker color and less for a stronger one — and wipe it on and off as you normally do with stain. The resulting water-based stain is compatible under all the common finishes we use.
Layers Banish Blotch
Stain once, whether with dye or pigment, and the wood “grabs” the stain where it chooses, sometimes absorbing too much in certain areas and leading to a blotchy look. Adding a second (or even third) layer of pigmented stain a day later can help even out the color and hide the blotch.
When applying a pigment stain over dye for the purpose of making it more uniform, it’s a good idea to seal the dyed wood first. Use a very thin application of Zinsser® SealCoat™ or dewaxed shellac, reduced to a watery consistency. That step is not necessary if your first color application was a pigment stain, since pigment stains partially seal the wood all by themselves.
To avoid going too dark, make all the stains lighter so they add up to the final color you want. After the first staining, you can adjust the color of the second stain to get exactly the right tone. Creep up on the final color; the more coats of color you divide your staining operation into, the more uniform it will look.
There you have it. They say knowledge is power; hopefully, you now have the power to be a more efficient and more confident finisher.


Keep the inspiration coming!
Subscribe to our newsletter for more woodworking tips and tricks