Video: How To Align Your Table Saw Fence

Adjust your table saw fence for perfect cuts. One of the keys to making safe and accurate cuts with your table saw is to make sure the table saw fence is parallel with the miter slot and blade. Aligning your table saw blade is not difficult. Learn how to adjust your table saw fence to be parallel with the miter slot and blade.
Skill Builder Video
Video: How To Align Your Table Saw Fence - Video Transcript
Speaker 1: When working with the table saw, it's critical that the fence is parallel with the blade and the miter slot. The reason for this is if the fence is at all out of alignment, it can result in burning on your workpiece, binding, pinching, or even dangerous kickback. Let me show you how to align your fence. Before aligning your fence, you need to be sure that your saw's blade and the miter slot are aligned in parallel. You can learn how to do this in your saws owner's manual. We also provided instructions for this in a separate video that you can find the link to in this video's description. Click here to watch the video.
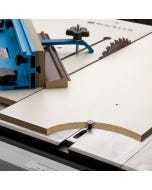
Aligning the blade and the miter slot is a process you shouldn't have to do very often, but checking the fence's alignment, and realigning is something you want to do on a regular basis because the fence can get knocked out of alignment just from daily use of the saw. Now, there are a number of ways to check the alignment of the fence, but I think the easiest method that's still accurate is to simply use your finger as a gauge to feel along the miter slot in the fence. To do this, simply place your finger on the sidewall of the miter saw closest to the fence, next, slide the fence over until the face of the fence is flush with the side of the miter slot.
Then, slide your finger down the miter slot to the back edge of the saw, and check to see if the fence, and the miter slot are flush at that end. If both ends are not flush, then you'll need to adjust the fence. Now, it turns out this fence is slightly toed in, meaning the backside of the fence is closer to the blade than this front end of the fence, so we need to make some adjustments. The way we do that is by adjusting some set screws. Each fence is a little bit different, but basically, we're going to be turning one of these two set screws, and those will move these tabs one or the other in or out, and that will torque the fence closer or further away from the blade. Let's make some adjustments.
Now, these set screws are Allen head screws, so I'm going to use this Allen wrench, and I'm just going to make very small adjustments. Now, in this case, we want the fence to move that way so I'm going to thread it in to push this, and that's going to torque the fence. Now, we recheck the fence and we continue this process of adjusting the screws, and rechecking until the fence is in alignment. I'm guessing you might be a little skeptical of the accuracy of using your finger to test the alignment of the fence, but I think you might be surprised by the sensitivity of your sense of touch. To test our results, I used an instrument called a dial indicator. This will measure the distance between the fence and the miter slot.
I measured the distance from the fence to the miter slot at both the front and the back of the saw, and it turns out the back end of the fence is only eight one thousandth of an inch further from the miter slot than the front end of the fence, which is perfectly acceptable. Really, as long as the difference is less than 15/1000 to 20/1000 of an inch, you're good to go. Remember, periodically check the alignment of your fence against the miter slot. Keeping this fence parallel with the miter slot will help ensure great results with your table saw.
Keep the inspiration coming!
Subscribe to our newsletter for more woodworking tips and tricks