Video: Build an Adirondack Chair
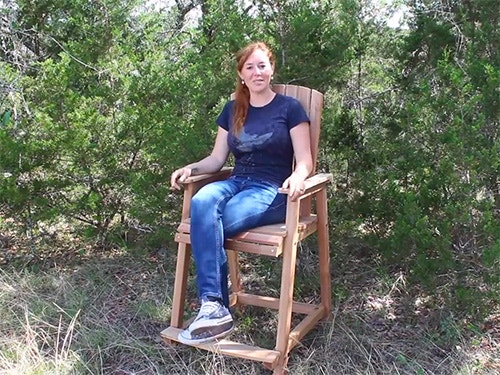
Learn how to build a set of bar-height Adirondack chairs. In this video, April Wilkerson takes you through her process for building several bar-height Adirondack chairs. The Bar Height Adirondack Chair Plan, Template & Stainless Steel Hardware Pack makes this a project that even a beginning woodworker can tackle.
You can find more great projects and techniques from April Wilkerson at her website.
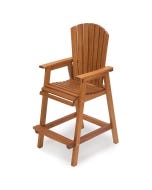
Rockler Bar-Height Adirondack Table Templates with Plan

More Template Kits for Outdoor Projects:
- Rockler Westport Chair Templates with Plan
- Rockler Portable Outdoor Chair Templates with Plan
- Garden Bench Plans
- Modern Adirondack Plan
- Folding Adirondack
- Bar Height Adirondack
- Traditional Adirondack
Click Here for More Outdoor Plans
Video Transcript
April Wilkerson: In this video, I'm going to be showing you how I made these tall Adirondack stools. Stay tuned. Since these stoles are going to be living outside, I decided to build mine out of cedar. You can build these tools completely from 1x buy material, and then glue two 1x together in order to create the thicker stock needed for the legs and the cross braces. However, my local store has one 1x cedars, but they also have 2x4 cedars. I went ahead and grabbed some 2x stock for my stool. Instead of having a whole bunch of hand sanding to do later on, I always choose to run the rough side through my planner before getting started.
I'm building this project on behalf of Rockler Woodworking. I'm using a set of plans that they have come up with. They not only provide the step-by-step instructions, but also the templates needed for several of the parts.
The first thing I did was start making the components needed for the seat assembly. I traced the seat support template on a piece of 1x cedar, then took it over to the bandsaw and started cutting them out. On the first one, I made sure to cut it out as perfectly as I could to the line. On the second, I just did a rough cut out in order to take away the bulk of the material, so that I could then take it over to the router table and use a flush-trim bit to get it exact to the very first one that I cut.
Next, I wheeled out my job site saw to the porch and started cutting all of the needed slats for the seat. After the slats were cut to length, I went back to the router table and round it over all the edges. I must say, it's awesome having the option of rolling up the equipment to the porch.
After all of the components for the seat were made, I started the assembly process. For this entire build, I'm going to be using Titebond III since it is a waterproof glue and these chairs will be living outside. I'm placing a dowel in between each one to act as a spacer for these slats. I actually made a mistake when assembling the seats. I thought the plan said to leave an overhang of 3/8” on either side. That's what I'm doing here with a spacer. However, I later learned that this is incorrect and the slats should be flush. I ended up making it work, but just to let you know if you end up following the plans, don't do as I do here.
After getting all the slats spaced evenly, I came through with a pre-drill countersink bit and then attached everything with stainless steel screws. If the chairs are going to be living outside, you want to make sure that you're using hardware of an exterior grade. With the seat complete, I moved over to the miter Saw Stand, grabbed my 2 X 4 material, and started cutting the legs needed for each stool. Now, I have a balcony that wraps around my entire porch so instead of just making one or two, I decided to make five so that I can place them everywhere.
With the legs cut to length and also angled at both ends, I take it out to my table saw and rip the 2x4 in half in order to create both of the legs needed. Then, I went back to the miter saw and started cutting the horizontal top brace that will connect the two legs and support it. Now, this top brace will be connected to the legs by way of a half-lap joint. If you're using 1x material for your build, instead of 2x material like me, then you can simply cut two pieces of different links and then join them together to create two rabbets. However, since I am using 2x material, I had to figure out a way to cut this out without using a table saw and dado stack as my jobsite saw does not receive a dado.
I went over to the bandsaw and rigged up something to make this cut. I'm not able to just push the material through the blade as it would give me a straight cut. Instead, I took a wedge and taped it to the bottom side of my stock. Then, for that face-angled cut, I was able to tilt the table of my bandsaw and then push through my material. I was very pleasantly surprised at how nice these rabbets came out. Next, I set them in place on the leg and simply trace the profile onto the leg so that I could repeat the process at the bandsaw and create the corresponding rabbet needed in the leg pieces.
The stop that I set up for the previous cut is exactly the same. It might look complicated, but it's very simple to repeat once you have the set up complete. Again, I'm using Titebond III wood glue on all of these joints to protect it from weather. I set the two pieces in place, clamp it together so that it won't move around on me, then counterbore and attach it using two screws at each joint.
Note that the screws here should be on what will be the inside of the leg. When the chair is assembled, you won't be able to see them. After getting one leg completed, I then repeated the process for the other or others as I'm making five. It was quite a few pairs. Next, I moved on to making the lower support. It's almost identical to the top support as it will stretch across both legs and connect the two. I was able to use my same exact setup over at the bandsaw. Even though it's a lot of parts, this did go pretty quickly once I got into a groove.
Instead of making all the cuts needed on one leg and then repeating on the next, I would make the same cut on all the legs before moving on to the next cut, because they all do require something a little different, either the fence move differently or the stop block adjusted, or even the bandsaw tilted to the other side. You can see that the left is a rabbet which I handled at the bandsaw, but right is a dado, which I can't handle at the bandsaw. It'd be easy with the table saw on a dado stack. However, since I don't have that equipment, I placed the stock in my SuperJaws and use my router instead. It is quite a bit of material, so I took it in two passes. Since I have so many parts, to speed it up a little bit, I would place two or three pieces in my SuperJaws at the same time.
Moving on to making the footrest. This requires a slight curve in the top portion, just for aesthetics. I clamped one of the boards onto my workbench, and then attached two screws where this curve needed to end. Then used these screws to bend a flexible ruler into the gradual curve. Since I'm making five, I cut five more boards to length and width, and then taped them all together, and then cut them all at once. Before taking off the tape, I flipped my belt sander upside down and refined this curve just a little bit more to my liking. All of the components are now made so it was time to refine them a little bit before assembling. I rounded over all of the parts at the router table, and then also gave everything a nice thorough sanding.
For whatever reason, I've got to plain down the edges of the 2x4 material. I use this brand new belt sander that Triton's come out with. It's a 4 x 24 inch belt sander in order to smooth out that rough cedar. The process for assembling the lower portion is to attach a lower back cross member and the footrest to those two lower supports. This is where I compensated for my mistake earlier in the seat design. Since I left the slats overhang by 3/8 inch on each side, I took out 3/4 inch in this back cross member, as well as this footrest. What this does is pull in the lower portion of the stool by 3/4 inch which is the exact amount that I left out of the seat.
Now, you can see how the two assembly start coming together, that lower support assembly with the leg assembly. It is very satisfying to have those rabbet and dado together so perfectly. I applied Titebond III to all of the joints, and then also used carriage bolts with a washer and a locking nut on it. After getting one side attached, I flipped it over and repeated the process on the other side. Now the seat assembly can be attached to the legs. Again, I'm still having to make modifications for my mistake with the seat design. The seat is supposed to be attached by attaching the seat support to the legs. However, my slats are in the way because I left them overhanging. To fix this, I set them in a place and used a pencil to mark the slats that I needed to cut out.
All it took was two quick little notches and the seat was able to fit very nicely into place. This was an unintentional mistake, but I think I like it. That is one completed stool base, or actually in my case, five completed stool bases. Hey, if you're going to make one, you might as well make a bunch of them, especially with Mother and Father's Day coming up.
The bottom assembly being done, let's move on to making the back assembly. After cutting all of the slats to width, I got out my Rockler tapering jig and gave every single one a slight taper. Since I'm making so many of these, as I was cutting up boards, I would assign them to a chair and place them on a chair until they were ready to be assembled. Grabbing all of the back slots, I used a clamp to hold it together and then used my compass here in order to make a slight radius up at the top. The plan actually calls out for something like 21 degrees. I don't know what 21 degrees looks like. I just made my compass as long as possible and made a very slight and gradual curve. Next I took it over to the bandsaw and cut it all out. I also cut out all of the lower and upper back supports. This is another part in the chair that comes with the template so all I had to do is trace it out a few times on the board. Everything on these is cut out at 90 except for that inside curve which is cut at an angle so that the back slats have a slight tilt to them whenever you're sitting in the chair making for a more comfortable sit.
I will admit, while it's a lot of work to cut all of the parts needed for five chairs, it sure did look cool in my staging area. To get going on the assembly of the backs, I set up a very simple jig and then started arranging the slats on the lower back support. Once again using dowels to act as a spacer here. I used a pre-drill with a countersink and then attached everything using screws. With that done, I dry-fitted the back into place and then clamped together the arms to the upper back support so that I can also dry-fit them into place. By dry-fitting them, I could adjust the position of the arms on that upper back support so that I could really hone in there left to right position on that leg assembly.
I was going for just a slight overhang on the inside which left a much larger overhang on the outside. Once I got the position where I liked it, I could then trace the profile of the armrest to that upper back support and then cut it out at the bandsaw.
At this point, all of the pieces are made, and it was just a matter of rounding things over and doing a little bit of sanding before the final assembly. The arms are attached to the upper back support by way of carriage bolt washer and also a locking nut. Then the arm can be attached to the leg assembly. That lower support also attached to the leg assembly. Then, finally the slats to the upper back support. Now, I have five complete Adirondack stools. I was not the only one anxious to test it out.
Well, what do you think? I take that as a good answer. These are going to be the perfect high stools for the balcony around the house. They're going to be tall enough to where I can still see over the railing and enjoy the view. Now, if you're interested in building a traditional Adirondack tier, then be sure to check the description down below. I've left the old link to the video I did on those last year. Big thank you to Rockler for supporting my channel and what I do. This was a really fun project as it was the very first one I got to complete in my brand new shop. I hope that you enjoyed it and I hope to see you on whatever it is I'm building next.


Keep the inspiration coming!
Subscribe to our newsletter for more woodworking tips and tricks