Video: Designing and Building The Ultimate Xbox Stand
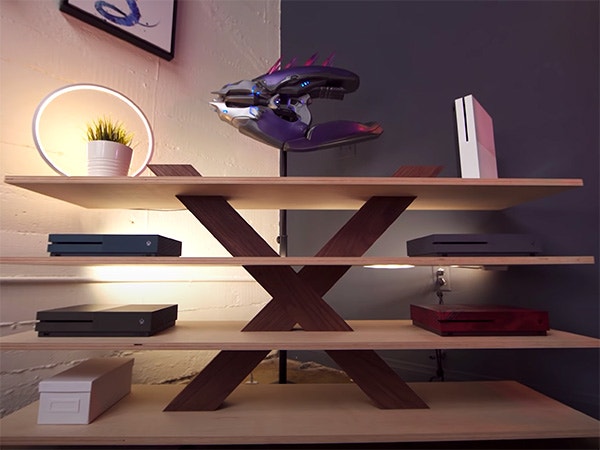
In this video, Chris Salomone partners with Kevin Kenson Gaming to create the Ultimate Xbox Set-up.
Chris Salomone discusses how this entertainment center project came to be, how he designed it and the techniques he used to put it all together.
You can find more great projects and techniques from Chris Salomone at his website.
Featured Tools:


Chris Salomone: A few months back, I met some YouTubers who do tech and video game stuff. We'd been looking for a project we could collaborate on, but obviously video games and furniture design don't have a ton of crossover. When they approached me with the idea of doing an ultimate Xbox setup, I immediately said yes. They started off by showing me a couple ideas that they had in mind, but they weren't really married to any of them. We went back and forth with a few different ideas before we eventually landed on this one.
The idea was that we wanted something that had a really strong X theme, but we didn't want it to feel too gimmicky or like it was a novelty. At the end of the day, we wanted something where if you took all the Xbox stuff away, it would still just look like a unique piece of furniture. I started off by cutting the four shelves which are made out of maple plywood. There really isn't anything too fancy going on here. I pretty much just crossed cut the sheet of plywood at 61 inches and then took another inch off the opposite end so that I wound up with a 60-inch piece that was clean on both sides.
Next, I ripped the pieces to about 15.15 inches and then took one last pass at 15 inches to get the shelves down to their final dimension. Whenever I'm cutting really big pieces of plywood on the table saw, I always try to leave them pretty oversized on my first cut and then make my final cut when the piece is smaller and more manageable. I find it can be more accurate that way.
With that out of the way, I set the shelves aside and got to work on the main part of the build, the big X. I started by joining one edge of the walnut. Then I ripped the walnut and oversized strips. I left the finished pieces about a quarter of an inch wider than I wanted them with the intention of getting them down to their final size once I had laminated the pieces together.
I had to do two pieces about the size that you see me working with here. I had to do them separately though, because I wanted to make sure I could get a good amount of clamps on each one as they dried. Once everything was nice and dry, I went back and joined it and cleaned up one face and one of the edges to make sure that everything was nice and flush. Then I planned the remaining face and edge so they had my three and a half by three and a half piece ready to go.
As you probably figured out by now, the idea that this piece is one intact X is an illusion, it's actually just a bunch of separate pieces that look like an X once everything's put together. In total, I needed six of the longer pieces and four of the shorter pieces that go on the ends. To make all my miter cuts, I use my miter saw. Normally I'd use my table saw for this type of finished cut, but my blade can't go high enough to get all the way through in one cut.
After I made a 45-degree cut on one end, I set up this little angled stop blocks that I could batch out the longer pieces first and then the shorter pieces. Next, I took two of the longer pieces and clamped them together at their centers so that I can make the X shape that sits up the dead center of the entire piece. Here, I'm marking out some lines so that I can create a half flop to join these two pieces together.
I usually use a dado blade when I make half laps like this, but here I opted for a regular blade. The reason I did this is because I'm removing more material height-wise than I'm used to, and the piece is relatively short. I figured that the regular blade would put a lot less pressure on the piece and make it a lot easier to handle. It just meant that I had to make a lot more passes.
Here I'm gluing the X together. I struggled a bit because I had erred on the side of leaving the joint a little tight since I wanted a really nice scene where the pieces cross. By the way, my cat isn't really that fond of all the rain we've been having lately, but I think she finds it more tolerable than the hammer.
With all the pieces created, and some sanding and pre-finish out of the way, I can start assembling. As you'll see over the next series of shots, I had to do this over the course of several days. I would pretty much glue up one or two sections a day, depending on what else was going on.
Glue is the only thing that's holding this together. I know it's partially end grain, but it's got a good amount of surface area. Trust me, these things are on there really tight. After I had the XP sandwiched in between two of the shelves, I marked out where my next pieces needed to go, by finding where the edge of the previous X piece would align with the edge of the shelf piece and making a little mark. Then I would draw a 45-degree mark that followed the angle of the X and transfer that mark back towards the center of the shelf. That would tell me where the next piece of the X should line up.
Then, to put the next shelf piece on, I had to visually center things and let the X mark the spot. I can measure my marks after to verify that I had things centered. Then I'd put on some tape to give me a visual reference as I set the shelf on top. It's really just a matter of repeating those two steps over and over until everything was together.
The details are not in the details, they make the design. That's a famous quote by Charles Eames, one of the greatest designers in recent history. I tend to agree with him for the most part, but with this piece, I don't. I think this piece actually looks better and better the further away from it that you get. As the shelves, anything on them, and then these semblance of detail just fades into the background, and you're left with nothing, but what's most important, see you next time.


Keep the inspiration coming!
Subscribe to our newsletter for more woodworking tips and tricks