Beadlock Loose Tenon Joinery Success
To make professional-quality mortise and tenon joints, you need a woodshop full of expensive tools, decades of experience and loads of time on your hands, right? Nope. Not if you have a Beadlock kit. With the Beadlock system and just a few common tools, you can make perfect mortise and loose tenon joints beginning with your very first try.
To prove it, we're happy to welcome Sandra, a fellow blogger at Sawdust and Paper Scraps. Below, she chronicles her first experience using the Beadlock system in a project that turned out a handsome and solidly joined set of drawer fronts. Thanks, Sandra!

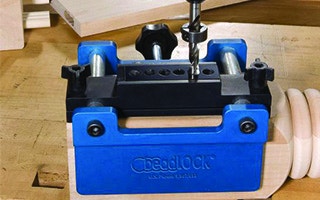
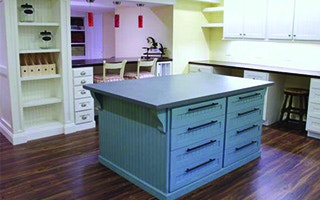
Hello Rockler fans! I'm Sandra. I'm a mom and an "almost" designer turned wannabe carpenter sharing my DIY journey on my blog, Sawdust and Paper Scraps. I recently finished building my craft room island and I got to try out the Beadlock Pro, mortise and tenon jig to build my drawer fronts.
I'd never done mortise and tenon joints before because I always thought they were too complicated. But after reading about the Beadlock Pro, it sounded like something a novice like myself could manage. I was excited to try a new technique on the drawer fronts. But first, I had to build the island! I built very basic cases out of Melamine, installed face frames, attached beadboard to the sides, painted and built all my drawers. Then I got to make my drawer fronts and use my new jig!
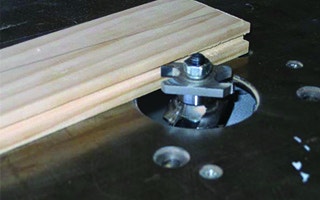
First, I routered all my pieces, using the back cutter on a reversible cabinet door bit to cut the panel slot. I used the 1/4" accessory kit that is recommended for 3/4" material and followed the instructions for marking and drilling the mortises.
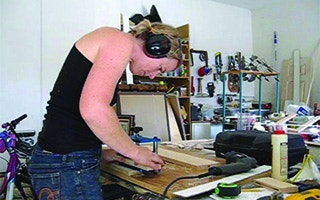
I had to practice a few times until I got it all straight in my head. Once I got it down...it went pretty fast! On the boards where I had to drill into the ends, I had to clamp the whole set up to my table saw (which luckily has a lip on the edge). I don't have a proper "Work Table".
One tip if you're using narrow stock - say on a face frame! I practiced a few times on some 1 1/2" pine and ran into a problem of the stock being too narrow for the clamp to hold the piece. I just butted a scrap piece up next to it and even though only a small bit of clamp was actually on my work piece, it held securely while I drilled!
So, then I dry fit everything to make sure I did it correctly and then glued and clamped... then busted out of my orbital sander because my thicknesses weren't perfectly matched. What can I say? I get it done however I can with the tools I have. (Planer-- on my wish list!)
After I sanded them flat, smooth and even, I primed and painted! Then I secured them to my drawers after a lot of fanageling to get them all even and right where I wanted them. I know Rockler has some nifty thingamabobs for that but I didn't have any at the time because I don't always plan ahead and I'm impatient. I resorted to careful measurements, carpet tape and countersunk screws from the inside of the drawers.
Here's my finished drawer fronts - I just wish I'd had the Beadlock Pro first because the island doors/drawers are definitely a step up from the others I built. Oh, well! I'm learning as I go and I learn something new with every project. I'm not a professional carpenter but I am a DIYer and I love learning new techniques and skills. And I love finding new tools that make it possible for me to be better at doing that!

Keep the inspiration coming!
Subscribe to our newsletter for more woodworking tips and tricks