Designing a Small-Scale Dehumidification Kiln
Save money when you dry your own lumber in a dehumidification kiln with a design based on the traditional backyard shed.
Many articles have been dedicated to solar lumber kilns: everything from a simple sheet of Visqueen over a stack of lumber in the sunshine to elaborate enclosures designed for solar gain. The problems with solar kilns include limited control over temperature and limited solar exposure, depending on your region and site location. Additionally, I have been underwhelmed by the performance of solar-operated fans.
This is not about simply staining wood from light to dark or beige to cordovan, but rather giving it a gentle nudge toward something a bit classier. Want to give it a try? Grab some scrap wood and experiment with some of these restrained but effective coloring techniques.

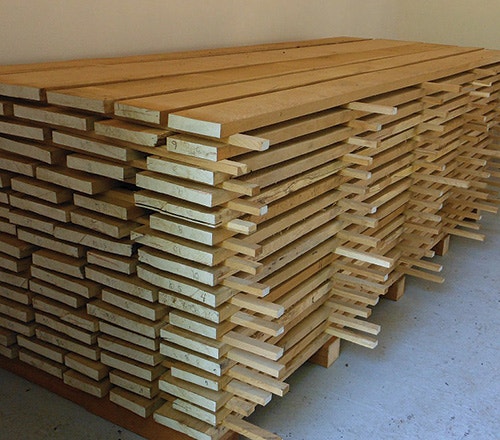
My aim was to develop a small dehumidification kiln for better control of the three key components of lumber drying: temperature, airflow and humidity. A dehumidification kiln makes sense particularly when the lumber is air-dried first. This limits the amount of energy needed to bring lumber to the desired 6% to 8% moisture content. Commercial scale steam kilns consume large amounts of energy. In contrast, a dehumidification kiln uses a sealed chamber, with only enough energy input to maintain the desired temperature. With a well-designed dehumidification kiln, hardwood lumber can be dried for mere pennies per board foot.
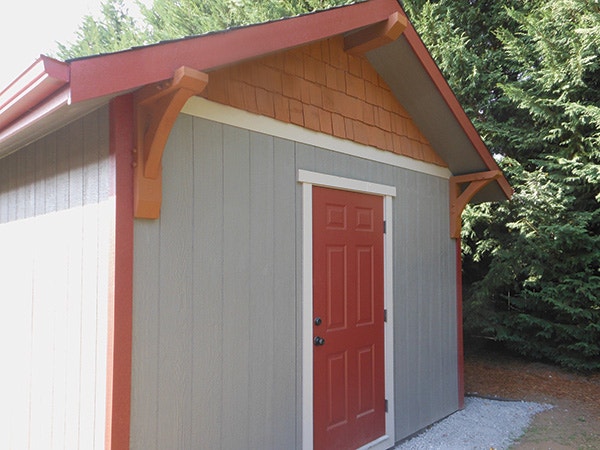
A shed kiln is an attractive alternative for a couple of reasons. It can be constructed in any style, with architectural features that match or complement an existing home. Built properly, a shed kiln may even increase the value of a property. I don't think the same could be said for an old reefer truck converted into a kiln (no matter how well it dries lumber). Another reason I like the idea of a shed kiln is the flexibility of future use. Minus the drying equipment, a shed kiln is just an insulated storage space, with a host of possible uses.
Designing a Kiln
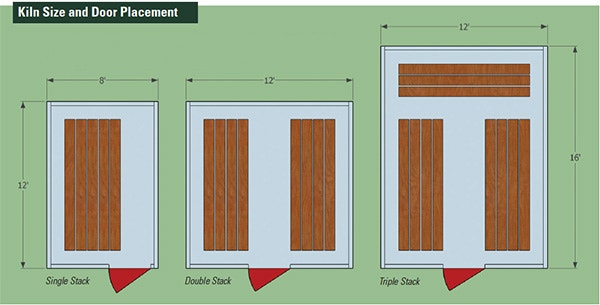
The first thing to consider when designing a shed kiln is size. Ideally, a lumber kiln would be large enough to dry multiple stacks of lumber. This lets the operator sort stacks by lumber species, so they will be easy to retrieve when the drying cycle is complete. Consider not only the space for the lumber stacks, but extra floor space to easily load and monitor the charge of lumber. Additionally, a 12" air plenum is required between the walls and stacks of lumber. This air space is absolutely critical for even airflow, so count on the extra floor space right from the design phase.
Many available kiln designs require a large, heavy door. My number one priority was to build a kiln that was easy to load and easy to monitor. For a single-stack kiln I recommend a minimum shed size of 8' x 12'. This would allow a stack of lumber four feet wide and 10 feet long. The remaining width allows for a 36"-wide door and space for your drying equipment.
For more capacity, consider a two stack kiln (12' x 12'), or a three-stack kiln (12' x 16'). Regardless of size, allow for a 36" door that opens to a "hallway" of open space. Changing the position of the doorway in various kiln setups helps provide the best access to the stacks of lumber.
Unlike general shop space, bigger is not always better for kiln design. If the interior volume of a kiln becomes too large, basic heaters and home dehumidifiers may be inadequate to control the kiln environment. For a small scale shed kiln, I recommend a maximum footprint of 200 square feet. Many regions have increased the shed and outbuilding maximum allowable size without need for a permit. Check your local building codes for regionally specific requirements and electrical permits.
My shed kiln was stick-built from standard building material, and sized to take advantage of typical 4' x 8' sheet goods. The cost associated with shed construction was similar to buying a prefabricated kit. In exchange for building the shed myself, I wound up with a shed of higher quality, with more features. A typical home center shed's floors are underbuilt for the weight of a load of lumber.
Another great option is to convert an existing shed or outbuilding to a lumber kiln. Any small building could work, as long as it has a minimum of 2" x 4" framing, and will seal out unwanted air. With advances in spray foam insulation, it may be possible to seal older, drafty structures as well. Consider the weight of the lumber that will be placed in the structure and fortify the building accordingly.
Constructing the Chamber
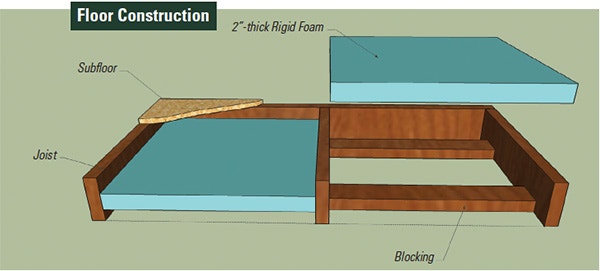
Construction of a kiln chamber is very similar to building a small house. Insulate the floor with 2" rigid foam for convenience and durability. Extruded polystyrene foam (blue or pink rigid foam) in this thickness has an R value of 10. To accommodate the floor insulation, blocking between joists is oriented horizontally instead of the normal vertical position. This serves a dual purpose of supporting the rigid foam insulation as well as stiffening the floor framing. Leave an air space between the rigid foam and subfloor for additional insulating properties. Insulation for walls and ceilings should be a minimum of R13.
Perhaps my favorite coloring technique is dry brushing, which lets you highlight the pores of wood selectively to make meranti or lauan look more like expensive mahogany. Use a water-soluble dye if you need it to add background color. If not, soak the surface with water in order to raise the grain. Open pores and the slightly rough surface that results are more conducive to picking up color from the brush.
Once the flooring deck is constructed, think about sealing the shed framing at every opportunity. A bead of silicone caulking between the subfloor and sill plate will prevent air infiltration. Lay down the bead of caulking before raising the walls. Corners where walls meet should be sealed with expanding foam sealant. Windows and doors are also sealed, as well as any holes cut for electrical service.
Installing a window in a kiln may seem counterintuitive at first, because windows lose more heat than an insulated wall. However, the natural light and ventilation offered by a small window outweighs any disadvantages. I recommend a 2' x 3' sliding window with bug screen. It should be double-pane, well-insulated with low emissivity (low-E).
Size and placement of the access door are critical as well. I selected a 36" outswing exterior door. An outswing door can always be opened, regardless of shed contents. A pre-hung steel exterior door is ideal in this situation, because it offers weatherstripping and is fully insulated.
Installing sheetrock and fire taping is a good idea for a heated room. The sheetrock also helps to protect the fiberglass insulation. Exterior sheathing and siding type also factors into the heat-holding ability of the structure. I chose "double wall" construction with 1/2" sheathing, and 1/2" T1-11 siding. Each layer adds approximately .81 R value. Staggering the seams between the sheathing and siding layers helps avoid air infiltration.
I also wrapped the shed with Tyvek® HomeWrap®. The membrane was taped and "lapped to the weather" so if the tape ever fails, any rain that gets behind the siding would still be shed down and away by the HomeWrap.
I opted not to install a true vapor barrier between the framing and sheetrock, because of potential condensation and mold issues with sheds constructed this way. This shed will be essentially unheated for much of the year and very hot during the kiln-drying cycles. A shed kiln has minimal venting (usually one or two gable vents) and sealed soffits. For these reasons, I feel it is best to let the shed breathe, and forgo a plastic vapor barrier.
Electrical requirements for a DIY kiln are pretty straightforward, but hiring an electrician is still a good idea. Add up the amp draw on all the equipment you plan to use in the kiln, including a heater, dehumidifier, fans and steam generator. Make sure the total amp draw is well within the limit of your electrical circuit. Don’t even think of powering your kiln with an extension cord.
Cost-saving Conclusions
Looking at the cost-benefit analysis of a shed kiln can be enlightening. On the last load of lumber I purchased, I saved $2.50 per board foot compared to retail prices for kiln-dried lumber. The order was 540 board feet (BF) of 5/4 white oak. On this order alone, I saved over $1,300 by drying the lumber myself. This, of course, is gross savings; we must calculate electrical costs to determine the net savings: in this case, about $62.
If we revisit the example of a $1,300 gross savings from a load of 540 BF of white oak lumber, and we subtract the estimated cost of $62 to kiln dry the lumber, we arrive at a net savings of $1,238 less than retail. That purchase was an average deal, and one I don't consider a particular bargain. I often buy from sawyers or homeowners at 40% to 50% of retail price. Frequently, the lumber has already air-dried for several years in a barn or outbuilding. When that is the case, I know I'll have usable lumber in just a few weeks.
If you use a lot of lumber, and you’re a decent hand at carpentry, a shed kiln will quickly pay for itself. Perhaps the best part: you won’t need to calculate your lumber needs down to the board foot. Just walk out to the shed kiln and grab what you need from your custom-dried supply.

Keep the inspiration coming!
Subscribe to our newsletter for more woodworking tips and tricks