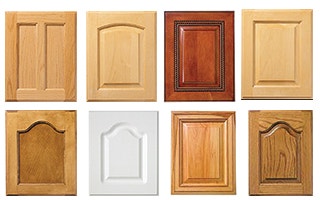
Selecting Wood for Raised Panel Doors
What’s the best way to invite success in frame and panel door construction? Below, a Woodworker’s Journal weekly newsletter reader gets some valuable advice on selecting and preparing wood for an ambitious raised panel door project.
I'm about to tackle a kitchen facelift with new doors and drawer fronts. I've done plenty of carpentry around the house but never furniture. I will need to make 18 raised-panel, pine doors, mostly about 12" wide by 28" tall. I have four questions I'm hoping you can help me with.
Woodworking Questions
#1 - What width boards do you recommend for the glue-up for the panels?
#2 - How wide should the original stock be; i.e., would you cut 4" boards from a 12"?
#3 - Is the D select pine available from Home Depot sufficiently dry for cabinet making, and is it necessary to let it sit in the kitchen acclimatizing for a couple of weeks?
#4 - I seem to remember having read something once about the grain of the board having a top and a bottom (direction of growth?) and that when raising the panels, you get a smoother cut when orienting the board appropriately. Any clue?
Answers for our experts
Lee Grindinger: The width of the boards in the glue-ups will depend on the stock you get. This issue has been a controversy in furniture making, but the present theory seems to be that wider boards are acceptable. Use the wider boards with the caveats I note below. An advantage that is yours is that the panels will be captive in their frames helping them remain flat.
I would not hesitate to cut 4" boards from a 12" board; however, in construction grade lumber, narrower stock is cheaper than wider lumber. Get what you think you'll need.
The D Select pine from Home Depot is probably fine as long as you finish drying it. Although I've never shopped for pine at Home Depot chances are good it's stamped S-Dry, which means the surface was dried to some percentage between 12% and 18%. Pine dries quickly so it should finish drying in your climate controlled space in a matter of several weeks. Be certain that there is air movement on all faces during this process. When you start building panels rip out any pith. Pith is the center of the tree, and the wood on either side of the center plays tug-of-war as the wood shrinks and the pith splits when this happens.
Orienting the board as it grew in the tree will have little effect on the machining properties. You want to feed wood into any machine the same direction as you would run a chisel or plane into it. Having the grain running out of the board downwind of the cut will give you a cleaner cut. In the case of raising panels this is not always possible since you are doing all four edges, but do start out on an end-grain edge as you work around your board so you finish with a long grain cut. This will remove the tearout from your first end grain cut.
You may consider calling a nearby hardwoods supplier and pricing out kiln-dried pine. Look in the Yellow Pages under Hardwoods and make a few calls. It would be better if you started with dried thicker stock. If you start out with 3/4" stock from Home Depot it leaves you little thickness for flattening, planing and sanding.
Michael Dresdner: The width of the boards, and whether you re-cut wide boards or not, has less effect on stability than choosing the wood correctly. If you pick properly dried wood that is straight, flat, and free of cupping or twisting, it will most likely stay that way. The message here is don't try to cut movement out of less-than-ideal boards, or be deceived into thinking that recutting wood changes its nature. Ideally, use vertical grain (quartered) wood, but lacking access to that, simply choose well.
As for being dry enough, I would be skeptical about the moisture content of box store wood, as you don't know how it was shipped or stored. Either check it with a moisture meter, or let it acclimate in your kitchen.
As for growth direction, I suspect you are referring to runout, a measure of how much up and down grain also goes into or out of the board. Less runout will make for smoother cuts, as will routing with the runout. I suppose you could glue up panels with the runout in opposite directions on each side edge so that all routing, which goes around the panel in one direction, is with the runout, but that would leave the panel with alternating shadows when viewed at an angle. At best it is a minor issue.
Once you have all of the necessary flat, properly dried, defect free lumber on hand and laid out so that the grain direction will cooperate, all that’s left is to make the doors. Nothing to it, right? Or does it sound like an ordeal? It doesn’t have to be. With a few basic woodworking skills, a little instruction, and a few key pieces of equipment, you’re chances of success are excellent, even if you’ve never made a door in your life.
As for the instruction, consider picking up a copy of Bill Hylton’s Frame and Panel Magic. You’ll find detailed instruction on making a variety of frame and panel door styles along with tips on choosing the right equipment and advice on setting up to move through the process safely and efficiently.
And here’s another way to end up with perfectly flat, professional looking cabinet doors: Have someone else make them. That’s a good option if what you’re most interested in is the finished product. And it may be a better deal that you first think. Add up the cost materials, any extra equipment need and the time you’ll invest in making your own doors and, as many professional cabinets shops have, you might just find that having doors made for you is a steal. Check out Rockler’s Custom Door and Drawer Front Program for the details. Chances are you’ll find the exact door style and wood species you’re looking for.
Keep the inspiration coming!
Subscribe to our newsletter for more woodworking tips and tricks