Video: Build an Adjustable Router Flattening Sled
In this video, DIY Creators is making a homemade router sled flattening mill.
Flattening lumber and epoxy can be challenging without the right tools. With this self-contained jig, you can set it up in seconds and start flattening your projects. The adjustable router base lets you flatten materials as thin as 1/2".
You can find more great projects and techniques from DIY Creators at their website.
Featured Tools:


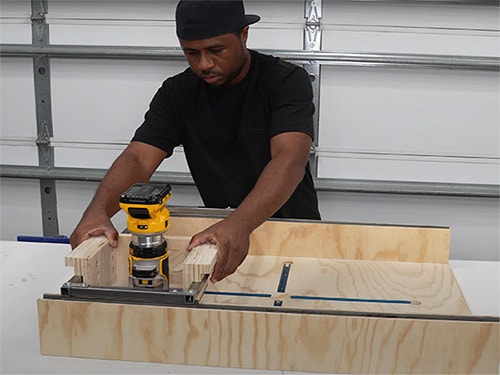
Glen: What's up, guys. In this video, I'm going to be building a router sled, perfect for flattening your own lumber. It's a self-contained unit. You can adjust the router base to three different positions, which means you can mill materials as thin as a half-inch and as thick as a standard 4x4. Aside from that, you can adjust your router separately for a more precise adjustment. Once you've locked that material in, you can mill to your preferred thickness. I have a lot of work to do here and big thanks to my friends over at Rocker for sponsoring this video. Let's do this.
The first thing I want to do here is mark and cut down the sheet of plywood to get it to a manageable size. The bulk of this is made from plywood. While you can use MDF to make this, I can be clumsy at times. When you drop something made of MDF, most cases, it's damaged. Now I'm going to head over to the table saw and cut these parts down to their final dimension.
I'm going to start by assembling the rails, set that off to the side so I can work on other parts. I'm doubling up on the plywood so I have enough thickness to install the tracks that I want to install. To speed this up, I'll shoot a few brad nails, this way I don't have to wrestle with clamps, trying to get the bullets to a line.
At this point, I have the two rails assembled and I'm going to throw them in the clamps. This is an efficient way to clamp both parts while the glue set up. I did double-check to make sure there weren't any wood glue in between the two before I sandwiched them together and put the clamps on.
Now, that I have these parts cut down, I'll go ahead and glue these parts, which is part of the router base assembly. Outside of the adjustments on the router, I wanted the base of this to have three different positions so you can set the height of the router. I line up the sides next to each other, then place reference marks so I know where to drill. With the reference marks in place, I drill them twice. The first hole doesn't go all the way through, but it's wide enough and just deep enough for the head of the screw to sit below the surface.
Now, I'll switch drill a bit for the next set of holes, but this one needs to go all the way through. As part of the adjustable feature in the router base, I'll drill out a few holes for threaded inserts. The tape on the bid is to make sure I don't go all the way through. Now, I'll need to install the insert nuts. Now you have an idea on how I plan to adjust the height of the router base. I checked all of the holes and everything seems to line up just fine. I'll set this off to the side, leave it alone for now, let the glue set up.
Now, I'm going to spend some time working on the bottom of the sled. I placed a couple of reference marks here so I know where to start and stop the router. I'm routing the slot for the T track I want to use. Now I set this up based on how I feel I may use this in the future. While I only use one track and try to make the best of the layout for that, this is certainly not limited to that.
After I routed the two slots, I repositioned the router set up, then I cut two more tracks perpendicular to the first set. At this point, I'm done routing. I need to square off the round ends for the T tracks. As you can see here, I went a little beyond the line on this one. Once I sand this down and remove the pencil marks, you won't be able to tell. Being that the slots do not extend all the way to the edge of the plywood, if I were to install the T tracks and try to slide on a T-bolt, it would never happen. Instead, I drill a large hole at the end of the T track so I can slide the T-bolt on.
Now I'll cut down the T tracks on the miter saw and install them in the tracks. This should make it easy to slide on and slide off. I grab the rails and I'll apply wood glue to it so I can attach the bottom. Now, a nail gun is not needed. I am using it so I don't have to fight with clamps. I can just get a quick anchor into it and then I can throw the clamps on afterwards. Now I need to check that the back is squared to the bottom. If not, I'll make the adjustment, whether to pull the rails closer or push them further apart.
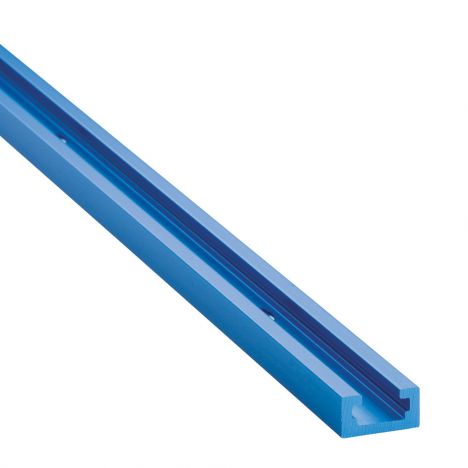
I need to route the rails so I can install the C channel. The C channel will be my track system. At the same time, I'm looking at this as more of an experiment so I can figure out what works and what doesn't. Installing the C channel here means I won't wear and tear the edge of the plywood. I did multiple paths to completely route this section out for the C channel. Every time I made a pass on the first rail, I then went to the second rail and did the same pass. Then I make some adjustments on the first rail and carry the same thing over to the second rail.
Doing it this way, ensure that I have the same routing profile for the second rail as I did the first. I was hoping that the C channel would be snug because this is as far as I want to go with the router, the rest of this will be left up to sanding. This looks pretty good to me. This is a snug fit, a little friction in some areas, but nonetheless, perfect fit. With the tracks being so snugged, I add a couple of small screws in here. I drill a pilot hole first, then I countersink that, and then install the screws. Going back to the router base, it's time to attach the Plexiglass.
Anyway, I'm going to set it up so that I know it's perpendicular with the long edge of my plywood and remove my factory edge or as much as I need to so that my piece looks clean at the perimeter. Where you place your straight edge guide is going to have to do with your circular saw. For me, the blade about 3-1/2 inches from the edge of the base plate. After making that first cut, what I'm going to do is measure from my edge guide that I had set up to where the actual cut happened.
I mark six mounting holes, then counters sink the holes so that the head of the screws sit below the surface. Now I transfer the holes over to the other parts. Then I use those marks to make the hose big enough for threaded inserts. Being that I'm drilling much of this freehand, a couple of the holes were out of alignment. To overcome this, I took a dowel, trimmed it down, fit it into the hole, and then I redrill the hole. Just add some wood glue onto the dowel as you're plugging the hole and you're good to go. To avoid over-tightening these, I recommend using a screwdriver. To make the sliding rail I'm using steel tubes.
Initially, I was planning to weld this, but I decided to try this out with brackets and a DIY approach to see how it works out. Corner braces may be the best way to put this frame together, but as a I was looking at it, I felt like the router base would interfere with it. Instead, I'm trying mending plates along with self-tapping screws. Now I'll make sure the frame is square before driving in the next self-tapping screw. Here, I have the frame altogether, and just below that in the tracks, I have another set of tubes. The tubes will be attached to the bottom of the frame and secured from beneath. I need to drill a few pass-through holes so I can secure this to the frame.
Now, I'll flip the frame over and attach the tubes to the bottom of the frame. Again, I'm using self-tapping screws here. They cut their own holes as I drive the screws in. All right, so this move pretty nice, but I have one more piece to add. The bottom of the router base is made of plexiglass, which allow you to see through as you're working. Without a third side, this could flex, but I'll make sure that doesn't happen. To make sure this is not just a block of wood, I decided to cut a couple of holes in it and then create one long hole. This allow you to see through and also makes it a bit stylish.
With this part complete, I'll transfer the holes from the router over to the new base. After drilling the holes, I check to make sure the head of the screws sat below the surface. I reassembled the router base, and then I added the third side. I did not glue the final part. I felt like a couple of nails should be good enough for this. If I need to break this down in the future, it's possible. Now, I connect the fixed router base to the sliding router base.
As it is, this moves very well, I'm pretty happy with it. The only thing I believe could be an issue down the road is possibly the frame shifting. A fix for that is adding corner braces on the inside or air brackets on the top of the frame. As I mentioned earlier, I was planning to weld the frame, and I'm still going to do it, but I wanted to show it with brackets just in case you don't have access to a welder. I'll make an update video to this because I see some potential for future add-ons and I think it's going to be cool.
Let me give you a quick rundown on this. This entire setup is self-contained, so everything about it fits within the frame. It's a really good size to travel with, or you can stash it in a corner somewhere. The best part about this is you can literally set it up within seconds, throw your router on it, and you're ready to go. You can drill the holes to mount a trim router or mount a full-size router.
You can keep the base in its lowest position to flatten the materials as thin as half inch. While I'm showing a three-quarter-inch piece of plywood, I wouldn't go much lower than this. In addition, you still have your adjustments on the router base. Let's say you want it to go a bit thicker in material, then you'll drop the guides on the side to raise the router base.
If that's not high enough for you, you can adjust the guides to the lowest holes. This will give you enough height to mill materials as thick as a 4x4. The three holes open up a lot of possibilities. I'm using a couple of hold-down clamps and some corner braces to hold this piece down. The next thing I want to do is set my route a bit and make sure I'm not going to run into any holding hardware.
I do have to think about some lower-profile hardwares especially when I'm working on thinner materials, but that's for another day. If you have some suggestions, you can let me know down in the comments. All right, so here it is, the first official cut on this jig. The first thing I noticed, I believe I'm taking off too much material, but I'm still going to power through this. I say that because I can feel the resistance on the router bit. Also, I have the router set to a low RPM. I'll adjust that in a second.
I believe this wood is monkey pod, if I remember correctly. I see some lines in it from the router bit, but other than that, it feels pretty smooth. I'm just going to power through this right now and just take off the entire top layer. Well, from what I learned here, the next thing I need to look into is adding dust collection to this. According to the square, this is a pretty flat surface. What's weird is I can see the lines created by the router bit, but I cannot feel them. The bit I ordered didn't come in time, so I just used one that I already had on hand. I'll sand this down to remove the lines.
After sanding this down, it looks pretty good to me. This part of the surface was much lower than the first pass I took off with the router. If I wanted to bring the rest of it down to that point, I'll have to pass over it again, but I'll pass on that. Now that I have a flat surface, I can flip this over, flatten this side, and then I can use it in a project. This jig is designed to be small, but able to do big things. You're only limited to how wide your material is, but in terms of length, you can continuously feed it through this. I don't know how soon I'll get the plans out, but I'll be working on them on and off.

Keep the inspiration coming!
Subscribe to our newsletter for more woodworking tips and tricks