Video: Crayon and Epoxy Inlaid Coffee Table

In this video, Chris Salomone makes a coffee table with melted crayon inlay and epoxy over top for protection..
Techniques include gluing up a wood top, working with complex angles, and more.
You can find more great projects and techniques from Chris Salomone at his website.
Featured Tools:


Chris Salomone: ay back on January 10th, 2019, I put out a video where I made this crayon inlaid coffee table. Actually, it was the first video that I put out this year. It only seemed fitting that I'd make my last video of the year be another crayon inlaid coffee table. I wanted to make sure that he did a very different design so that I could make it hopefully another interesting video, but we'll get into all of that as it comes together.
For now, let's just get to building. After I'd finished breaking all of my boards of walnut into chunks that are a little bit closer to their finished sizes, I use my joiner and plainer to get all the boards perfectly flat and to even thicknesses. Thickness? Anyway, after that was done, I used my table saw to rip the boards that are finished wits and then glued them up into what will become my tabletop.
While that's setting up overnight, we could turn our attention to the base. Again, here I started by ripping my boards into a few strips so that I ended up with a bunch of pieces that are an inch and a half thick and two inches wide by however long. That's because we're going to cut them to length in a minute. Actually, that's what you see me figuring out in the shot here. Actually, while I'm doing that, let's cut to an animation that goes over the design so that you have a better idea of what I'm doing moving forward. The first crayon tables that I made were much more organic with a flowing river inlay. For this one though, I decided to make the pattern a lot more geometric and purposeful.
Basically, I connected a line from corner to corner and then made more lines spaced evenly at the same angle. For the base, I wanted to do something to keep that theme going. I started off by making a long sub-assembly that will run the diagonal of the table to match that line. This will be made up of two verticals with 15-degree cuts on either end in the shape of a parallelogram to give it that lean that I wanted, and then two horizontals with 15 degree cuts on either end in the shape of a trapezoid to connect the verticals. Then I made two more assemblies with the exact same vertical pieces and horizontal pieces with a 15 degree cut on one end and left long on the other.
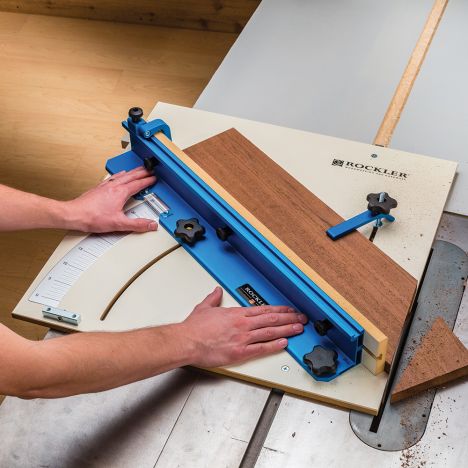
That's so that I could lop these ends off what ended up being 63.4 degrees or something weird, but in any case, an appropriate angle where it would result in a leg that comes from the corner at 45 degrees. Now let's do it in real life. Here I'm using my Rockler crosscut sled to break my sub-assembly pieces down into individual pieces all still too long at this point. Then I'm actually going to rip them one more time on the table saw barely removing any material, just a little kiss. That's just to make sure that things are good and clean and straight before I start cutting any angles.
Next, I set the fence on my crosscut sled to 15 degrees and locked it down. I don't want to touch this again until after I've cut the angles on every piece, that way they're all gonna end up consistent. Then I could start working my way through all the cuts just like we talked about in the animation.
Now with the sub-assembly set up, let's go back to the tabletop and start working on the crayon stuff. The first step there was to finalize the size of the top. I took one of my large woodpecker squares and clamped it to the edge of my top and then referenced my track saw against that to ensure that I'd make a cut that was perfectly at 90 degrees. Before I did that though, I tilted my plunge saw at 15 degrees, and that's so that I can create a back bevel on the underside and then it can make the cut.
Once I'd done this on each end, I used my table saw to make 15-degree cuts along the long ends. With the tabletop size finalized, I marked out a line that was an inch and a half in from each edge. This was a guide to show me the edge of where I wanted my crayon grooves to end.
After the crayon had fully cooled off, the next step was to seal it in epoxy. The first time that I did this, it came out pretty good, but I wasn't 100% satisfied with the result so this time I decided to use TotalBoat Thickset, which is specifically made for doing deeper pores. My reasoning for using it was I think that it generates less heat or at least gets up to its max heat more slowly when curing.
To my eye, it also just is the clearest option. After I had it good and mixed, I poured it in pretty liberally. After I had poured it, honestly, there weren't any air bubbles that I could see. Since I'd just bought a torch and because they look cool lighting in slow motion, I decided that I'd hit the surface real quick just to be extra safe that if there were any air bubbles they'll be removed before the stuff hardens.
After about a day and a half, the epoxy was finally hard enough that I could start sanding it down and polishing it. This took quite a while to do even with some pretty aggressive sanding. In fact, while I was sanding it, I was even thinking about alternative tools or methods that I could use to get the job done faster. I thought about using a hand plane, a blow torch, a card scraper. Heck, I even thought about using a shaving razor.
After I'd removed all of the epoxy that spilled over the top and got everything nice and flat, I did a lot of sanding. Normally, I would just go up to about 220 for a tabletop, but because here I really wanted that epoxy to be nice and clear, I continued on past that all the way up to 4,000 grit, and then even use some compound and polish to really get it to shine. I will say this seems to be the clearest epoxy pour that I've ever done. I'm really happy with the result and it's definitely what I'm going to do again moving forward.
Now let's move back over to the base and finish that off. When we left off, we had three subassemblies and the next thing that we had to do was cut the weird angle off of the smaller subassemblies to form the 45-degree angle that I want under the tabletop. I know that sounds weird, so just rewind back to the animation if you need a refresher. Oh, wait. Good. Okay. The first thing that he did was mark out how long I needed the subassemblies to be, then I could mark out the exact angle my cut would be. This is all just to help me line the piece up when I go to make the cut on a sled in a minute. You'll see.
Also, whenever I'm cutting angles, I like to make a little mark that shows me what direction that angle is going to be, just so that I don't get confused as I flip things around or whatever. Look how close I made the mark to what my actual angle was supposed to be. It's not often that I impress myself, but this one got me. Now I'm going to tilt my blade to 63.4 degrees and then lock my fence down and establish a cut line on my temporary slide. With that established, I took some scrap wood that I made that same 15 degree cut on way back when I was first building the subassemblies and used those to position the sub-assembly exactly where I wanted it to be on the line and then I could cut.
Like I said in the beginning of the video, it's funny that I started and ended the year with a pair of crayon tables. I promise this wasn't any grand design, it just sort of worked out that way. I'm glad that it did because it's clear to be able to reflect or even look back at what I was doing a year ago, and see how far I've come. In doing that, I'll say that the main thing that I've noticed is-
Sean: Whoa, whoa.
Chris: What?
Sean: How far you've come. You're building almost the exact same thing you did a year ago.
Chris: Yes, they're both crayon tables, but the videos are pretty different.
Sean: Are they though? Let's look. Here's a nice shot of you putting crayons in color order. Where are we seeing this before? How about this, some nice close-up action of cutting the crayons out of their wrapper? That must be new, right? Nope. Same glasses. Same blue rubber gloves when putting on finish. You're even wearing the exact same outfit you wore in the older video.
Chris: That's just a coincidence.
Sean: You're even wearing the gloves right now.
Chris: Sean, you know that I get dry skin this time of year-
Sean: Putting on lotion on the gloves helps.
Chris: -and putting on lotion on the gloves helps. What are you doing?
Sean: I'm copying you to prove that everything you do you've already done before, you don't do anything original.

Keep the inspiration coming!
Subscribe to our newsletter for more woodworking tips and tricks