Video: Custom Edge Grain Cutting Board
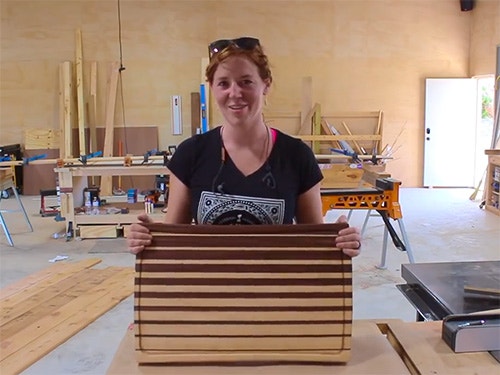
These cutting boards go really well in a working kitchen and also make for a great custom gift.
The incremental name comes from the pattern of two contrasting woods incrementally getting smaller and larger from left to right and from right to left. For April Wilkerson's board, she chose to use the beautiful combination of walnut and maple.
You can find more great projects and techniques from April Wilkerson at her website.
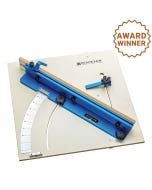
Featured Tools:


April Wilkerson: I feel like making a cutting board is kind of a rite of passage for an entry-level woodworker, but I've been woodworking for five years and I've not made one until now. This is an incra style cutting board. I believe it stands for incremental and stay tuned if you want to see how I made it. The incremental name comes from the pattern of two contrasting wood incrementally getting smaller and larger from left to right, and from right to left.
For my board, I chose to use the beautiful combination of walnut and maple using my neighbor's jointer to first get one face and one edge of the boards nice and flat. A big thank you to my neighbor for being so gracious with his shop and tools. After flattening one face and the edge on my walnut board, I also did the same with my maple board. Then since I was already in my neighbor's shop, I went ahead and use his planer to flatten the other side of the boards.
Getting the boards back into my own shop, I figured out how long I wanted my cutting boards to be then added about an inch and cut that length at the miter saw. This way my boards are rough cut to size but I still have room to cut them to final length later on. Before continuing, let me explain two different cutting board options. There is end grain and edge grain cutting boards.
End grain is where you have the end grain of the wood facing up and down for the cutting surfaces and edge grain is where you have the edge facing up and down. End grain is easier for a nice edge, but edge grain is just so darn pretty, so for my pattern, I went with edge grain. I took the boards over to the bandsaw and started cutting them in strips and this dimension that you choose here will ultimately become the thickness of the cutting board.
Keep that in mind when you're choosing this dimension. Next, I glued these strips together by applying glue to the face grain of the pieces so that the edge grain will be facing up and down. For this project, I am using Titebond III as it's waterproof. Now, it's worth noting that if I bought some thicker stock, I wouldn't have to do this step. If you want to move through this project a little bit quicker, you can actually buy wood that is at least as thick as the widest strip you want in your cutting board.
For example, my widest strip is one and a quarter inches wide so if I want about wood that was at least one and a quarter inches thick, then I would have been able to completely skip this glue-up but no big deal. Instead, I'm doing this glue-up so that I have a massive block of edge grain walnut and maple, to then cut into whatever width of strips that I want.
The next morning I took the edge grain blocks and ran them through my thickness planer to get both sides completely flat. Next, I’ll use my job site saw to start cutting up the blocks into strips. The trick with these strips is you start off with a set dimension. In my case, I started with one and a quarter inches, then run the walnut through, and then the maple through to get a strip of that size.
Now, I’ll move the fence over to reduce the cut by one-eighth of an inch for whatever increment you personally prefer. I dropped mine to one and eighth been ran through the walnut and the maple blocks, once again. Every time I moved the fence over the same amount, one-eighth of an inch, until I got down to one eight-inch strips. Then I was able to rearrange them so that the two outside strips are the one and a quarter-inch strips.
Next to those are the eighth-inch strips, then it's the one-eighth inch, and then the quarter-inch, and so on. You can see the effect that it makes as the walnut shrinks in size going from left to right, the maple grows the same amount. Once I double-checked that none of the strips got out of order, I got my Rockler bar clamps ready and did the final glue-up.
This glue-up was a little bit more time consuming as each strip was a different height so the glue had to be placed and smeared individually. Again, I'm using Titebond III for this. After letting that set up overnight, I grabbed my crosscut sled and cut the board down to its final size.
I once again, knocked on my neighbor's shop to use his larger thickness planer as the cutting board was now too large to run through my 12-inch benchtop planer. Now, you could call the board done at this point and it is very pretty, but I did think it was just a tad bit plain so I started playing around with adding a few curves to the body. I first drove some screws in my workbench then used a flexible ruler to just trace out a nice subtle curve.
I repeated the shape on the other side, then take it over to the bandsaw to cut and this came out all right but it wasn't perfect as the cut was made freehand. I did what I could to clean it up over at the spindle sander. I also wanted some curves on the top and bottom of the cutting board but I first wanted to cut in the handles on the side while the sides were still square.
To do this, I used a straight fit in my router and made three passes to get the depth that I wanted. Again I did this cut freehand and while they did come out okay, I learned my lesson and would definitely recommend using a template to make it not only cleaner looking but also quicker to cut. After getting the cutting done with the router, I came back with a chisel and mallet to square up the corners.
When moving to cut in the curves for the top and bottom, I actually took the time to make a template, and I will tell you that using a template makes a huge difference in speed and final look. I made my templates from scrap laying around the shop. I used double-sided tape to attach the curve to my cutting board, and I flipped it upside down and used a flush-trim bit to make the cut.
The bearing of the bit rides along the template making the edge of the board match the curve I wanted perfectly and if you're interested, I do have these templates available over on my website, the template package includes CNC cut templates for all of the body curves, the handles as well as making the juice groove which we'll see in the next step. Before moving on, I use my palm RS to round over the sharp corners just by moving it back and forth a few times on the point.
Next was a little bit of a tricky part. I really wanted a juice groove and my board, there are plenty of tutorials on making this cut when your board is a rectangle, but not any on making one with an irregular shape so I improvised. I cut off some cardboard bigger than my cutting board then traced the shape onto it. Next I came in a little bit on all four sides and used my cutting board to trace in these lines.
I'm essentially making the same shape as the board but just a little bit smaller, then I'll use the template or guide for my router to cut in the juice groove. Once I was happy with the shape and size and cardboard, I transferred the template and made it from some scrap wood I had. Once again, using some double-sided tape to stick it to my cutting board making sure that it was nice and centered before I made the cut.
I'm using a three-quarter inch round nose bit, and a guide bushing to make this. You just got to make sure to take your time and keep that guide bushing pressed up against the template. I will say that I was beyond happy with the way that it came out. It's a small thing and I know that it serves a function but even if it didn't, dang does it look nice?
The sanders screwed nice and smooth, I grabbed a Rockler contour sanding grip that was roughly of the same size and made a few passes. Now it was my absolute favorite part, not sanding. I started off with a hundred and twenty grit sandpaper, then we're down to 220. The final touch before throwing on a finish was to round over the edges over at the router table.
I set the height of the bit then started running all of the edges through, completely forgetting about the handles on the sides which meant whenever it got over to the handles, the bearing fell into the void of it and ate into the body of the cutting board. Oh, no. No, no, no. I'll be honest and say I was pretty disappointed in my mistake, but I did decide to finish it and keep the board anyways. Gives the board a story.
Moving on to finishing, I first wiped the board down with water to get the grain of the wood to raise up. Once that was dry, I lightly sanded the board using 400 grit sandpaper until everything was baby smooth again. You can skip this step but the first time you get your board wet, the grain will raise up and it will no longer feel smooth. I'm not even joking this time, this really is my favorite part, adding on a finish.
For the finish, I'm using the standard cutting board finish since it's food-safe, and won't go rancid. I applied three coats right off the bat using a paper towel to spread it around the entire board, its edges and even the juice groove. Now after I clean and wipe down the cutting board I can every once in a while, apply a new coat of finish just to maintain it. Even with my little hiccup, I am completely in love with how this board came out.
Now if you're interested I do have templates available for sale on both of the curves, making the juice groove as well as the handles available for purchase on my website. If you want to make a large batch of cutting boards, whether it be to make and sell or to simply pass out as presence around the holidays, then the templates will certainly make it go a little bit quicker for you.
Other than that, I would love to hear your thoughts on what you think about my incra style cutting board, and I'll see you next time.

Keep the inspiration coming!
Subscribe to our newsletter for more woodworking tips and tricks