Video: Epoxy Locking Miter Joints
In this video, Chris Salomone builds a table with some unique joinery features.
Chris Salomone tries out a new woodworking technique by using epoxy resin to reinforce miter joints. This both increases their strength and adds a unique aesthetic. In addition to this new technique, the video covers making angled, tapered legs, creating templates, half lap joinery, and more.
You can find more great projects and techniques from Chris Salomone at his website.
Featured Tools:


Chris Salomone: Let me start this video by saying that I'm not claiming to have invented this idea. What I mean is, while I didn't get it from something else that I've seen, I highly doubt that I'm the first person to ever try this technique. If you've ever seen it elsewhere, or if you're the person who did think of this first, congratulations, and we all commend you. Now let's move on.
Okay, so with that out of the way, the first thing that I did was break down all of my boards of Beachwood into some more manageable-sized chunks using my jigsaw. Then I could joint one edge, rip the other, and then cut my N-square, basically getting myself to where I had some nice pieces of wood as a starting point for refining things.
Now, I was hoping that by cross-cutting and ripping my individual pieces, I would remove most of the curvature in them. I probably did but it turned out that there were a few pieces that were still a little bit more bent than I wanted. I ran those pieces over the jointer a couple of times and then I could plane everything to their finished thicknesses. Anyway, and by the time I was done with that, it was getting pretty late, so I decided to shut it down for the day.
While I'm sleeping, let's quickly go over the design so that you have a better idea of how things are going to look moving forward. Because this piece is more about experimenting with a technique, I decided to make the table heavily based off of another one of my designs, the spider coffee table. It's basically just a square version of that. The table is going to consist of seven pieces total, four identical legs, two almost identical stretchers, and a glass top. Really, we only need to make three unique pieces. Two and a half. Okay, fine two and a half.
The next morning, I grabbed my blanks and began refining them. I started off with the stretcher pieces. Now back when I had ripped these, I had made them their finished widths. Next, I had to mark out what their finished lengths should be. After that was done, I could grab my template and trace out the curved detail shape that they would have along their top edge. Actually, let's go back in time for a second to talk about those template pieces since those are pretty important.
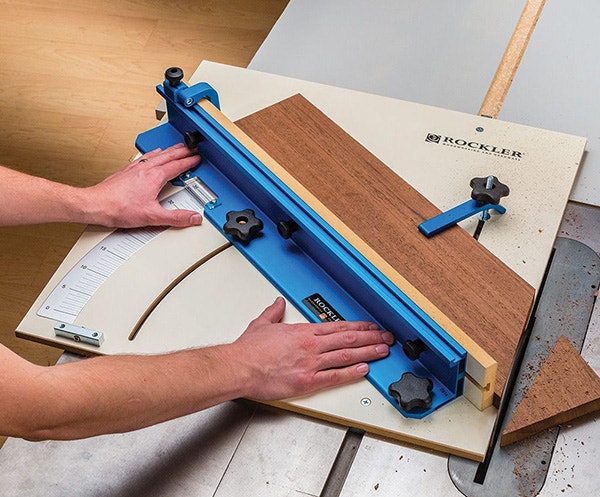
There's two ways that you can make these. Most of the time, I would just use my X-Carve to get the job done, but I think it's good to show the manual process every now and again. That's what I'm going to do here. Next, I basically just look at my original drawing and reference where various angles start and end and try to copy degrees if possible. Basically just do my best to translate my drawing into a real-life piece of MDF. Nothing really too technical. Next, I'm going to use my Rockler crosscut sled, tapering jig, and some sanders to get my templates finalized.
The important thing to remember is that 95% of what's going on here is purely aesthetic. Like really the only thing that matters with these particular templates is this joint right here. To get that just right, I'm going to actually put the templates together. If it's not perfect, I'll just sand it a bit to make it perfect. Once I'm satisfied, I can start using them. All right, let's go back to the future. Great Scott. Wait, I feel like this doesn't make sense. Shouldn't it be the part where Doc is telling Marty that - Channel into the flux capacitor. It just might work. Next Saturday night, we're sending you back to the...
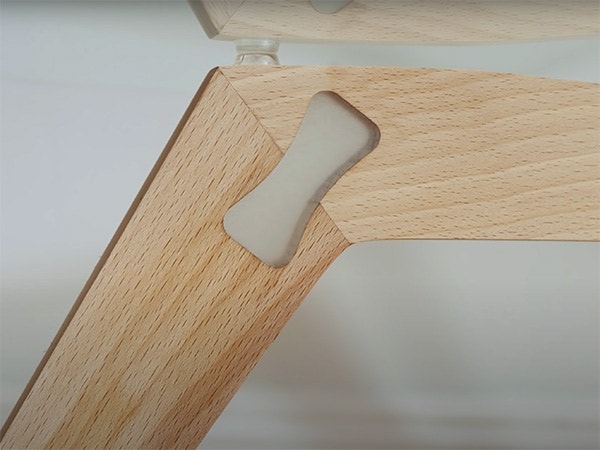
Okay, with my structures all marked up, the last thing that I wanted to do before I shaped the actual piece was to cut half laps on each piece where they're going to join. This wasn't too hard, but we do have to plan a little bit ahead just because of this particular shape. If you're not familiar, here's the detailed shot of the way that the joints going to work. Where the pieces overlap, the stretches are going to be an inch and a half wide. That means each half-lap needs to be cut three-quarters of an inch deep but because we want to do this before we shape the stretcher, that means we need to make sure that we cut an extra half-inch deep into this piece.
While I was marking up my pieces, I made sure to label everything and double-check my work so that I don't get confused when I'm making the actual cuts. To make the actual cuts, I'm just going to slowly raise my blade to get the cut right where I want it, and then once that's set, I can use the eighth-inch drill bit trick to make the dado perfectly sized.
Once everything looked good, I repeated this process again on the other stretcher, and then it could test fit them. You can see here that the joint is definitely on the tight side. I like that because it means that after I do all of my sanding, they should go together easily enough but still be pretty tight. Okay, now let's set the stretchers aside for a minute and work on the leg pieces. Again here, I'm going to start by tracing my template shape onto my leg blanks.
Then over at the bandsaw, I can cut them out just making sure that I stay proud of the line that represents the inside angle of the leg. The next thing we need to work on is that crucial joint, the miter joint. To cut that, we're going to make some temporary sleds that we'll use over at the table saw. First, I grabbed a piece of plywood that I had sitting around, locked my fence down, and established a cut line.
Then I could take my template piece and match the miter faced with the cut line. I apologize that this is so out of focus because it's actually a pretty crucial step that I really wish I had captured. I guess you'll just have to use your imagination. Anyway, once I had it flush, I clamped it down. You know what? Actually, I think I can fix this. Hang on. Okay, one or two? Three, or four? Okay, five, or six? How's that? Clear? Perfect.
After that, I could repeat this cut to make miters on the other three ends of the stretcher piece and then pretty much do the same thing to the leg pieces. Only there, I'd have to make cuts on both ends, for where the miter faces and for where the leg is going to hit the ground. With that out of the way, the rest of shaping the leg is mostly just aesthetic, the joints and mating faces, and all the business ends are done. Next, I took my stretcher piece over to the bandsaw and again trimmed proud of the line. Then used my template and a couple of flush trim bits to get the piece to its final shape.
Finally, once I was happy with everything, I could glue up my miters. This is where we're going to start getting into the more experimental part of this build. You'll notice that I'm not using any jigs for clamping pressure, not reinforcing the joints with any dominoes or dowels or splines, I'm literally just putting glue on the miter faces and sticking them together with hand pressure. I just want the joint to look good and nothing else at this point, not worrying about strength really at all.
After the glue had dried for a day or so, I could get to work on the epoxy locking joint reinforcement or whatever I called it. Anyway, the basic idea was this. Make a joint, don't worry about the strength, and then cut a shape into it and fill it with epoxy for looks and to reinforce it. You can cut this manually or with a CNC, but for my purposes, I'm going to use the CNC, more specifically my X-Carve.
Here you've been seeing me model in my first idea, which is basically like a butterfly or bow tie. Once I was happy with the shape, I export it from SketchUp as an SVG file that I could import into Easel to cut on my X-Carve. Then within Easel, I had to eyeball it. What I wanted the center of the cut to be was positioned right at the 0-0 origin within the software.
Then in real life, over on the X-Carve, I positioned my bit so that it was at the center of the joint and hit carve and let it do its thing. For the most part, I'd say that this went really smoothly. Only had one mess up on one joint and it was definitely user error where I positioned things bad as a starting point.
Now, normally I probably wouldn't do four different cuts for something like this. I'd just pick one and repeat it, but since this was an experiment, I wanted to try out a few different ideas. I ended up going with the aforementioned bow tie, this sort spline look, a puzzle piece, and what I'm calling joint inception, which is basically like a shrunken down version of the entire leg.
For that one, I thought about leaving an even smaller repeat of the same ship in the middle of the epoxy, but it was just getting too small to really see the shape repeating so I abandoned that idea. I think one of the things that I took away from this project was that I probably don't experiment as much as I would like to with my CNC. It was fun to mess around on this project. I think it's something that actually has some less goofy applications that I can try out down the road. Also for anybody interested in getting into the world of digital fabrication, I'll leave a link to the X-Carve in the description below, so you can check it out.
The next step was to pour the epoxy, but before I did that, I made sure to spend some time doing a really thorough job of taping up everything because I did not want it to leak. Once I felt like that was good, I used TotalBoat ThickSet, which is their deep pore system. This is the same stuff that I used on the Crayon table and the splinter console. Whenever applicable, I'd say that this is my favorite epoxy to use because for whatever reason, I don't get any air bubbles with it and it just seems to drive the clearest in my eyes.
Now, with the shop being colder this time of year, I've been giving my epoxy a good two to three days of cure time before I sand anything. Pretty much, I just let these guys sit for Christmas and then came back and sanded everything flat using some 80 grit and a little elbow grease. Then from there, I proceeded to sand up through the grits to 400 and then did a little polishing as a final pass.
Now, like I said earlier, this project was very much an experiment. In a more finished version, I don't think that I do a separate shape at each joint. In fact, I'd probably make a much more square-shaped base overall, not something so angular, the way the joints could really be the star. For those reasons, as a finished piece in a vacuum, I'd say that this is probably not my best work, but as an investigation of this technique, I call it a success. As for what will become of this piece, well, I think it's proven its point, served its useful life, and can rest easy knowing that its sacrifices will certainly lead to bigger better things. For that, we commend you.


Keep the inspiration coming!
Subscribe to our newsletter for more woodworking tips and tricks