Video: New Technique for Engraving or Embossing
Chris Salomone: I realize this video is more about experimenting with a new technique than it is about building a piece of furniture, so I'm going to start of by talking about the technique, then build a piece of furniture to go around the technique. Then at the end when I'm finished building the furniture, I'll share a few more thoughts and tips about the technique in terms of what I found worked best during my experience while making the furniture. Let's get into it.
You can find more great projects and techniques from Chris Salomone at his website.
Featured Tools:


Chris Salomone: I realize this video is more about experimenting with a new technique than it is about building a piece of furniture, so I'm going to start of by talking about the technique, then build a piece of furniture to go around the technique. Then at the end when I'm finished building the furniture, I'll share a few more thoughts and tips about the technique in terms of what I found worked best during my experience while making the furniture. Let's get into it.
Okay, so the whole idea here was experimenting with a simple technique that you could use to emboss anything, literally I guess. That can be any pattern, logo, drawing, anything. Now, the way that I came to this idea was kind of out of laziness. Basically, I build a lot of furniture and occasionally I like to paint the furniture. I'd say the best my painting has ever come out in terms of quality is decent, but not great.
I started with the idea of using vinyl wrap like the stuff that they use on cars instead of paint. It seemed faster, it looks really nice, and it just sounded like something fun to try. Then as I researched it a bit, I saw a few pictures where people embossed logos and decals under the vinyl and I thought it made for a really cool subtle effect. I suppose that takes us to the first and arguably simplest version of the technique, and that's just using stickers.
Basically, you'd put a sticker onto the drawer front, put some vinyl over it, and that's it. The upside is, it's super simple and you can get some really fine detail using this method. The obvious downside is you're limited by the sizes and shapes of the stickers that you can find. A slightly more laborious approach that's still pretty simple is using construction paper to create a pattern. Here I'm just cutting out a few random geometric shapes, then using some sprayed adhesive to attach them to my drawer front, and then covering that in vinyl.
The upside here is it's customizable, doesn't require any special tools, and it's easy. I guess the downside would be basically just your skill level. I would just say that most of us aren't really capable of cutting out a super complex shape from construction paper, and that takes us to the last general approach which allows you to cut extremely detailed shapes that are infinitely customizable. Those are the upsides. With the downside being that you need a pretty specific tool, which in my case is the X-Carve by Inventables. If you want to learn more about that, the machine, I'll have some links in the description so that you can check it out.
All right, let's start building the piece that'll incorporate this engraved, embossed, whatever drawer fronts. Then when we work our way to that part of the build, we'll get into the details of what I found works best to achieve a good look and some general tips and tricks that'll be helpful if you want to try something like this too.
With all of my wood milled and glued into some panels, the next thing to do was make our box that'll house the drawer. To do that, I'm going to cut a 45-degree bevel on each end of each piece.
Then with that done, we'll cut a rabbet along the back of each of the four pieces. At this point, if we glued it up. Our box would look like this, and the drawer would go here. Before I glued it up, I decided that I wanted to recess the drawer into the box a bit and add a few bevels to make it look like this. Then I remembered that piece was going to go on my parent's guest room where my kids often play, and maybe a super sharp front wasn't the best idea, so I ended up cutting it flat and then rounding it over after it was assembled.
For the drawer box itself, we're going to go really simple, just some plywood glued and screwed together. Instead of hardware, some runners that'll make opening and closing it easy. To make sure the box doesn't fall out if somebody pulls it too far, we're going to put a strip of wood towards the front of the inside top piece, and a little rotating piece at the back of the drawer box that'll catch on the strip. If you want to remove the box, just rotate the catch and enjoy your removed box.
Okay, let's work on the base. Here I'm cutting out some templates for myself again on the X-Carve, and that's because I wanted to play around with doing a subtle arch on the style of basis that I would normally do just to practice with something a little different. Once I had those cut-out, I could trace their shape onto some wood and then use my ACS to cut the pieces free so that I could start working on shaping them.
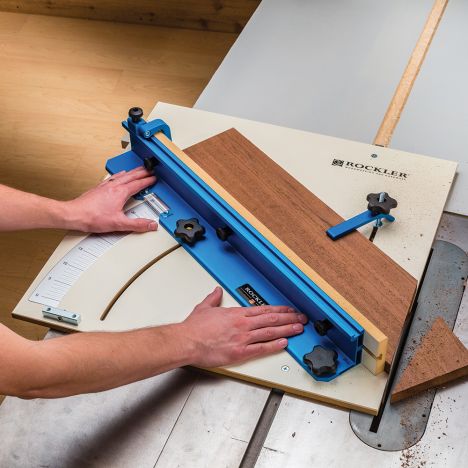
By far the most crucial part of this shape is this cut here where the leg will meet the stretcher. To cut that, I use my Rockler crosscut sled dialed into the perfect angle and then cut that onto all four pieces. Then I could set the angle for the stretcher piece and again make those four cuts. At this point, if we glued it up, we'd have pieces that look like this. Really chunky, and we eventually want them to look like this. Before we do that, we need to cut the joinery for how the two subassemblies are going to connect. Since I don't want them to connect at a 90-degree angle, but rather a 120-angle, it just makes it a little bit more tricky. I use my DelVe Square and this 30-degree angle block from Woodpeckers to mark out the joinery and find the center, and then I could cut it on the table saw.
Okay, so at this point, the shapes are still rough, but we can go ahead and glue our subassemblies together. Then after letting the glue harden for a couple of hours, I use my bandsaw to very roughly cut out the shape just making sure to stay proud of the lines. Then I could use the templates in order to route out the final shape of the subtle curves.
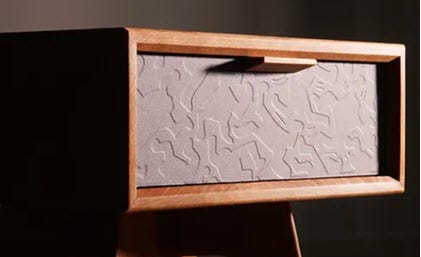
Okay, at this point, our nightstand is assembled, our drawer box is done, and the last thing to do is the drawer front. This piece was a gift for my dad who's a Steelers fan, so one of my first ideas was to do a subtle minimal version of their logo smack dab in the middle of the drawer front. I drew it up in the illustrator, but then had a change of heart and decided instead to try a pattern with the Steelers rounded diamond shape thing repeated indefinitely.


Keep the inspiration coming!
Subscribe to our newsletter for more woodworking tips and tricks