Video: How To Cut Tenons With A Table Saw
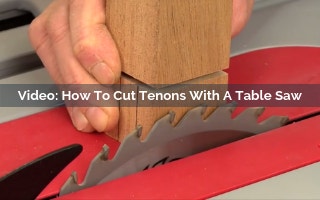
Learn how to cut accurate tenons using a table saw. You can use a regular saw blade or a dado set to cut the tenons for mortise and tenon joints.
Skill Builder Video
Video: How To Cut Tenons With A Table Saw - Video Transcript
Chris Marshal: Now the good news about tenons is you can use any table saw to make them, using either a standard blade or a dado blade set. You don't need a big cabinet saw like this one over here to make tenons. I'm going to use this job site table saw to show you how to make tenons with both of these two blade styles. I'm going to show you how to make tenons with a standard saw blade first. Every table saw owner has a standard saw blade, and they all work fine for this task. You're also going to need a tenoning jig of some kind. The purpose of a tenoning jig is to hold your work pieces vertically and securely when you're making the cheek cuts.
Now, you could invest in a big cast-iron tenoning jig like this. It's very sturdy, it's fully adjustable and it works great. You can also build a tenoning jig like I've made here from scrap. Mine is nothing more than a housing that fits over the rip fence and slides back and forth on it. It's got this tall fence for supporting workpieces, and I've installed this toggle clamp to hold them. Then there's this backup support piece. This will get chewed up along the bottom as you're making tenons, so it's a good idea to bolt it to your jig so you can replace it when it wears out.
Now, you can leave the clamp off your jig if you want to and just handhold your workpieces, but a clamp is always the better way to go because it'll make sure that your workpieces don't shift as you're sliding and cutting them. For the time being I'm going to set our jig aside until we're ready to make the cheek cuts, because we're actually going to start the tenoning process by cutting the shoulders. Start the process by making sure your saw blade is square to the table, then adjust it until it just lines up with your cheek layout lines. I've marked my cheeks here and here. Now set your work piece against your saw's miter gauge with a long scrap fence installed. This fence will prevent the blade from tearing out these shoulder cuts on the bottom corners.
Now slide your work piece over against your rip fence and move the rip fence and work piece together until the outside of the blade just lines up with your shoulder lines. I've marked my shoulder lines right here. Lock the fence. You're all set to cut the long side shoulders. Start the saw and push the miter gauge through to make the first cut. Keep the end of the workpiece pressed against the rip fence, then carefully pull the miter gauge back, flip to the other workpiece face and repeat to cut the other long shoulder.
At this point, you've got your long shoulders cut, but you still need to make the short end shoulder cuts. If your end shoulders have the same proportions as the long shoulders do, you can just set your work piece down on its edges and make two passes just like you made the long shoulders to make the short shoulder cuts. Or raise or lower your blade as you need to to adjust for the sizes of the short shoulders. Whatever you do, don't move the rip fence. That's going to keep the shoulders lined up all the way around the tenon.
Now your shoulder cuts are all the way around your workpiece and it's time to make the cheek cuts with your tenoning jig. The first step in the process is to raise the blade until it meets your shoulder cuts. Clamp the workpiece vertically to the tenoning jig and pull the jig in front of the blade. Now move the rip fence over close to the blade so you can line up the first long cheek cut. Lock down the rip fence. Go ahead and cut the first long cheek by sliding the tenoning jig and workpiece past the blade. Then pull the jig back carefully, flip the work piece and re-clamp, and make the second cheek cut. All that's left to do on this tenon workpiece is to make these end cheek cuts, and I've marked those here.
Then re-orient your tenon workpiece in your tenoning jig, lock it in place and move the rip fence one way or the other to line up these end cheek cuts. Lock the rip fence down. Make these last cheek cuts the same way as before, flipping the tenon from one edge to the other in between cuts. Hold or clamp the work piece in the jig as needed to stabilize it. If it's too wide to hold or clamp safely or easily, make these cuts at the band saw or with a handsaw instead. That's the process for cutting tenons with a standard blade and a tenoning jig.
You can also cut tenons with the dado blade, and in one sense it actually speeds the process up because the dado blade makes a wide cut. Unlike with a standard blade where you have to make separate setups to cut the cheeks and shoulders, a dado blade cuts the cheeks and shoulders in one operation, and you don't need a tenoning jig. Start the process by stacking your dado blade to between 1/2 and 3/4 of an inch wide. The specific width doesn't matter, because the purpose of the dado blade here is to cut away a lot of material in just a few passes.
Now raise the dado blade until the teeth intersect the cheek layout line of the tenon with the workpiece laying flat on the table. The dado blade is all set for making the cheek cuts, but you still have to set up the saw for cutting the shoulders, because the cheek and shoulder cuts happen at the same time. Set these cuts up the same way as you did when cutting shoulders with a standard blade. Use your miter gauge with the scrap fence attached, set your workpiece against it, bring the rip fence over and move all three together to line up the outside face of the dado blade with your shoulder layout line, and then lock the fence.
Make the long shoulder cuts first in two passes over the dado blade, flipping the workpiece between passes. With these first two long shoulder and cheek cuts made, you're ready to hog away the rest of this cheek waste. You can do that by repeating the cutting process. Slide your workpiece down the miter gauge, make a pass, pull it back over the dado blade again and reset for the next cut. Leave your rip fence locked right where it is. Once you've worked your way down the end of one cheek, flip the workpiece over and clean off the second cheek.
Now, the short end shoulders and cheek cuts are just as easy to make, especially if you don't have to change the blade height. This time set your workpiece on edge instead of on its faces and cut away the waste starting with the shoulders. In a nutshell, that's all there is to cutting simple tenons with either a standard blade or a dado blade set. Either one of these two methods will give you good results. However, a standard blade will often give you a smoother, cleaner finish. It all depends on the cutting quality of your dado blade set and how splintery the wood is that you're cutting. Give both methods a try and see which one you prefer. It's always good to have options and to fine-tune your tenon cutting skills. Thanks for watching.

Keep the inspiration coming!
Subscribe to our newsletter for more woodworking tips and tricks