How Do You Install Lazy Susan Hardware?
How do you properly install Lazy Susan hardware?
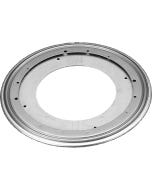
I have a small Lazy Susan bearing plate to be used in a paint station. Here's my dumb question: how do you install the bearing to the base and then attach the upper piece to the top bearing plate? I know there's a simple answer to this, but I can't figure it out, and I have faith in all the experts you have on staff that someone knows the answer. Thanks for your help. - Larry King
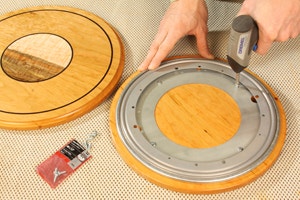
Chris Marshall: I've encountered this little puzzle before myself, but there's an easy solution. Your Lazy Susan hardware actually has a top face and a bottom face. The bottom face should have at least one or more larger holes in it (I'm looking at a sample from Rockler right now with four 3/4-in.-dia. holes in it) plus smaller holes for screws. If you swivel this face around, the larger holes will align with smaller screw holes in the top face of the bearing plate. That's key to the puzzle: the large hole provides access for screwing the top face of the hardware to the project. When you're ready to assemble the top and base of your paint station, drill a hole through the base to match one of the large holes in the bottom face of the swivel. Screw the hardware to the base first, so the big hole you drilled lines up with the big hole in the hardware. Then carefully line up this assembly with the top turntable piece of your project, and use the big access hole to drive screws through the bearing hardware and into the turntable. That's all there is to it.
Tim Inman: Dumb questions, around me, are the questions people have that they don't ask. That's dumb. If you have a question, you should get the answer. This question is certainly not in the big "D" category. However, the answer might be a little bit humbling. If you'll look at your bearing, you'll probably see one bigger hole in the screw circle on one side of the bearing. That is the key to the whole (hole?) megillah. Locate the bearing on one side of your table, and mark where that big hole is. Drill a big hole in the table (usually the bottom piece) so you can "see" the screw holes in the other side (the top) when the bearing is rotated around. Next, mount the bearing on the "big hole side" of the table (the bottom) with that big hole lined up with the hole you drilled in the wood. Later, you put in the second half of the screws through this hole into the other side (the top). Then, turn the table right-side up, and act smug when folks ask you how you got that skinny little bearing tucked in between those two plates. FYI, I prefer a big bearing on my turntables. Keep it oiled up so it spins easily, too. I make my turntables so the edge of the table is at the same height as the soft area just under my kneecap. That way, I can use my knee to turn the table while I'm spraying - and I have both hands free to do whatever. Pre-drilling and pre-setting the screws in the top half before final assembly can help cure blue air during final assembly.


Keep the inspiration coming!
Subscribe to our newsletter for more woodworking tips and tricks