Video: Aluminum and Walnut Side Table
In this video, Chris Salomone builds a night stand table using woodworking and metalworking techniques.
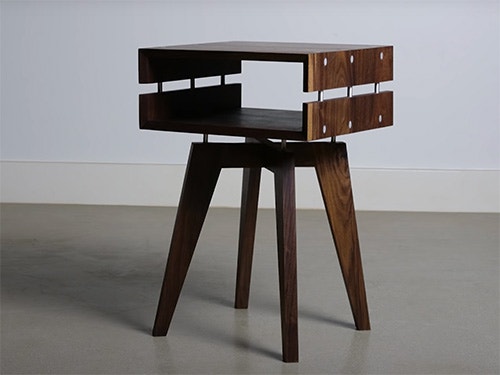
This exploded side night stand table incorporates walnut panels and aluminum dowels to create an interesting statement piece
You can find more great projects and techniques from Chris Salomone at his website.
Featured Tools:


Chris Salomone: Today we're going to build this exploded side table out of walnut and aluminum. If you follow me on Instagram, a couple of weeks back, you might have noticed Ben, Mike, Johnny, and me all hanging out. Long story short, Johnny and I both had done some in-store demos and meet and greets at local Rockler stores. We figured since he was already out this way, we should see if Mike and Ben wanted to come down and knock out a couple of projects. All that's to say, that's why you're going to see a lot of people in the background working on their project at the same time as you see me. I'll link to those projects down in the description as well.
I started this build with the upper box. Since this one is smaller and because I knew there was going to be a lot of cutting and sanding involved, I went with hardwood instead of plywood, that way I wouldn't need to worry about wearing through the veneer.
Next, I set my table saw blade to 45 degrees so that I could start cutting out my box pieces. Before I actually cut anything, I measured and marked out where, from the wood, each piece would come from. In the shot, you can see me making some marks that will help me keep everything organized during the glue up, that way I can get a continuous grain look.
After I'd cut all of my pieces, I set my blade to 15 degrees and ripped with the front edge of each board. This is going to give me a nice little back bevel detail on the front of the box and it'll also bring my pieces down to a consistent width. Then I assemble them. I just used the tape method for this.
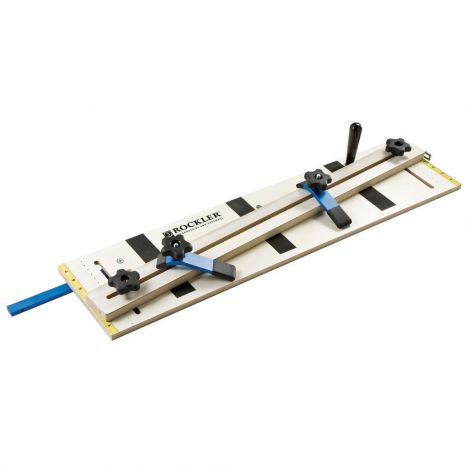
Once the box was dry, I wanted to reinforce all of the miters with some dowels using this thing, the corner key doweling jig. If you look on Rockler's website, you'll see that most of the pictures show up being used to make a lot of small decorative boxes and that sort of thing. I wanted to try using it on a slightly larger piece of furniture. What you do is mark out where you want to put your dowels, clamp the jig to your box, and then drill a hole that you can fill in with a dowel.
Normally, you'd probably use wooden dowels for this, but I just wanted to try something different. I went with 3/8-inch aluminum instead. Here I'm using my miter saw to cut a small piece of aluminum, and then I can polish it up a bit and put it in.
I didn't use any glue or epoxy for this. I thought about it at first, but it was already so tight that I just put them in there and I'll just monitor it over time and see how it all works out.
Okay. Now, before we move on, let's talk about the design for a little bit. The project started off in my head with two requirements. First, I wanted to use the doweling jig as a joinery method. Second, it had to be something that I could build relatively quickly while the guys were in town. Basically, something on the smaller side. That's why I went with a side table. Johnny and I were talking about it, and we came up with the idea of using the aluminum as a focal point.
Since we were going to do that, we wanted to do more to make it the star of the show. That's where the idea of exploding the pieces came from. After a couple of drawings, it was enough that I was excited about building it so that's what I went with.
Here I'm using a 3/8-inch doweling jig, which centers the dowels on 3/4-inch material. I drilled three holes into the freshly cut edges of the box. In those I inserted more aluminum dowel.
All right, let's set the box aside and start working on the base. Here, I'm marking out my material for creating my tapered legs. Once I had it all measured out, I could set my cross-cut slide to 10 degrees and cut my pieces into two chunks, each of which is going to yield two legs.
You can see at this point, I have two parallelogram-shaped pieces. On those, I'm going to mark out the taper that I want to create, so, say, from one inch wide at the bottom to two inches at the top, which I think is what this was. Then I could set my tapering jig so that the lines that I marked out were just hanging off the edge of the jig. Once it's all set up, I can cut my first piece, rotate it 180 degrees, cut the second piece, and then repeat that as many times as I want to keep making identical legs.
Next, I ripped out a couple of pieces that I'll use as the cross braces that are going to attach the two legs together.
Then I used one of my legs to mark a line that matches the inside angle of that leg that I'll need to remove from my cross brace. To make this cut, I decided to use the miter saw. I got everything set up by just eyeballing it to the line and then locked it down. You can see here that the angle came out to something like 16.8 degrees. Once I felt confident, I could make the cut. You'll notice here that first I'm cutting really proud of the line. That way, if it seems like it's a little bit off, I've still got an opportunity to course-correct. It looked good. I made my official cuts and then used an offcut as a stop block to ensure that both of my cross braces came out an identical length.
Here, I'm marking out the half lapse that I'll need to cut into each of the cross braces which is going to join everything together.
At this point, when I'm cutting, I'm looking for a really tight fit. That way, by the time that I get everything sanded, it'll be a lot easier to assemble but still tight enough that it's good and strong. Speaking of joining things together, to attach the legs to the cross braces, I use the dowel jig again, only this time with wooden dowels since they're going to be hidden and much easier to work with, not to mention more appropriate for this purpose.
Next, I had to attach the top to the base. Again to do this, I'm going to use some of the aluminum dowel. This is the one design aspect that I feel like I messed up on. Basically, I cut the dowels a little bit longer than I wish I would have, but I could pretty easily remove the top, cut them down, and then put them back in if it ever really starts bugging me.
This was a fun project to work on for a couple of reasons. First, just having the guys around to bounce ideas off of. Also because I always like any time that I design something, where I'm coming from a specific starting point, in this case the joinery. Then seeing where that takes me. I always feel like I end up in a place that's in line with other things that I would do, but not exactly the same as what I come up with if I were starting from a blank slate.
At the end of the day, even if I think these piece is only average, I'm happy with it because it's different. It can certainly be something that I'll draw upon down the road as I work on other ideas. All right, thanks for watching. Thanks for subscribing and I'll see you on the next one.
Keep the inspiration coming!
Subscribe to our newsletter for more woodworking tips and tricks