Video: Bookcase with Edge-Grain Patterned Plywood
In this video, Michael Alm takes his edge-grain patterned plywood idea to the next level, incorporating it into a bookcase project.
Michael Alm builds a bookcase designed for a tight space for his friend, incorporating his edge-grain designed plywood techniques to give it a bit more visual flare.
You can find more great projects and techniques from Michael Alm at his website.
Featured Tools:

Michael Alm: Last week I experimented with pattern plywood edge banding, and I'm super excited to build something substantial out of it, an actual piece of furniture. My good friend, Janna, has asked me to build her a piece. She is a professional gardener. She's helped me with the garden here for years, and I've been building built-ins in her condo for just as long. Say hi, Janna.
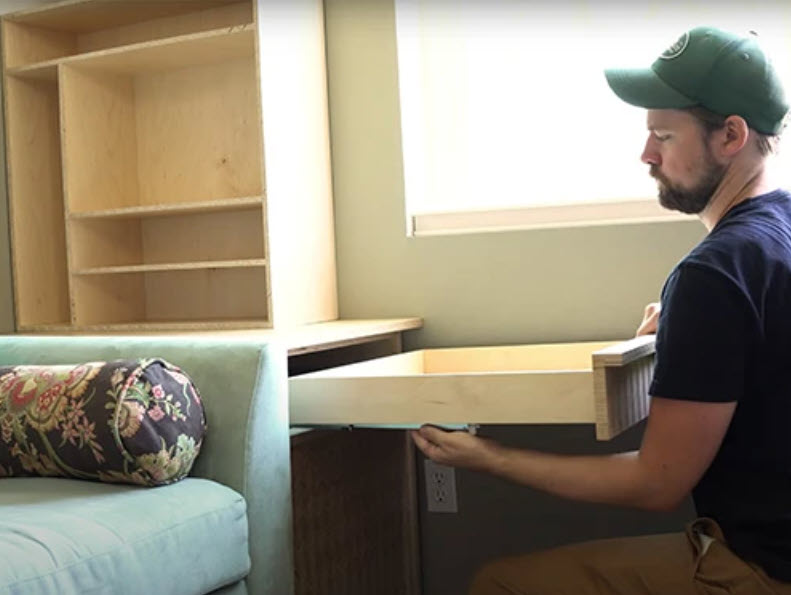
Janna: Hi, Janna This is my wonderful desk and this is the standing desk that I just adore that Michael did. I live in 400 square feet and that includes my closet. I still have lots of room. I love the window. I love my place. This is a pulled-out couch. I asked Michael if he would build me a box. It's going to have a pull-out so I can put my linens in there, and then there'll be a bookcase and I can sit and see my teeny tiny view. See, there's all my stuff in there that sooner or later, it's going to go back there.
Michael: All right. This is the plan. I could bump it up to four and a half to match what's going on here and here. We could do-
Janna: That's what I was-
Michael: -four and a half, four and a half, four and a half so it all looks right.
Janna: No, I like the look of that too.
Michael: Okay. We'll go with basically that. Once I had the design planned from Janna, I could start ripping down the sheet plywood. It's pretty much designed to be made out of one sheet of half-inch and one sheet of three-quarter inch. The half-inch is being used to make up the bookcase, and that's what I'm working on here.
Since I designed this whole thing in sketch up to get approval from Janna, it made it really easy for me to lay out all the dados, rabbets, and joinery that holds this thing together. I don't need these lines to be super accurate. Really, all I'm looking for is reference so that I don't accidentally cut a section wrong. It's really easy to do. Every single one of these panels is different, so I just check and double-check before I head over to the router table.
When I made the grill card a couple of weeks back, I used a half-inch bit to cut it out. It was just a little bit loose, so I've gone to this undersized bit made by Whiteside. It's 21. No, 31/64ths. I know everybody goes crazy in the comments when I use 64ths or 32nds, but I'm stuck with the Imperial system. It's how I grew up and it's how my mind works. Although when it gets down to the 64ths, it starts getting real confusing.
I started by cutting the rabbets on the backside and the top and the bottom of the outside panels so that they can meet up with nice joinery and I can slot the back in. Now I'm going to be cutting the tracks for a couple of the shelves.
Well, I might have a little bit of a problem. I wasn't really thinking this through. A couple of the dado tracks are about 10 inches back and this fence doesn't go anywhere near that far. I think what I'm going to have to do is do the rest of them on the table saw. Yes.
Using all the shims and pretty much every part in my dado pack to set it up at 21-- No, 31/64ths. Then I could grab my Rockler miter gauge and set up a stop fence so I could make repeated cuts.
Two of the panels require a track for bypass doors. I'm going to make little pattern plywood bypass doors. For this, there's two tracks on each panel. The first one's pretty easy because I can just cut it straight through, but for the second one, I'm going to have to make some stop dados.
I drew a line on the panel at the end of the cut that I want to make, and I lined that up with a line on my fence. You can see it's just a pencil mark. It'll wipe off later, but it's a great way to tell you when to stop so you don't cut all the way through into the next portion of the panel. This half-inch plywood was a little bit wonky, so I just made sure to pass it through a couple of times, pressing down on the panel to make sure that I got a nice even cut. I can actually look at the layers of the plywood to tell if it's cut all the way to depth, which is pretty handy.
It's always good when checking these tracks to lay them up against each other. Make sure they line up properly. Also, you'll notice that the upper one is set at a deeper depth, and I'll show you why that is in a little bit. Everything seems to be fitting pretty well and I left a couple of these pieces long because I wanted to cut them to fit. This piece has the tracks in here, but I use the same measurements off of the bottom, so I have to cut about a quarter inch off in order to do that. I'm just going to trace it out and then take it over to the table saw.
The cool thing about building this way is that it is a little bit more work on the front end, but everything squares up super nice and you get rewarded with the glue-up because it's just super strong, easy to clamp. I like this building method a lot.
The one spot that wasn't holding together was this middle area, so I flipped it up and popped a clamp on there, and then while I was back there I could check it for square. One and and a half plus. Awesome. Almost an eighth. Okay. Square.
I tend to like to leave the back until the end of a glue-up. I try not to add too many elements to the glue-up, so it's nice to wait. It gives me a chance to clean up the inside. Then I can cut the back to fit and it's way less stressful this way.
Here, I'm checking for any blowouts and fortunately, I didn't get any. Well, as I mentioned at the top of the video, I've been experimenting with pattern plywood, edge banding. If you want more details, go check out the video I put out last week. This is just a quick compilation of what it took to build the blank for it. It's the chevron pattern that I'm using here, and I'm going to take that edge banding and use it for this bookcase. It's from the same blank. I'm actually going to use the blank multiple times throughout this build.
This is a pretty straightforward process. All I do is lay out glue and then apply the edge banding. The edge banding is slightly wider than the width of the plywood, so I have some room to sand it back. I use these bandy clamps to hold down the pattern. plywood while I wait for the glue to dry.
Cutting the edge banding to fit is not trivial, and honestly, I probably in hindsight would've set up a jig for hand saw. I think it might work a little bit better, but I did use the table saw, After doing it a couple of times it turned out, once I added an extra piece of plywood behind it as like a zero clearance insert, I got a lot cleaner cuts. Before I accidentally snap these off I wanted to trim them down using a Japanese pull saw really delicately, but it worked great.
I tried using the bandy clamps over the tracks for the bypass doors, but it just didn't quite work, so I ended up going to blue tape. Blue tape is a great method. I just don't necessarily love using it because it's so wasteful, but there's just certain areas where I had to do it. I let the edge bending dry overnight and then came back with my orbital sander, sanded it up, and then finished it off with some hand-sanding.
I still had a chunk of that pattern plywood left over from making all the edge banding and I decided to use that for the bypass doors. I wanted them to be horizontal and I didn't have quite enough to do that, but I figured if I glued him together, I could do a diamond pattern in the center, and then I would have plenty of material to make the doors out of.
Out of the clamps it wasn't perfectly flat, there was one side that was a little rocky. The other side was a bit flatter, so I ran the flattest side against the fence cut off the side with the rock on it, and then flipped it around, shifted the fence over a little bit, and nibbled off just a little bit more. I didn't have a lot of extra material to work with, but this ended up being just enough.
Off camera, I made a little template to dial in the thickness of material to make the bypass doors work properly, and so I just traced that out onto the big pattern plywood plank, brought it over to my band saw, and re-sawed it.
The re-sawing got me in the ballpark, but I had to go back to the table saw to get it nice and flat, and dial in the thickness on both pieces. The panels looked slightly unfinished to me, so I added some maple edge-banding to the outsides, and then I started working on the handle design.
I wanted to keep the handles pretty nice and simple, and so I decided just to use the curve of the blade to cut in a little notch, and then I made another piece out of maple to go into that notch. I arched it to the arch of the table saw blade, so it has this little point on the end of it, and that'll make it easy to grip and slide it back and forth.

Keep the inspiration coming!
Subscribe to our newsletter for more woodworking tips and tricks