Video: Building a Bathroom Vanity With Drawers - Part Two
April Wilkerson designs and builds a bathroom vanity in this second of a two-part series.
April Wilkerson completes the construction of her bathroom vanity project and its drawers and gives it a spray finish and a countertop.
You can find more great projects and techniques from April Wilkerson at her website.
Featured Tools:


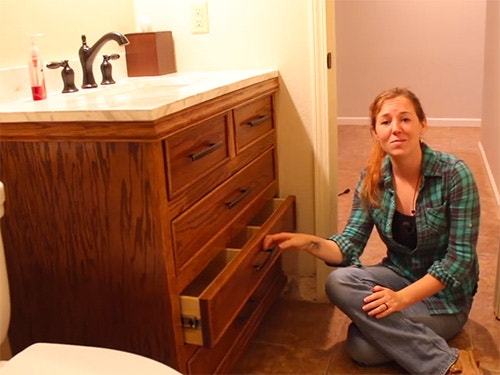
April Wilkerson In part one, I showed you how I started this vanity. In part two, I am going to be finishing it up, so stay tuned if you're interested. Just to give you a visual, this is how I left the vanity at the end of part two. I cut these drawer faces to the exact size of this opening because I plan to pocket hold them in from the back side.
However, a few of you suggested in part one of the video to still cut in a reveal but just don't go all the way through, that way it matches all of these. I love that suggestion, so I'm going to go ahead and fix these before putting on the face trim. I used my table saw to cut in this reveal taking off about a blades width on all four sides. This was such a small detail but man, did it make a big difference, so I really appreciate all of you who suggested it.
Before adding all of the door trim, I went ahead and paused and sanded all of the drawer fronts as well as that base frame down to 220. Keep in mind, if you're going to be making your own vanity, then of course, you don't have to add trim to the door fronts, you could just leave them as is. However, I really like the look of the added trim. So I put out a profile that I liked and use my router table to cut in the profile on some of these scrap oak pieces.
I would cut the trim in on both sides of the piece, then I take it over to my table saw to break both of the profiles loose from each other. Now, the profile that I picked actually came with two shoulders on the side that I didn't want, so I ran it through my table saw in order to trim off both of those shoulders. You can see the top one is with shoulders, and the bottom one is the final product without.
To attach it to the vanity, I'm using a very small bead of Titebond Original Wood Glue. The reason for the small bead is because I don't want a lot of glue squeeze out. After cutting in the miters, I then used a lot of painter's tape to attach the trim in it's place. I'm relying so heavily on tape because I'm going to be staining my vanity and I didn't want any nail holes to try to cover up. This step is a little bit time consuming, but I just love the added detail that it gives to these flat drawers.
After getting all of the trim in place, I once again pause and did about a half days worth of sanding. Really utilizing the contour sanding grips on this trim. The next day, I was ready to start prepping this thing for a finish. I started by adding in the two faux drawers then removing the three reel drawers. I plan to stain the entire body and drawer faces, but only clear coat the inside of the vanity and the drawer boxes. To make doing that a little bit easier, I removed all of the sliding hardware from both the body and the drawers, as well as remove the drawer faces.
I started off with the staining process. I'm going to be using my Fuji Spray System to apply all of the finish on this project. I was lucky enough to have gorgeous weather this week, so I've moved my project outside, set my system up and then started spraying. I'm only going to be staining the outside of my carcass because I don't have any doors on my vanity. With them being drawers, you're never going to be able to see the inside of the body unless you remove the doors for some reason.
I want to say a big thank you to Fuji for sponsoring this video and supporting my channel. I am going to be doing a giveaway for the next two weeks of a Fuji Spray Mini Mite 3 bottom feed spray system. If you'd like a chance to win your own spray system, then head over to my website at wilkerdos.com and enter into the giveaway. This was my first time spraying a stain and I was shocked at just how quick it went on. I was able to spray on an entire coat in just a few minutes.
When spraying the drawer faces, I started off with a wide fan, but then before moving to the edges, I reduced the fan pattern as well as the flow control. You can see, I keep cardboard on hand to test my adjustments before spraying my actual pieces. Something else that was really useful is that whip hose accessory, it's very lightweight and flexible, which allowed me to maneuver the gun around in very intricate angles, especially on the inside of the cabinet.
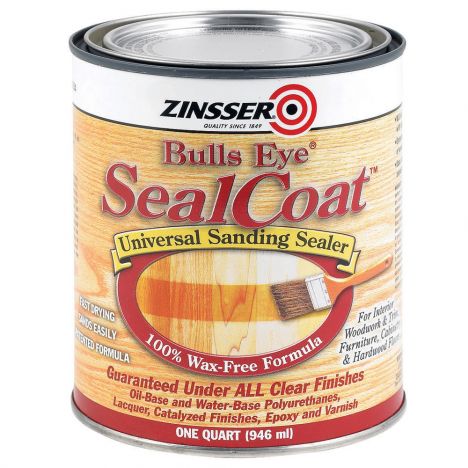
After letting that sit overnight, I came back to add a shellac clear coat finish. This is a wax-free shellac called SealCoat. The reason I'm applying this is because I actually plan to add a water-based lacquer finish to the vanity for protection. However, it's water-based, so it would make the grain raise up. By adding the wax-free Shellac finish first, it's going to seal in the grains so that the water-based finish won't be able to raise the grain. It was on this finish that I not only sealed the entire inside of the vanity, but also all of the drawer boxes.
After letting that set overnight, I then came back with my final coat of finish, which is going to be a water-based lacquer. This finish is going to be able to protect the vanity a lot better than just that shellac finish alone. This is my first time using this recipe of a SealCoat first, and then a water-based lacquer, but I must say it went on very quick and easy and I'm very pleased with the results. One thing I love about water-based finishes is that they dry super quick.
If you can believe it, I forgot to make the feet. When making a vanity, you pretty much have two options, to add in a toekick or to put it on feet. This is just to create a gap along the bottom so that you can get close to a vanity without your toes running into it. I started off with gluing up the feet from some scraps in my SuperJaws. I used a crosscut sled at my table saw in order to cut them all to size after they were dry. I traced out the feet on some half inch plywood, and then started playing around with a profile that I wanted the feet to have.
This is just going to be my template for all four of the feet. I cut it out with a band saw then traced it on each foot. Making sure to trace it on two adjacent sides. You can see I'm using my sled to make sure the template is flushed to the foot. After they were traced out, I used my band saw to cut out both of the profiles. I think I'm happy with that. Next, I pulled out my belt sander and just give them a very quick cleanup.
After giving all four of those a coat of stain and sealing them, I then started attaching them to the vanity. I first applied glue to the top that I intentionally left unstained, then used a bar clamp to clamp it onto the vanity, while I moved to the inside to attach it. Again, since I only have drawers, you're never going to be able to see these screws. I think that's it. I took a few photos before getting into that crowded bathroom space.
The install was actually a little bit tricky, but I ended up getting it worked out. I was able to move the vanity into place but I did not take into consideration the tiled border around the bottom of the bathroom, which left a gap in between the wall and the vanity. I ended up busting out the tile so that I could move the vanity against the wall. I do have some leftover tile so that I could cut in a nice piece to put back and cover up this busted up drywall, but that's going to be another time.
To attach the countertop to the vanity, I'm using a Titebond Fast Set Construction Adhesive that is waterproof. I lay down a bead on all of those plates. Which you can see, I actually had to modify so that the sink base and wall fit into the vanity without problems. I did that with the jigsaw. After laying down some construction adhesive
Next, I attached backsplash by applying a bead to the back side, as well as a small bead along the backside of the countertop. Once that was in place, I came back with some clear silicone to seal the joint between the countertop and the backsplash, as well as the countertop and the wall. Then finally, I installed the faucets, the drawer pulls and then I called this vanity done.
That's going to be it. I will have to come back and finish with this tile work right here. Other than that, I'm so happy with the way that this turned out. Hope that you enjoyed the video. If you're interested in making your own, then I do have a set of plans on my website. That's it for this one. I'll see you next time guys. Man, that sun is fun.


Keep the inspiration coming!
Subscribe to our newsletter for more woodworking tips and tricks