Video: Building a Double Sink Bathroom Vanity - Part 2
In this video, April Wilkerson continues the build of her parent's double sink bathroom vanity.
After starting her construction in the last post, April Wilkerson will be explaining how to install the drawer slides, make the drawers, and also make and install the faux faces and doors.
You can find more great projects and techniques from April Wilkerson at her website.
Featured Tools:


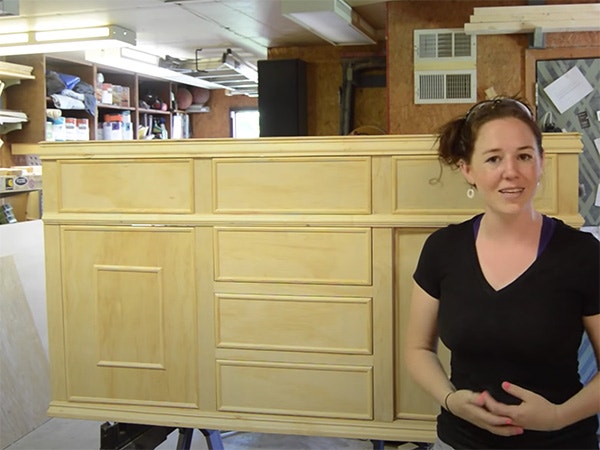
April Wilkerson: All right. If you remember last time, this is where I left the vanity. This time, I jumped in by making the runners for the sliders. I would first cut some strips at the table saw, tack it into place, then make sure that it was square. I first used a countersink bit and then came back with the screws. To hold the actual slider, I used the clamp and then used the screws that came with it to attach it permanently. I repeated these steps until all of the sliders were attached. Now, it is very important that the sliders are in the same position on both sides, so take your time measuring.
Then it was on to making the actual drawers. I grabbed a half-inch sheet of plywood and cut it down using my circular saw. Then I cut the pieces to length using the stop block at the miter. I'm actually using Jay Bates' method for making these drawers. He put out an excellent tutorial, so I left you a link in the description of the video. After drilling in the pocket holes and cutting in the dados, I started assembling everything. Then I cut a bottom from quarter-inch plywood and stuck it in place. I repeated until I had all my drawers made.
I used John Hines' method for installing the sliders to the drawers, first putting down a spacer. I also added a kickstand just to make things easier, but then I would attach the sliders to the drawers. Once I had the fronts attached then I would pull the drawer out more, making sure that the spacer was still in place, and then attach the screws in the middle position. To get a screw in the very back location, you actually have to unlatch the drawers as if you were going to pull them all the way out. Then just repeat until all of the drawers are installed.
All right, now to make the faces. I grab some 3/4 inch and first cut some strips. Then I would measure each space then go and cut a piece to that exact dimension. I would fit it in place, see where it was catching, and then go shave off a little bit at a time. Put it back into place, see where it was catching, and then repeat the steps until I got a perfect fit. I'm only showing you twice, but I actually had to do this around seven or eight times before getting the right fit. Then I simply repeated for the other side. Two down, four to go.
I would measure, test fit, shave off just a little bit, test fit again, shave off a little more until I got the perfect fit. On these drawer faces, as soon as I got the perfect fit, I would once again remove it and then shave off each side to where I had about a sixteenth gap. Once all the faces were made, I removed them one by one and glued and nailed on some molding just to give it a decorative look. There we are. I think that looks a lot better. Okay, to start attaching things.
I started with the faux drawers. I put it in a few pocket holes and then just screwed it down. For the real drawer faces, I used a hot glue gun to hold it in place until I was able to get to the inside and attach it with screws. To make the doors I repeated the same steps. I would put it into place, go shave a little bit off, then test it again until I got the perfect fit. Once I got the perfect fit, I cut an additional sixteenth off each side.
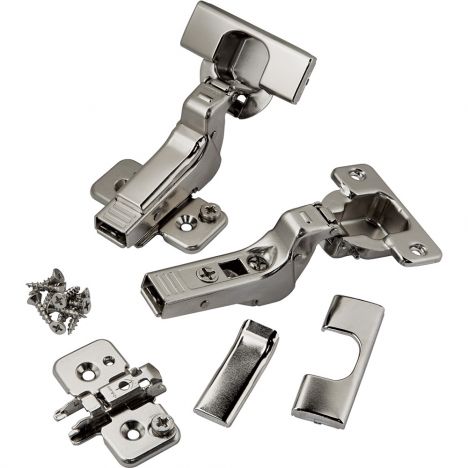
For hardware, there are a ton of hinge options out there, but what I was needing is an inset option since my door is going to be inserted into this hole and not outside of it. Then also, since my unit has a face frame, I need an inset with a face frame. However, those hinges were actually out of stock, and I didn't want to wait a week for them to be ordered and delivered, so the woman at the company suggested that I use these, which are hinges for an inset door but something without a face frame. She says that cabinet makers will use these and then just build the material inside of this so that I can mount it here and it will still work. I'm going to go ahead and use that option.
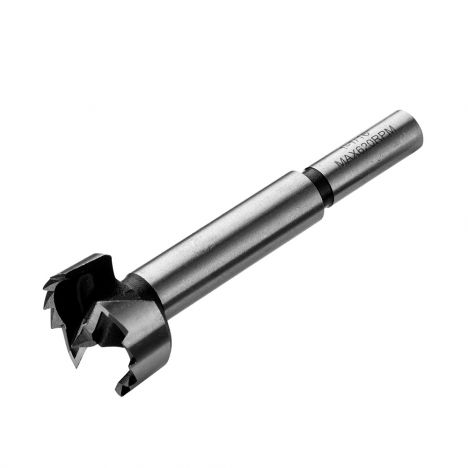
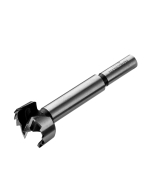
I went ahead and cut some strips at the table saw. However, before drilling into my new doors I just made, I set up a mock trial just to make sure that this route was actually going to work for me. It seemed to do fine on scraps, so I went ahead and moved forward. I first attached the strip on the back side with two screws. Then I used a Forstner bit to bore two holes on the back side of my doors. Then I started attaching the hinges. I started the screws with the drill. However, I came back with a screwdriver to fully tighten them down. I cut a sixteenth of an inch spacer then laid it down on the bottom. Then I was able to start attaching the doors.
Once it was in place, I went to the inside, started the screws off with a drill, and then hand tightened them down with a screwdriver. This is where I ran into a problem. For whatever reason, when I closed the door it actually goes inside of the cabinet instead of resting at a 90. If you can tell me what I've done wrong, please leave me a comment below so I can fix it. When I went to install the other door, it actually got hung up and wouldn't close. I took it off using the quick disconnect feature and then just shaved it off a little bit and it worked fine. Well, except for it going inside the cabinet.
Next, I took off both doors and gave it the same molding treatment around the perimeter. However, on these, I also added an inside one just because I thought it was too plain looking. I threw the doors back on and that is actually as far as I got this week. This is a lot more time consuming than I thought it would be, but I am highly enjoying myself. I am so happy right now. I feel very accomplished because honestly, I did not think that this was all going to work. I'm loving the way that it's turning out, except for these doors, of course. This is completely unacceptable, so if you know how I can fix this then please leave me a comment below so that I can fix it next time.
I thought I was going to be able to finish the entire cabinet this week but obviously, I'm not, so next time I will be making the feet, doing the finish, making the countertop. Stay tuned for part three. If you missed part one, there is a link in the description of the video for you to check out and, of course, you can check out my blog for the written tutorials. Leave me your thoughts on what you think about my progress this week and I will see you next time.


Keep the inspiration coming!
Subscribe to our newsletter for more woodworking tips and tricks