Video: How to Build a Bed Swing
In this video, April Wilkerson builds the perfect backyard hangout spot, a swinging bed.
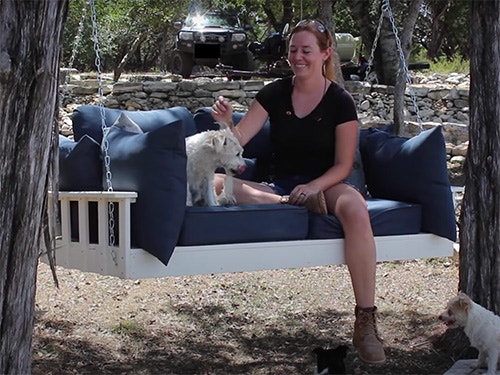
April Wilkerson designs a comfortable swinging relaxation spot, perfect for hanging between two trees or a frame. The overall dimensions of the bed swing are 65" long, 19-1/8" high, and 35-7/8" front to back.
You can find more great projects and techniques from April Wilkerson at her website.
Featured Tools:


April Wilkerson: I absolutely love just sitting outside and relaxing, so I decided to build myself this bed swing. If you want to see how I did it, then stick around.
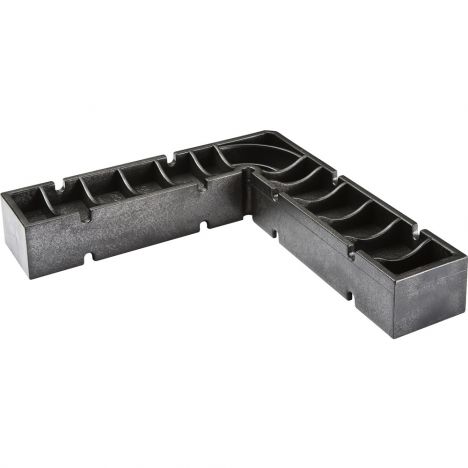
The first thing that I did was start by cutting all of the pieces that will make up the platform or the deck. I folded up the wings of my miter saw and cut all of the boards that will make up the bottom supports. To make connecting the bottom supports to the front board a lot easier, I'm going to be using this right-angled jig. This is a jig especially made to make joining two boards at a right angle easier. You can see that you just place your two boards in the orientation that they need to go. Tighten down the jig so that it holds it in place, then I was able to pre-drill and then countersink with screws.
After establishing the two outermost bottom supports, I then spaced the three inner supports evenly. Then I moved on to cutting the boards that will make up the platform. I cut all of my boards to size, then glued, and screwed them down. I do have a set of plans available for this project. I'll leave a link down below on where you can find those plans if you're interested.
Now, the very backboard on the platform needed to be ripped down, so I had to move the platform off my table saw in order to use the saw. Then move the platform back up to attach it. I'll tell you what, I cannot wait to have my bigger shop and build a dedicated assembly table. I am definitely making it work in the meantime.
After all of the boards were attached for the platform, I went ahead and stopped and gave everything two coated paint just to make life easier. While that was drying, I went ahead and got started on the back supports. First by cutting all of the boards to length, then ripping them down with the table saw. To give it a little bit more of a decorative look, I round it over the tops using the bandsaw.
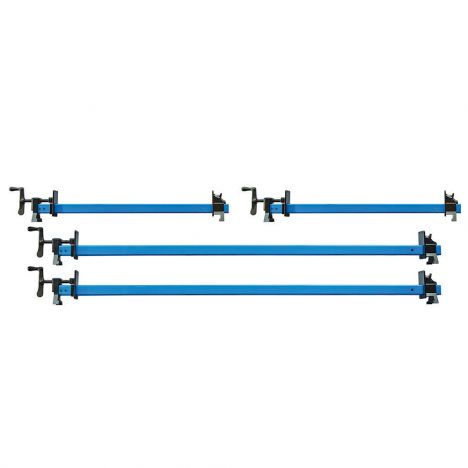
Now, for the outmost back supports, one on the far left and the far right, I went ahead and doubled up on the material to make it a little bit more beefy, because these will have a carriage bolt attached now. Then later on, I'll be adding a chain. I clamped it in place in order to drill a through hole. Then use the hammer to tap on the carriage bolt before tightening it down with a washer and a nylon nut.
After getting the two sides done, I used a bevel gauge to attach the three center back supports. The bevel gauge just ensures that I'm keeping all five of these back supports on the same line.
Now, I was on to creating a back. I set up a stop block with my miter saw and cut all of my pieces to length first. Before assembly, I decided to round over some of the edges just to soften the look a little bit. To do this, I use my round over bit in my router table. Whenever it came time to attach those back slats, I cut two spacers, so I can make spacing these out just a little bit easier.
Now, those of you who have been watching my channel a little bit will know that this is actually my second bed swing that I've made. On my first one, I attached all of these slats using pocket holes. However, I wasn't a fan of the look. On this one, I decided to use dowels instead. I went through with a pencil and first marked off the location of the dowels. I'm using this really handy doweling kit made by Rockler.
The jig you see here has a line on it that you line up with your pencil mark. Then you can use your drill to drill the dowel hole. This process is just as easy as using pocket holes. However, at the very end of assembly, you're not going to be able to see any holes. I applied glue in all of the holes, then inserted the dowels before attaching the slats, using my mallet just to ensure that everything was seating all of the way. For getting all of the bottom of the slats attached, I came through with glue on the top and repeated the process forward the top rail.
I really thought this step was going to give me some trouble. Honestly, it wasn't that bad. I attached to a clamp to one of the far ends, then use my mallet to just slowly start walking that top rail on. That wasn't as bad as I thought it would be.
After getting the entire back two coats of paint, I then take it over to the bed swing bottom and attached it using screws. Now, you'll notice that whenever I was painting the body, I intentionally left the sides unpainted. That's how I could come back and glue and screw on these side styles, once again, utilizing the space here to make spacing these out go quicker.
With those on, I started cutting and shaping the arms. Before attaching these, I also round it over its edges and gave it a good sanding. Since you're actually going to be touching them, I just want it nice and smooth for the touch.
After attaching the arms, I drilled a through hole in the front, so that I would then have a spot to attach a carriage bolt and the chain. The last thing to do was attach the chain and hang it up. Oh, and then cushions. You can't forget the cushions.
I think a bed swing is a great addition to just about anybody's home. It's like a porch swing but just a little bit cozier. Now, if you'd like to build your own, I do have a full set of plans on my website that has a full shopping list, material list, and steps by steps on how to build it. Check it out below if you're interested. That's it for this one.
Keep the inspiration coming!
Subscribe to our newsletter for more woodworking tips and tricks