Video: Making a BBQ Grilling Station
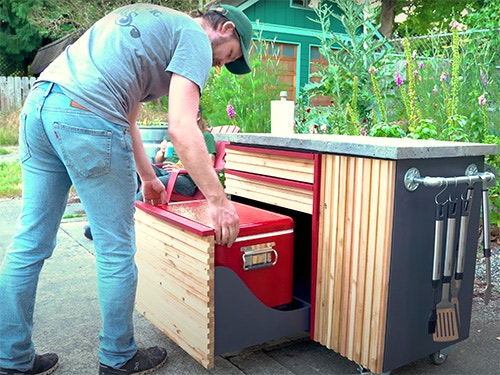
In this video, Michael Alm builds an outdoor BBQ grilling station with a concrete countertop.
This outdoor party favorite features a cooler drawer, locking propane storage, paper towel holder, bottle opener, and more!
You can find more great projects and techniques from Michael Alm at their website.
Featured Tools:


Michael Alm: Every summer I get the itch to tackle a couple of outdoor projects. This is one from a couple of years back. It's a 12-foot long planter bench. There's another video on building this and it has held up great. I love this thing. This year, I'm thinking about building a grill cart. The grill that I have has a couple of wings on either side, and it's really not enough to hold much more than a single plate. I need some more counter space. I need a place to keep the cooler. I need a place to keep the grill accessories. That's the idea. That's the design. Let's get into the build.
It's been a good bit of time designing this grill cart because I figured some people might want to build it themselves. I've got plans available on my website if you're interested. The cart is designed to be made out of two sheets of plywood, a three-quarter-inch sheet, and a half-inch sheet. The half-inch sheet makes up the drawers and the three-quarter-inch sheet is the body of the cabinet.
I have to be a little bit strategic with my cuts here because I designed it to be just one sheet of plywood. I have to puzzle piece them out, but the plans will come with a cut list so you can figure out how to do it yourself. I should also mention the elephant that's in the room right now. I'm making an outdoor piece of furniture out of plywood, but this stuff has waterproof glues in it, and I'm also going to be painting it at the end. I think it's going to be just fine.
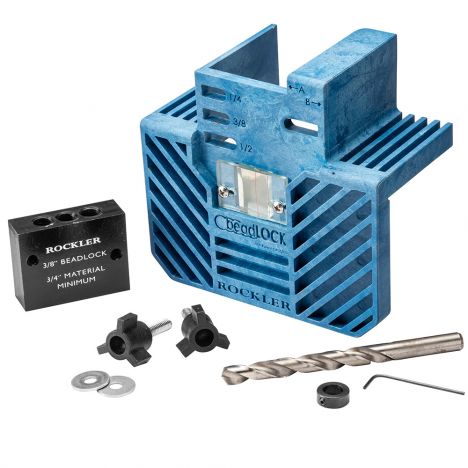
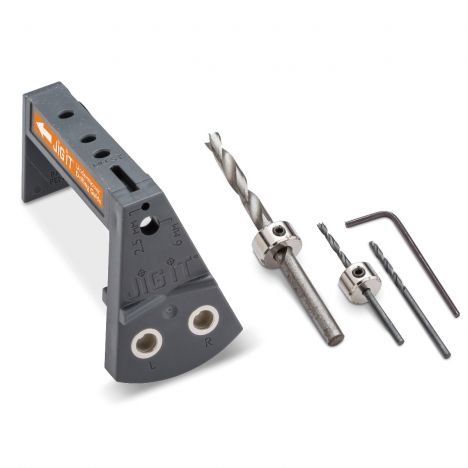
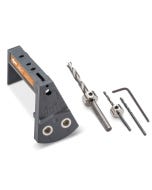
This cart is going to be taking a lot of weight. It's got a concrete top on it and the weight of the drawers, the weight of the body of the cab. It's a beast. I wanted to reinforce those joints. For that, I'm going to be using floating tenons. This is the Rockler Beadlock system. Typically I would go to my Festool Domino, but I wanted to test this out because the Domino is incredibly expensive and this is a fraction of the price and it basically gets the same results.
The other cool thing is that the Beadlock tenons, you can make in your own shop. All you have to do is buy a router bit and you can batch a whole bunch of them out and you can just make them out of the scrap that you already have. No matter what system that you have in your shop, whether it's the Domino joiner, the Beadlock system, or a doweling jig, it's all going to work in this case. You can even probably get away with pocket hole screws, but I don't think it's going to be quite as strong and it might not last quite as long.
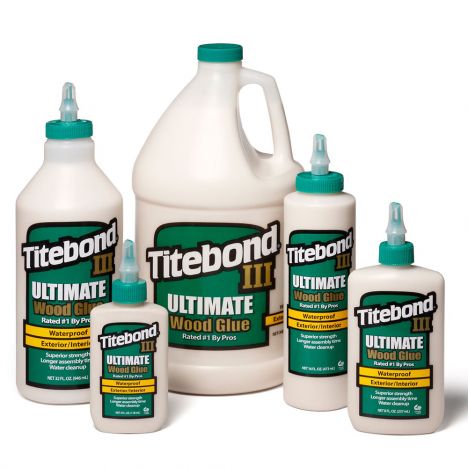
I used a waterproof wood glue on all the joints and tenons to assemble the cabinet. Here, I'm installing the bottom panel to the back panel, and it took quite a bit of persuasion to get them to sit, but once I put some clamps on them, they flushed up really nicely.
For the top pieces, I'm not using a solid top. This is going to save on weight. It also saved on plywood. I didn't have enough plywood leftover to make a solid top. In hindsight, it made a lot of sense to remove it just because this thing is already very, very heavy.
I'm now installing the other top rail, and this is just going to hang out for a little bit. There will be a cross piece that will reinforce this in the end so it won't be so springy. Then I can install the second side. I was really happy with how this thing squared up. I was a little bit nervous because I didn't really do a dry fit. I was concerned that because the tenons were pretty tight, that the whole thing wouldn't come back apart again. I just went for it with the glue-up, but a couple of clamps and it glued up great.
Shifting gears here a little bit, I'm going to start working on the concrete. I know that the concrete's going to take a little while to dry so I wanted to get this done early in the process. I'm just breaking down some pieces of melamine to make the mold. Melamine is just basically, a particle core, and I'm not sure what the outside liner is, but nothing sticks to it. It's great for mold making.
I drilled out some holes so that I could attach it to my baseboard and for that, I'd start with a Forstner bit and then went to a smaller bit, which is wider than the threads of the screws that I'm going to be using. Now you can see how this works. The screw slips right in. It sits nice and flush. I want it below the surface of the board because I'm going to have to screw this. I'm going to have to level it out later and I don't want any screw heads sticking out the top.
Now, I'm not a professional at doing concrete work, but I've learned a couple of tips and tricks from Mike Clifford over at Modustrial Maker. I'll leave a link down below. He does this trick a lot where he'll cock all the seams after laying down a bead of paste wax and he goes over the top of it with something called a fondant tool. This is just basically a round ball bearing on a handle. You very messily smooth out the joint. What this results in is like a nice curved bead on the inside of the joint and you can come back later and peel away the excess.
This countertop is only an inch and a half thick. I did a little bit of research online, and it said that you still need to reinforce something that thin, but rebar will cause it to crack. I found this much thinner metal mesh at my local hardware store and it seemed like the right stuff. Time will tell if it works or not, but it looked about right. I did have to straighten it out a little bit just to make sure that it laid flat and then I concocted a way to suspend it in the mold. I don't know if this was necessary at all, but again, I'm pretty new to concrete work.
Now, when it comes to calculating volume, I'm never good at it. I bought four bags of concrete. It ended up taking about a bag and a half. Maybe I'll have some future projects. I also tried dying the concrete just to make it a little bit darker. I'm not really convinced this did much either. I mixed it up according to the instructions, added it to the water. I used the amount of water it said on the bag, and that didn't look like enough. I grabbed some more water and I ended up about two liters more than it was required on the bag.
I laid it out. It didn't seem to flow like it said on the bag, this is the QUIKRETE Countertop Mix and it said on the bag that it would be liquid at this stage. It really wasn't liquid at all. From people I talked to on Instagram, they'd say that concrete really doesn't become liquid. Anyway, I don't really know what I'm doing here, but it was working. The screening worked fine and then when I got to putting in the metal mesh, I know that typically you pour around the metal mesh, but the consistency was so thick that I didn't think I could actually do that.
I ended up just pressing it into place and then slapping it a whole bunch. It was chaotic, to say the least. I think it's okay. I was not super confident that it would go very well and we'll see the end results, I think, at the end. One thing that I did know from traditional woodworking, anything that's outside, you need some sort of drip edge. I use a fondant tool to make this round over, and that allows the water to run off of it. Once I was done with that, I put it under plastic and then left it alone until the very end of the project.
Real quick, let's talk about this week's sponsor. I'm really excited to work with bloomscape again. As I mentioned before, I'm upgrading the outdoor areas around the house this summer, and what better way to do that than with some new plants? bloomscape is a modern garden center that delivers healthy plants, pots, and other gardening supplies directly to your home. They've recently expanded from indoor plants to outdoor plants with their outdoor porch and patio collection. They sent me out another kit this time. It is the Coleus Mix Combination Kit with a rectangular wall hanging eco pot and some potting soil. It's perfect for hanging off our deck and bringing a little bit of green space to the upstairs. What do you think?
Back in the woodshop, I'm starting in on the drawers. These are all made out of half-inch plywood and they're ripped down to various widths, which will all be included in the cut list in the plans. There are three drawers in this cut. There's one for the cooler and then two just accessory drawers. If you want to know more about building drawers, how to measure them out, how to pick the right hardware for them, I did a video a couple months back on the subject, basically demystifying the process and helping people who are a little intimidated by drawers because I know that that was the most intimidating thing for me when I first got woodworking and I kind of wish that video existed back then. Go check that out if you haven't already.
This is going to be my go to technique for undermounted hardware drawers. I use this a lot and basically, it just uses a half-inch router bit on the router table and you set it up to make some rabbets on the ends and then a dado slot in the middle. The cool thing about building drawers this way is it basically just clips together and automatically squares itself up which is super nice. It takes all the stress out of the glue up. All you have to do is glue it together and nail off the corners.
Because this is going to be an undermounted drawer slide, the back panel doesn't need to stick down below the surface. In fact, it would get in the way of the drawer slide so I just use a regular board. I cut the bottom a little bit long so that I can actually nail into that board from the bottom. That leaves the nice gap for the slide itself.
Like I said, the first two drawers are identical but the third drawer, it needs to support this cooler. I found this really cool metal banded cooler, it looks super retro. I like it a lot. I want to have a nice drawer for that. I want to make sure that I have room to access the handles so I can take it out to clean it or drain it. I also want it to be high in the front because the drawer front is going to sit there and it's going to take all of the force from pulling on the drawer pole. I came up with this kind of compound curve and whenever I'm cutting curves like this, I like to gang up the two pieces so as I'm cutting, I'm cutting them exactly the same so I know they're going to come out identical on both sides.
Now that I have the drawers built, I can install the center support. I use the drawers as spacers and then add in a little bit of extra half-inch plywood to allow for the offset from the drawer slides. I can then slip in the center support and anchor it into the cabinet. I figured the easiest way to anchor this in and get a lot of strength was just through dowel it. It's a 3/8 inch drill bit and I hammered in some 3/8 inch dowels.
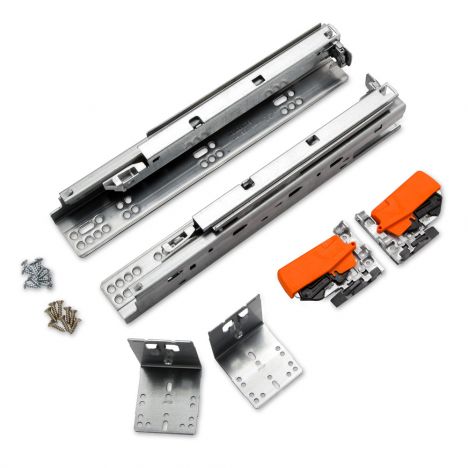
Now is ready to install the drawer slides. I'm using Blum. I never know [laughs] how to call it, I've been correct in both ways. I'm going to call them Blum drawers slides from Rockler. they sell these on the Rockler website. I'll put the link down below. Rockler also makes this jig which is super handy if you're installing a whole bunch of drawers with this kind of hardware, drills the holes in the appropriate spot so that you know that everything's going to line up right.
Once the clips are in the bottom of the drawers, I can install the drawer slides themselves. I set them back about an eighth of an inch from the front of the cabinet and put in three screws per slide. Whenever I'm installing slides, I prefer not to measure. Usually what I do is a find a reference point, put a little spacer in between. In this case, it's on top of the cooler and then space it out just enough so that I can get that next drawer in. Once that one's in, I put in another spacer and then install the next slide.
When I built the 12-foot long planter bench a couple of years back, the material that I used was an old deck that a friend of mine had torn out and so I got loads and loads of cedar from it. I think I only used about half of it on the bench and the rest of it's been in deep storage for a while. I figured it would look really nice as the drawer fronts to the cabinets. I pulled out a whole bunch of it and started milling it up.
They could use this stuff just as flat panels. I thought I'd make it a little bit more interesting and cut it down into a bunch of strips. This will add a little bit of texture to the front of the cabinets and just make it a little bit more interesting. I'm going to start the milling by ripping off that front edge. It's a little rounded over, it's not going to glue up very well, and then I can shift over my fence and start cutting it down into three-quarter-inch strips.
The original material was an inch thick. Now it's one inch by three quarters. I want two different sizes on this. Ones that are a little bit shorter, ones that are a little bit longer, so I ripped down half of them to three quarters of an inch. Again, just rotating them 90 degrees. That gave me the two different sizes that I needed. I laid out a whole bunch of clamps and got started in on the glue up. Right here I'm gluing up both the two front small drawer faces and you'll see right here actually skip a glue up. I don't want them to be glued together. I'm just using the same clamps on both of the drawers. This is for the larger bottom drawer This is the cooler drawer. It's basically a rinse and repeat, just a lot longer.
The fourth and final panel is for the propane tank door and I'm going to be cleaning these up as I go. I use the straw trick. I just use a drinking straw and run it along the seam. I don't really want any glue squeeze-out in here, it's going to be hard to clean up afterwards, so this works really well. With the panels all dry, I popped them out of the clamps and then can trim them down to size.
We keep the handles. I decided to keep it fairly simple. I'm gang counting all three of the handles for the three drawers here. I'm going to double-stick tape them together. Take them over the band saw and give them a little bit of a decorative, I don't know what you'd call this, a back bevel. I still had that router bit set up from when I was doing the drawers and I decided just to add a little bit of a pull inside of it. This ended up working way better than I expected and it's a super simple thing to add into a drawer handle.
When it came to mounting the handles to the panels, I decided to just do countersunk screws. I got some stainless steel screws, they'll be pretty inconspicuous and if anything happens to the handle, I can replace it. Also, this is going to be taking the most abuse of anywhere on the cabinet, so it's good to reinforce them. Attaching the drawer fronts was pretty straightforward, I just screwed them in from the back after clamping them into place.
The lower drawer was the most complicated but my measurements were pretty darn good so that the bottom of the drawer front sat right flush with the bottom of the cabinet. Basically, all I did was lined it up and screwed it in from the back. For the cabinet door, I'm using concealed hinges and these are super easy to set up, really easy to install, and to adjust. They're my go to for any cabinet doors. I got this little Kreg jig that drills them out of the right depth and everything and super handy.
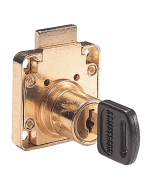
The plan for this cabinet is to use it to store my spare propane tank, I don't want it walking away so I decided to put a lock on it. The lock, it worked but it didn't really catch on to anything and the lock didn't come with any latch so I reached into my Odds and Ends and got creative, I found this L-bracket which is pretty heavy duty. I took it over to the Porta band, cut the front end off of it and then brought it over to my sander and sanded it until it was the right thickness.
With all the cabinet elements fitted and working right, I can now break it all down and get ready for paint. Here we going to kick it off with some all-purpose exterior primer. This is going to make sure that the wood is sealed and that the next layer of paint sticks really well. For the topcoat, I'm using a heavy-duty exterior paint. This is the same stuff that I used to paint the outside of my building, it's been painted that way for over three years now and it still looks like brand new so I feel like this stuff will hold up really well.
For the handles, I decided to add a little pop of color. This is the red paint that I use to paint the doors of my building and I really like this color a lot. All the surfaces got a coat of primer and at least three coats of paint, I let it dry for a couple of days, and then I could come back and install all the hardware.
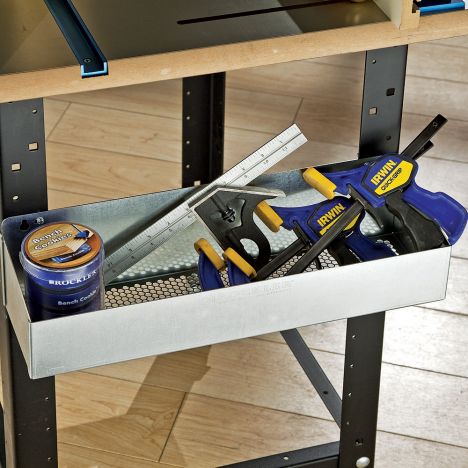
I found these bins on the Rockler website. They're made for holding tools but they're galvanized steel and they have a mesh bottom so water can drain right out, I thought it'd be perfect for holding condiments or some herbs or really whatever I might need on the backside of the cart. Now it was the moment of truth to see how my concrete job did. I would say in general, it went pretty smoothly. I gave it probably about a week and a half to dry, so it was perfectly dry. I definitely saw a little bit of air bubbles on the sides as I was removing parts of the mold, but the mold came off clean and the sides looked fairly smooth so I was hopeful.
Josh: Less than 160 probably.
Michael: Less than 160 pounds. I invited my buddy Josh over because I didn't think that I could lift it on my own and I promised him that I would grill out for him afterwards. Stand it up. One, Two, three. Hey, that's not too bad.
Josh: Why don't we carry it up and down and then lay it flat.
Michael: Okay.
Josh: Rather than trying to walk it.
Michael: One, two, three. I thought that might be heavier. Be careful. For the most part, the top was great, there was a little bit of a wobble but that was easily fixed with a shim. I think that and then that.
Josh: Ready?
Michael: Yes.
Josh: I'm going to drop it.
Michael: I picked up a bit of galvanized pipe from my local hardware store and made a couple accessories for the cart.


Keep the inspiration coming!
Subscribe to our newsletter for more woodworking tips and tricks