Video: Outdoor Bench with Standing Height Table
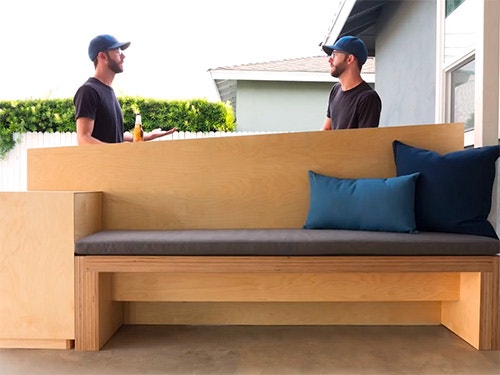
This video by Chris Salomone focuses on a bench with a standing height table on the back.
Chris Salomone's back patio was in need of some outdoor furniture, so he got a bunch of plywood and started the remodel. This is a pretty simple woodworking project that almost anybody could customize to their needs.
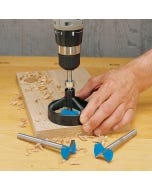
Featured Tools:


Chris Salamone: Today, we're going to build this bench with some storage and a standing-height table on the back, all while making my backyard look like a Chipotle, the restaurant, not the pepper on Foureyes. You think I'd be sick of plywood by now, but based on the 10 sheets you see me unloading here, clearly that's not the case. Now, before I go any further, let me say I'm not using 10 sheets on this project. This is actually going to be the first of at least two projects that I'm doing as part of my patio renovation. All of them use plywood. If you're watching this the day that it comes out, videos for the other projects are coming soon. If it's been a week since this was posted, then at least one more should be out.
So far, all I've been doing is breaking down my sheets. I did this using a combination of my track saw and my table saw. I'd like to do it all on my table saw, but some of the pieces are just too big to either physically fit or to handle on my own. Once all of my pieces were down to a manageable size, I could start putting things together. We're going to start with this really beefy bench that's going to be good for about four people to sit on. I started by taking four pieces that were slightly oversized and laminating them together.
I pretty quickly realized that in the sun, the glue was just drying way too fast, so I moved things into the garage. Actually, that was the biggest challenge of this build, just barely having enough space in the garage to function. I was constantly stepping over and on material, but luckily, as the pieces got finished, I could just move them to the backyard and out of the way. I guess in that sense, things got easier as I went along. Anyhow, while those were drying, I started cutting the rest of my bench pieces down to their rough sizes.
This is a pretty repetitive process of just ripping things to width and then cross-cutting them to length. Let's cut away to a drawing that's going to help explain how things go together. The bench is comprised of four sub-assemblies. We'll call them the top, two sides, and a center stretcher. Each sub-assembly is made of several pieces laminated together. The top as you already saw is made of four pieces.
The legs are made of eight pieces each, three larger pieces that make up the overall height and the width, four pieces that create a ledge for the seat to rest on, and one piece to finish off this built-up data that the stretcher can fit into. Here I'm gluing up my sub-assemblies. Again, I'm being quick and rough at this point because I'm going to take these back to the table saw to cut them down to their exact finish size once they're dry, and then I can put the entire sub-assemblies together.
Later that day, I could put the entire bench together. The pieces were heavier than I felt comfortable assembling on my own. I had the idea to do it upside down. Thankfully, the longest clamps that I have weren't long enough to do that because I had totally forgot to put my center stretcher in at this point and it would have been pretty much impossible to get to if I had glued things together. Having cut that, I went back to the table saw to cut my stretcher to size and then turned everything back upright and installed it.
After that, I waited until later that night when I could get one of my neighbor friends to help me put the benchtop into place. Big shout out to my neighbor Mark. What's up Mark? Once things had dried, I cleaned them up a little bit and reinforced everything with some long screws that are going to tie the top to the sides. I'm not really worried about the look of the top because eventually, this is just going to get covered with a cushion. The next day I got the bench out of the way and started in on this little storage cabinet armrest thing. I decided to use rabbet joinery for the case and I wanted to try doing it using my regular blade instead of a dado stack.
In this shot, I'm setting my fence to cut a groove that'll be the same width as the thickness of the plywood. Then I made the first of the two cuts needed to create the rabbets along the eight appropriate edges of my pieces. After that, I could raise my blade to make the second of the two cuts that's going to clear out the rest of the material. In this drawing, now you can see what I have here is a set of rabbets, that's going to join the tops and the bottoms to the sides, and then another set of rabbets along the backs of all four pieces that will accept a back panel.
Next, I could install my door. If you have a drill press, that's probably the easiest way to make the mortises for the hinge hardware, but I recently got this drill guide that could also be used. I decided to put it to the test and I made one mortise with each. Honestly, the quality and the results are pretty much identical. After the hardware was attached to the door, I marked a line on the inside of my cabinet and used this hinge plate template to mark the screw locations and install the rest of the hardware. Then the last thing to do before installing the door was drill one more hole that's going to go all the way through and that's going to act as a handle to open it.
With that set aside, I turned my attention to the last part of this bench which is the standing high table that's going to go behind it. Here I'm laminating two sheets of plywood together which will become the backrest. Once they were dry, I made a cut on each end of the back panel to get it down to its finished length. Then I measured and marked out a long angle which is going to go along the top of the back panel. You could definitely just keep this part rectangular, but I thought it just added a little more interest.
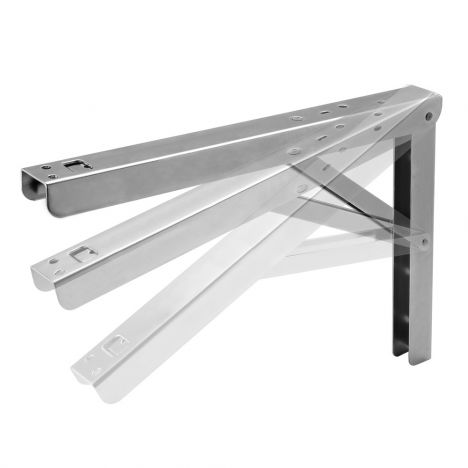
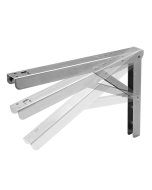
Next, I spent several hours over the course of a day which I'm condensing down to about 10 seconds putting several coats of finish on everything. Finally, with some help from my dad, we positioned everything and started screwing it all together. Here I'm making sure to get all the screws into the big sub-assemblies of the bench so that things are nice and solid. Then I attached my top using these folding shelf brackets. You could use something fixed, but we have kids that like to run around back there.
This thing is pretty much perfect height for the potential of a nasty Triple H's clothesline so we decided to play it safe. I think this piece is going to add a ton of functionality to our backyard, especially once you see it together with the other pieces that I'm going to build. I know things like the cabinet might seem tacked on or odd at this point, but it's all going to tie together nicely really soon. At least I hope it will.


Keep the inspiration coming!
Subscribe to our newsletter for more woodworking tips and tricks