Video: Turning an Office into A Bedroom
In this video, Chris Salomone turns a home office into a spare bedroom.
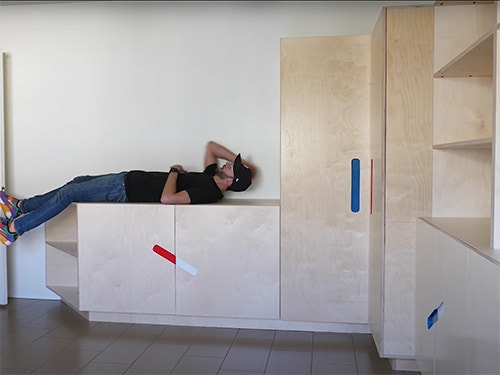
Chris Salomone builds what is basically a closet and a dresser and shelving unit in one. The room didn't have a closet, so he makes built-ins with lots of storage, a place to hang some clothes and more. Chris uses subtle pops of color and a unique door pull style to achieve that.
You can find more great projects and techniques from Chris Salomone at his website.
Featured Tools:


Chris Salomone: 14 sheets of plywood, 20 hinges, 682 screws. This had got to be one of the biggest builds that I've ever done. By I mean we, and by we I mean me, Chris, and Shaun. In total, it took us about six and a half days to complete, one of which started at 9:30 in the morning and ended at 4:30 the following morning. I'll admit, I had some fun along the way, but this definitely wasn't something that I would describe as a fun build. In the end, though, it was one of the rare times that I actually felt impressed by seeing something that I was part of. Let's jump into it and we'll walk you through the whole process. Oh, and I made up that 682 screws part. I didn't really count.
All right, so we're starting the project and I guess the first question is, what should we do first? We got a lot of plywood here. Tell me if this is a dumb idea. Basically just cut-
Shaun: It's a dumb idea.
Chris: What I was going to say, cut out every single piece, slightly oversized, we're done dealing with big sheets, we don't have to worry about lugging anything heavy around.
Shaun: That is exactly what I would do. We'll rough cut everything, from there we can refine on the table saw.
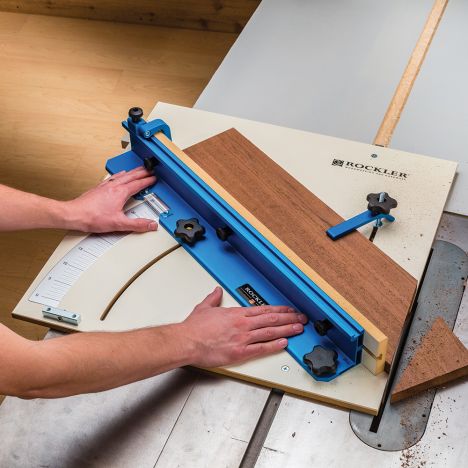
Chris: Yes, we maybe even be able to do table saws since there's two of us. That's exactly what we ended up doing. Using the table saw for the lion's share of the cuts and the Kreg adaptive cutting system for some of the crosscutting that was too wide for the table saw. All that said, at this point, we're breaking things down in a really rough manner, basically leaving them as large as the sheets will allow. In terms of accuracy at this point, the only real concern is making sure that the blade is at a perfect 90 degrees, and making sure to keep track of the pieces so that we're organized.
For example, see how I'm writing purple on this post it? That's because I have everything color-coded in this really gaudy-looking SketchUp file that I made where I organized all of our pieces. Actually, let's quickly go over the entire build so that you'll have a frame of reference moving forward. Here's the room that we're building this piece for. As you can see, it has a skinny entry point. That's because this used to be a closet. Well, technically, it's still a closet, it just isn't one for this room.
All right, let's lose some of the walls to get a better view. The build itself is essentially composed of a large angled cabinet, a really large corner cabinet to make up for the lack of a closet, and three smaller shallower cabinets. On top of the three smaller cabinets, we'll have two shelf units, one of which was designed to accommodate a TV and behind all the doors, there's going to be adjustable shelving. I guess that's really about it, though, it feels like I'm forgetting something. We just got the pieces roughed out. What are you thinking?
Shaun: The next step is to get everything to its final dimension.
Shaun: Doors, yes.
Chris: Would the- Like how- Okay, the reason that I left some of the confusion in there is because a build like this is all about that in terms of growth or getting better as a woodworker. There's nothing about this build that is technically challenging. We're basically just cutting things square aside from a few angles. More than any kind of muscle memory skill or anything else, it's really just your ability to think of things in advance.
The fact that we, or at least I, sound slightly confused while thinking my way through the build, I think that shows the growth. Earlier on in my woodworking career, I might have just looked at my drawings and said, this piece needs to be 62 inches and cut into 62 inches, but knowing the order to cut things in, what things need to wait and so forth, actually makes it a lot faster and more importantly, more accurate.
Here's a good example that expands on that idea. Looking at our cut list while talking we broke the pieces up into cut now and cut later, and that's great. Now, your instincts might be to work your way through all of the cutting out pieces and finish them off, but really you shouldn't be thinking, "These pieces need to be 15 1/4 inches wide, but so do these pieces, so I should rip all of them to finish with that one time. Look all these pieces need to be 13 inches. Ooh, all these need to be 37-1/2 inches long."
Basically paying attention to order of operations, because even a mediocre fence that hasn't been adjusted is better than the most accurate tape measure when there's a human using it. In any case, at this point, we've cut everything that we can to the finished dimension. Now we can cut the stretcher pieces before we assemble. Shaun.
Shaun: Once we had all of our main panels cut to size, we then needed to cut the upper stretchers. Building the cabinets this way was quick and efficient since we weren't cutting any dados or rabbets. It also gave us a clean aesthetic as there wouldn't be any visible pocket holes on the insides of the cabinets. We cut these to about four inches wide, which is completely arbitrary. As you can see here, Chris keeps his blades so sharp, it often feels like we aren't cutting anything at all. Or maybe we just miscalculated our material width. I'll let you decide.
At this point, we had all the parts needed to start assembling all of the cabinet boxes. Before we did that, we first did some quick sanding on any of the faces that would be showing after final assembly. We first started by cleaning out the dried glue from one of Chris's glue bottles. I keep reminding Chris to close the glue bottles, but it just doesn't seem to stick.
After that, we actually started by first putting together the cabinet with the angled end. We used the combination of glue and screws for all of the joints and we drove screws in from underneath the cabinet for the bottom joints. Then with our outside panels attached, we could measure to the center in order to find where our middle divider would sit. With that in place, we could cut our top stretchers to length and attach those with pocket holes. Chris is showing here how important the proper pre-pocket hold procedure is. Yes, another perfect pocket hole pre-drill performance.
From there, we could attach the top panel which exactly matched the bottom panel with a few screws up through the stretchers. With the first cabinet assembled, we could put the three smaller boxes together. These were constructed very similar to the first, though for these we were able to use pocket holes on our side panels instead of driving screws up through the bottom since these three boxes would ultimately be attached together and the pocket holes would never be seen.
The only one we didn't do this for was the outside end, which would be seen after the final install. For this, we screwed the side panel in place from below like we'd done on the first cabinet. With all the lower cabinets assembled, we can build the upper shelving units that would sit on top of the right-side cabinets. As with most of this project, it was just a matter of cutting the panels to width and length, then assembling them with glue and screws.
With all of our lower cabinets and the upper shelving units assembled, we could start working on the tall corner cabinet that would essentially be used as a closet. The first thing we did was build the upper and lower panels which needed to be an "L" shape. We decided to make these out of two pieces for each panel as it would be easier to get a clean and accurate inside 90-degree angle than if we had tried to cut it out as one piece. We achieved this by breaking each one into a square and a rectangle and using dominoes to glue them together into one panel.
With the top and bottom panels finished and the side panels cut to size, we assembled the corner cabinet in the same way as the others with glue and screws. With those in place, we then added back panels to enclose the entire closet and to add some structural rigidity, as well as added a back panel to the angled cabinet as we needed the back to extend from the cabinets to the angled shelves. The only tricky part here was adding a bevel on one end to match the angle already on the end of the cabinet.
Chris: All right. So far, we've pretty much been tagged teaming everything, got the boxes assembled. Now, we can finally split up. We have to do the doors and the bases that the boxes will sit on next. Why don't we split up? You do the doors, I'll do the bases. Why don't you make your head really little? I'm going to make my head really big. Ready? Go.
Okay, I started off by ripping a bunch of material to 4 inches wide, since that's how tall the bases needed to be. You know what? On second thought, let's do the doors first and then come back to this.
Shaun: Are you sure?
Chris: Yes, I think it'd just make more sense that we finish off the cabinets before we put them on the bases.
Shaun: That makes sense. I started off by cutting--
Chris: Actually, you know what though, you just got finished talking about a big section, so maybe I should talk now, just switch things up.
Shaun: Yes, man, whatever you think works. I'm good with whatever.
Chris: You know what? Actually, you go.
Shaun: Ok.
Chris: Do the doors.
Shaun: I started off by cutting all the lower cabinet doors to dimension. The six doors on the right side were all identical while the two on the left side were the same size, but the door on the left needed a bevel to match-
Chris: I changed my mind. I'm going to do the bases. Like I was saying, I ripped everything to 4 inches wide, and after that was done, I use the ACS to crosscut the factory edge off of each of the long strips.
Next, I could start cutting everything to the finished length still over at the ACS. Again, I think an animation is going to be better at explaining what I'm doing rather than just seeing me do a bunch of crosscuts. Here's what I'm making Two shallow platforms that would go under the shallower cabinets, and then one shorter, wider platform, one longer, wider platform, and one triangle endcap platform thing. The goal is to end up with a shape that leaves 3 inches of overhang along every edge of the cabinets, except for along the back where there's going to be one inch of overhang. That should leave enough space that the cabinets will clear the baseboard, and they can butt up against the walls.
Actually, cutting things was pretty straightforward, and for the most part, just a matter of marking things out, setting a stop fence, and then repeating. I'm sure some of you will wonder why I don't use a miter saw to do this, and that is certainly a way that you could go, but in order to take advantage of it, you really have to have a big miter saw station, and to have a big miter saw station, it takes up a lot of space. I just can't justify the space compared to the amount that I think that I use something like that, at least not at this point, but maybe down the road. Who knows? Anyhow, the only not straightforward part here was making the triangle piece. To do that, I cut what would be the front face by making a 45-degree cut, measuring out the finished length, and making another 45-degree cut on the opposite end.
Then, I could put a 45-degree cut on the end of two other pieces and dry assemble and mark where I'd need to make a 90-degree cut to finish off the lengths of these pieces. Here's a little detail shot that might illustrate it a bit more clearly. Again, I feel like I'm forgetting something, but I still can't think of what it is. Anyhow, then I could assemble everything in fast motion just like I always do.
Shaun: Hey, Chris, is it cool if I go now?
Chris: Yes, go for it.
Shaun: At this point, all of our cabinets were constructed, and we could move on to some of the details which included the doors. I started off by cutting all the lower cabinet doors to dimension. The six doors on the right side were all identical, while the two on the left side were the same size, but the door on the left needed a bevel to match the angle on the cabinet.
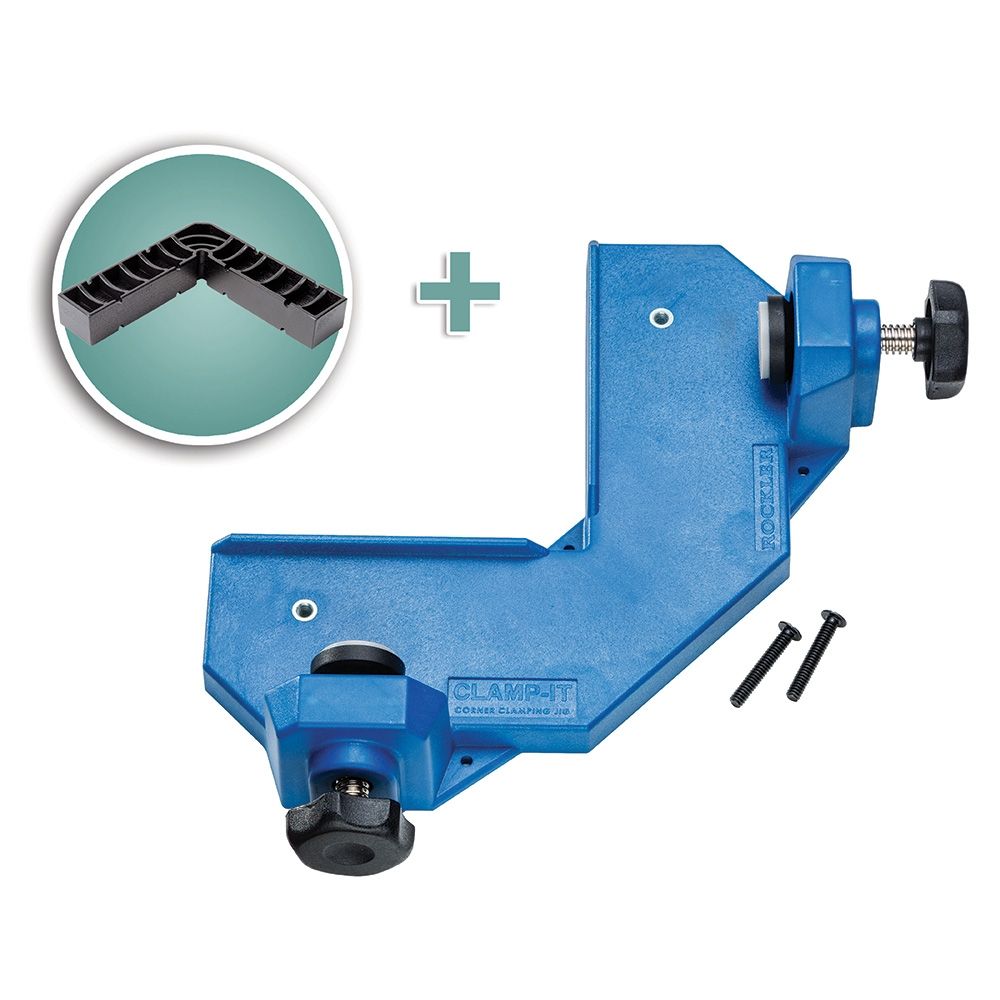
With the doors cut to size, I could start mounting the hardware, and I usually use a drill press to drill the hinge mortises, but Chris had a handy Kreg jig that works surprisingly well. From there, I could attach the other half of the hinges to the inside of the cabinets, which can be a little tedious, but once again, Chris had a jig for that. This one was from Rockler, and it made quick work of pre-drilling holes for the screws in the right spots.
Chris: With the doors installed and mostly fine-tuned, we could start cutting in the door pulls. The reason we had to wait is because the pulls visually extend from one door to another. Let's talk about the design. When Shaun and I were coming up with the design, we were really worried about the whole thing coming across as a big group of boxes. We tried to break things up with staggered depths and a few 90-degree angles here and there, but the handles really felt like the spot where we could either make or break the design. We wanted to try something that we hadn't really seen before.
After a few drawings and discussions, this is what we settled on. It felt like a good compromise where we were only introducing a few small pops of color but letting them make a big visual impact. In addition to that, something that always interests me is coming up with new ways that I can use my X-Carve on larger pieces or as part of a larger piece. I feel like whenever people think of the X-Carve or CNCs in general, they tend to think about a piece that is constructed entirely of parts that come off of it or signs and so forth.
That's fine, but for the type of work that I do, furniture, obviously, I want to use it as more just another tool, but one that lets me quickly do things that would be hard or slow to do manually. In this shot, I'm making a drawing at the exact scale that I wanted our handles to be, and then I'm going to use that to cut a template on the X-Carve out of some 3/4 inch MDF. Now, the doors are actually small enough that I could have cut them directly on the X-Carve by sliding them onto the bed and letting the machine do all the work, but because there are slight deviations in the size of the gaps between each of the sets of doors.
Shaun: Nice job, Shaun.
Chris: I was worried that we would end up messing ourselves up somewhere. Basically, the machines going to cut perfect every time, but if we mess up in where we play something, it's not going to adjust for our error. My solution was to cut the template out where the perimeter had a 30 and a 60-degree corner cut into it. That way, I could put the square on the door and use the cut edge to reference the placement which would make the handle sit on the cabinet at exactly 30 degrees every time. By drawing directly onto the doors while the doors are still attached to the cabinet, makes it so that it doesn't matter where the center gap is. The recess is going to cross the gap and stay visually aligned.
Next, while I continue to draw the shape of the cutout into all the doors, Shaun got a drill and a Forstner bit and started removing material. This will probably get rid of about 75% of what needs to be removed. That way, the router isn't doing all the work and things just move along more quickly and with less dust. From there, we could clamp the template back onto each door, making sure to match it to the line that I'd drawn, and use a templating bit to remove the rest of the material. This could technically be a one-man job, but we found a way to make it, too.
Finally, so that the pulls would actually function, we got a slot cutting bit and cut a I guess slot into the bottom of each of the recesses. This gives your fingers just enough purchase to make the whole thing work.
The next bit to work on was the open angled shelving which is the first thing that you'll see on this piece as you walk in the room. I started off by measuring the opening to figure out the spacing to end up with three equal cubbies. Once that was determined, I used some scrap plywood to cut a pair of spacers that would position the shelf just right. With those in place, I set the oversized shelf in and marked exactly where I need to cut the angle so that it would end up flush on each edge. Then back over the ACS, I placed the chalk on the line and made the cut.
With that done, I could glue it in place, and you'll notice now that it's actually halfway up the vertical distance and that's because we decided that the three cubbies just felt a little bit too small. Also, you'll notice that the glue's doing all the work here, and you can certainly wait for it to set up a bit and then drive in some screws from the backside, but instead, I cut these angular runners to laminate to the underside to help support the shelf. I forgot to film myself installing them, but it looked like this.
Okay, now here's the part where I look like a hypocrite. For all of my talks in the beginning about order of operations and yada, yada, yada, we forgot to drill in our shelf pinholes before gluing our cabinet together. Thankfully, they were pretty big and open, and drilling them in at this point was only slightly more inconvenient than it would have been to do them before the glue-up, so I guess we just got lucky there. While we're covering more of the minutia of what functionally went inside of the cabinets, prior to mounting the doors for the tall cabinets, which we didn't get any footage of-
Shaun: Nice job, Shaun.
Chris: I installed this fixed shelf with a few pocket screws. To help hold it in place while I installed, I had cut four pieces of scrap to the same length so that the shelf could rest evenly. The reason that we did this before mounting the doors is because there's a good chance that installing something like this is going to slightly change the geometry of the cabinet.
Next, I painted the inside of the door pull recesses a few bright pops of color, and then we could move on to sanding and finishing everything. There was a lot of that to do, so I'm going to work on sanding everything while Shaun starts the finishing process.
Shaun: At this point, we were finally ready for finishing, which we imagined would be a daunting task and we were definitely right. We decided to spray on a water-based polyurethane, which I prefer to use for plywood projects like this with an exposed edge. We probably spend a good day and a half spraying and sanding and ended up at about three to four coats on everything. This was also a great opportunity to work on spray finishing, which is a technique that I've used plenty of times before, but certainly don't consider myself to be an expert and Chris has a pretty limited experience with. Even with one bone head getting quasi instruction from another bone head, we were able to get a nice-looking finish with relative ease, which is really one of the nice parts about working together. Two heads are always better than one, even if they are just made of bone.
Chris: Finally, the last thing to do was get it all in the room and installed everything. Like I said, I was really happy and impressed with the way this whole thing came together, which is rare for me. Maybe that's because I went into this build feeling like it wasn't very inspired, which is kind of the opposite of normal. Normally, I go into a project really liking the idea and the design, and then I view the actual build as me trying my best to preserve the idea and not ruin it in my execution.
Here though, since I was only lukewarm on the aesthetic of the initial idea, maybe it freed me up to be pleasantly surprised by the outcome, but hey, you know what they say. If you have an idea for your parents' guest room and you don't think you like it, take some inspiration from your parent's restroom, and then you might like it.
Shaun: Chris, that's not how it works.
Chris: How what works?
Shaun: The rhyme thing for the end of the video.
Chris: What do you mean? Like and like it or a perfect rhyme?
Shaun: They're the same word, you can't rhyme a word with itself.
Chris: Well, what about parents' restroom and parents' guestroom? That was pretty good, right?
Shaun: Yes, I guess, but that's not the part that's supposed to rhyme.
Chris: But restroom and guestroom aren't in the same word. Where do you take a dump?
Shaun: Dude, that's not the rhyme. You know what, I guess we'll just have to agree to disagree.
Chris: And let it be?
Shaun: Hey, that rhymes.
Chris: Shaun?


Keep the inspiration coming!
Subscribe to our newsletter for more woodworking tips and tricks