Video: How To Make Waterfall Corner Joints
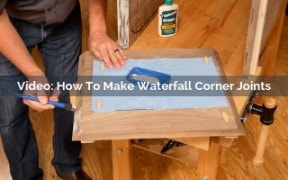
A cabinet with waterfall corner joints features continuous grain flow around the corners of the cabinet. A waterfall miter joint is a great way to highlight wood with beautiful grain. You'll learn how to cut the miters using a large crosscut sled and how to clamp this joint with temporary clamping cauls.
Skill Builder Video
Video: How To Make Waterfall Corner Joints - Video Transcript
Rob Johnstone: Waterfall joints in cabinetry are very popular these days, and that's when the grain flows around the corner of a carcass, obviously done with a miter joint. Now, cutting a miter joint accurately seems easy, but when you're thinking about it in terms of a wide panel, you can get a little bit tricky. I'll show you how we approach that. Let's go over to the table saw.
We've created our glued up panel to cut the waterfall, joints out of. I'm going to cut the side, the top and then another side, so the grain can flow right through it. Now you might notice this really large crosscut sled, reason why I'm using that, is it helps make the cuts more controllable. In addition to the sled, I have a hold down cleat here which holds the board tightly to the surface.
I have hold-down clamp here, does the same thing on this edge and then I have another cleat that holds it tight to the fence. All of those things take those problems out of consideration for me, I can just concentrate on making a good cut. One feature of this crosscut sled is that it has a saw kerf that indicates where the saw blade actually cuts.
I marked the length of the panel, and then slide that mark right up to the kerf. Last thing I do before I cut is to make some marks on the panel so that I could easily reassemble the panel in the order they were cut. Another way to make this cut more controllable is to wax the bottom of the jig so it slides easily across the tabletop. Now, with the pieces all cut up square, I've got my two sides and my top, I'm going to now lean the blade over to 45 degrees.Then I'm going to raise it up through the jig, then I'm going to make a complete cut cycle, so that I have the clear curve here and a registration mark for my 45-degree angle, should work perfectly.
There's a lot of ways to glue together miter joints, but some of them lose their functionality as the start getting bigger and bigger projects like this console. In this case, I'm going to glue my clamping cauls right to the walnut, but I'm going to take advantage of the characteristics of this hide glue, which is both brittle and water-soluble.
I'm going to glue the cauls down, will clamp the case together square across using those cauls and then afterwards, I'll take a hammer and a chisel break it loose use some hot water and a scratchy pad, clean it all off, raise all the grain, and then we're ready to go.
I put on a single wiggly bead of hide glue. I don't put on too much because otherwise, the caul will be harder to remove later on. One of the challenges about gluing together a miter joint is sometimes that joint wants to slip especially when you have glue on. In order to prevent that, we're going to use biscuits on this miter joint, I'm going to do three of them, one registered off each side and then one dead in the middle and it'll allow me to glue it up perfectly.
With any furniture project, dry assembly is a really important step. You need to test it out because let me tell you to glue up is hard to reverse, and speaking of glue, I'm going to be using Titebond III in this case, because it gives me a little bit longer open time and this is a big project, it'll make that easier. When I've got it clamped up like this in a dry assembly, the next thing I need to do is measure from corner to corner, why am I doing that? See if this carcass is square.
If the measurements are not exact then I can take a clamp and squeeze one way or the other, and square it up, because that's important. It has with nearly any glue joint, the way to success is to have a thin uniform coat of glue on both surfaces. You might want to cheat only put it on one side, you're going regret that decision. This is how you get a perfectly solid glue joint.
In this case, I'm not gluing the biscuits, they're simply for alignment purposes there'll be some glue that joins them, but it's not essential to this operation. They are essential to me getting the joint perfectly aligned, however. You can see why a longer open time with Titebond III is a big advantage here. You can see that this is essentially end grain, it's not a hundred percent in grain, but that's one of the reasons why it's important to get a good coat of glue on both phases.
Now, with this last clamp, this end of the cabinet it's glued up, I'm going to move to the other end, and do exactly the same thing and then it'll be ready to go. This is it the last clamp, joint fits together tightly, I'm going to measure for square. That looks great. Once the glue is cured, we'll come back take the clamps off and then we'll break off these clamping cauls, which I have to say have made this task a lot easier.
Now, you have to get these clamping cauls off of the carcass. Now, remember that we used hide glue, which we're counting on its brittle nature to fracture before the fibers of the wood pull up. Oftentimes, what actually happens is that the plywood will fracture and you'll leave behind some pieces of veneer. When that happens, you just sand it smooth, but you're not done there, you still have to come behind with hot water and a scratch pad to dissolve any of the hide glue that has seeped into the wood fibers. Then, you go through your sanding and staining, everything's good.
To get started, you want to hold the chisel flat to the carcass and what you're really counting on is this wedge shape that will force the plywood up and fracture the glue. Start near the end and give it some whacks.
Here's the result, we scrubbed away any excess height glue with hot water and a scratchy, we sanded it smooth, and now, you can see how well this grain flows right around the corner, really demonstrating it well.
If you're building a cabinet in the near future and it has some-you're using wood that has some really lovely grain, why not consider a waterfall miter joint? I think you might find it very attractive. If you're doing that, don't forget our tip of the temporary clamping cauls, they work great. I'm Rob Johnstone from Woodworkers Journal, keep on making sawdust.


Keep the inspiration coming!
Subscribe to our newsletter for more woodworking tips and tricks