Keepsake Box Project
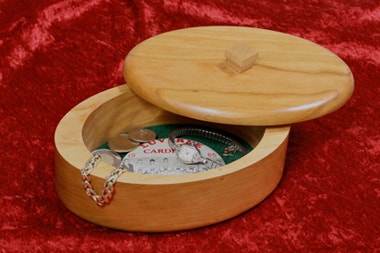
Here's a simple and fun way to make a band saw-style lidded box with your scroll saw.
Using the basic construction techniques shown here, you can make a keepsake box any shape or size you prefer. In this case we made a small oval box to demonstrate these box-making construction techniques. You can download our Keepsake Box pattern as a PDF to build our oval version. Make your box from a hardwood with tight end grain, such as cherry, maple or birch, for best effect.
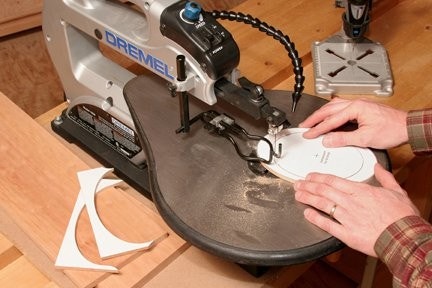
Step 1: Print out and mount the Box and Lid Template to your piece of 1/4-in.-thick stock with spray adhesive, and trim off the excess paper. Cut the outer oval to shape on a scroll saw, then drill a tiny starter hole on the layout line for the inner oval. Make this through hole just large enough to fit a scroll saw blade. Carefully cut out the inner oval - you'll need both ovals for the final project. Smooth the cut edges of the larger oval so it can serve as a template.
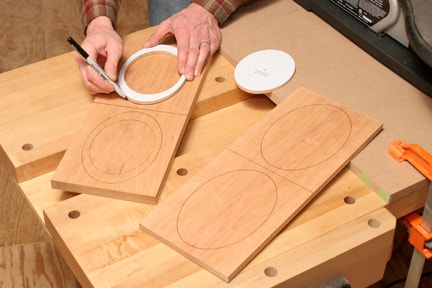
Step 2: Step 2: Draw two ovals onto your 1/2-in. stock using the template. Trace only the outer edge. Then, trace both the inner and outer edges of the template on your 3/4-in. stock. Draw the shape twice. Cut out the four ovals and the inner cutouts to form the box's top, bottom and middle two laminations. Be sure to cut these parts about 1/16 in. outside the layout lines so you can sand them to final shape.
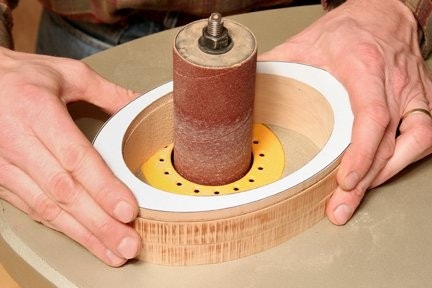
Step 3: Glue and clamp the template and the two middle (3/4-in.-thick) laminations together with the template piece on top. When the glue cures, sand the inner edges of the blank to match the template shape. DO NOT sand the outer edges yet. Use an oscillating spindle sander or a drum sander in your drill press to make quicker work of this sanding job. Finish-sand the inside of the box by hand.
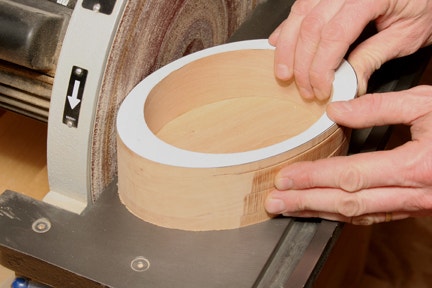
Step 4: Next, finish-sand and glue one of the 1/2-in.-thick ovals to the bottom of the box blank. At this point, you can refine the outside face of the box by sanding the laminations until they match the top template. A disc sander is the ideal tool for this task.

Step 5: Take your remaining 1/2-in.-thick oval and mount it temporarily to the top of the box with a few dabs of hot-melt glue. It will become the box lid. Make sure this oversized lid piece overhangs the outside edges of the box evenly.

Step 6: Sand the edges of the lid until it matches the rest of the box. You can either do this on a disc sander, or switch to a smaller detail sander. Then sand the lid, bottom and face of the box up through the grits to 150.

Step 7: While the lid is still attached to the box, ease the sharp edges with a trim router and 1/2-in.-diameter roundover bit. Remove the waste in several passes of increasing depth to prevent tearout and burn marks. Sand the routed edges to blend in the curved transitions, and smooth all the outer surfaces of the box up to 180-grit.

Step 8: Tap the lid free from the box gently with a rubber mallet. Make sure to do this over a padded surface so you won't damage the lid in the process! Sand the paper pattern off the rim of the box. Now, sand off the paper from the inner oval you cut in Step 1, and smooth its edges. This piece will become the lid's inner layer to help register it on the box. Use another copy of the paper pattern to trace the location of the inner layer on the lid. Glue and clamp the lid parts together.

Step 9: You can choose any style of hardware knob for your box lid. A knob is also easy to make with your drum sander and a stick of 3/4-in.-square scrap. Here's how: draw two layout lines around your scrap - one measuring 1/4 in. from the end of the scrap and a second line at 7/8 in. from the same end. Install a 1-in.-diameter sanding drum in your sander, and sand a gentle concave between the layout lines. Do this on all four sides of the knob. Try to match the sanded profile from face to face. Now cut the knob free from the scrap with a fine-toothed handsaw. Make the knob 5/8-in. long.

Step 10: We've provided a centerpoint on the paper pattern to help you locate the knob on the lid. Cut out the inside oval of the pattern, and lay it on the lid's inner lamination to mark the centerpoint with an awl. Drill a 1/8-in.-diameter, countersunk hole through the lid for a #6 x 1 in. wood screw. Then, drill a stopped hole into the bottom of the knob. Drive the screw through the lid to fasten the knob in place.
Step 11: Topcoat the surfaces of your box with a finish of your choice, but leave the inside bottom of the box bare. That way, you can line the bottom with colored felt for a distinctive touch. Cut the felt to shape and glue it in place. When the glue dries, present your Keepsake Box to someone special who'll know just how to fill it!
Napkin Holder Cutting List
(1 piece) 1/4 in. thick x 5-1/2 in. wide x 8 in. long
(1 piece) 1/2 in. thick x 5-1/2 in. wide x 16 in. long
(1 piece) 3/4 in. thick x 5-1/2 in. wide x 16 in. long

Keep the inspiration coming!
Subscribe to our newsletter for more woodworking tips and tricks