Project: Making a Bubinga Sideboard Table

This elegant and well constructed sideboard table was made using a piece of rare African bubinga.
Beautiful woodworking does not have to be overly complicated — this sideboard provides all the evidence you'll ever need of that. It's comprised of five basic parts, and yet it is a lovely thing to behold. In this case, I used ash lumber for the legs and cross members and a remarkable piece of bubinga lumber for the top. But even if bubinga does not fit into your budget, a nice piece of cherry or even red birch or mahogany would fill the bill very nicely.
For the sideboard table diagrams and materials list in PDF format, click here to download the PDF.
Getting Started
The design of this table was a collaboration with Woodworker's Journal art director Jeff Jacobson. From that design, I was able to lay out the shapes of the legs, apron rails, end rails and cross rails (pieces 1 through 4). I began by making accurate templates for all the individual components, using 1/2" Baltic birch plywood. These pieces are used both for shaping the table's components and to determine exactly how I want the piece to look. By examining the templates, if I deem the legs too fat or the stretchers too shallow, I can make the necessary adjustments long before I execute my cuts on the actual stock.
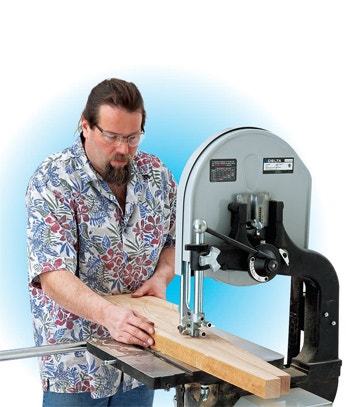
With that task accomplished, I traced the components' shapes onto ash lumber, taking grain direction into account to achieve optimal structural integrity and to enhance the leg set's visual appearance. Moving to the band saw, I cut out the rail and leg shapes, leaving a scant 1/8" material all around my marked lines.
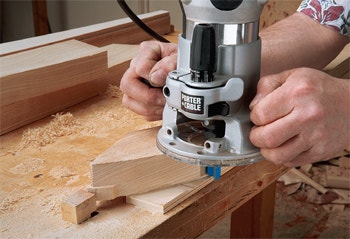
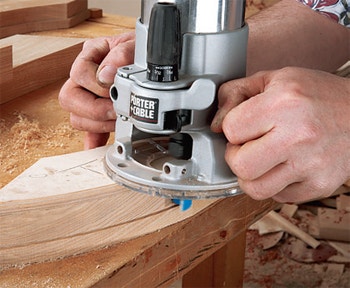
I then carefully template-routed the components to their final shape. This was done in two stages on the legs and apron rails to compensate for the length of my pattern-routing bit (it was too short). I attached the templates to the wood using brads for the first pass, then removed the templates and used the freshly routed edges as a guide for the final pass.
Joining the Stock
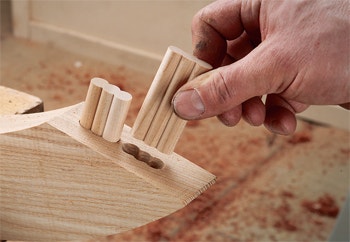
I chose to accentuate the joint between the legs and the apron rail by means of a slight chamfer on their joining edges. The mating faces of the joint were cut on the table saw. The joinery consists of double floating tenons that I installed with the beadLOCK jig system. After dry-testing the joinery (including figuring out how to clamp these big subassemblies together), I assembled each leg and apron rail subassembly and allowed the glue to cure.
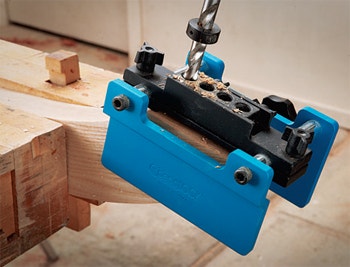
I decided to use dowels to join the end and center rails (pieces 3 and 4) to the leg-apron rail subassemblies. I carefully laid out the dowel locations and bored the holes on my drill press. Gluing and clamping these pieces to the two subassemblies wasn’t that complicated, but as with any project this size, a test run is a good idea. (As is inviting a friend over to your shop to lend a hand!) The final bit of shaping on this leg assembly is to rout a slight radius on the outside edges of the legs. When that's done, it's time to grab a sander and a dust mask and smooth the piece through the grits, right up to 220.
Big Bubinga Boards
About this time I was blessed with the arrival of four of the biggest and most spectacular bubinga boards you're likely to ever see this side of the African jungle. We picked the finest of these for our top.
In the spirit of waste-free woodworking, I made a mock-up of the top from plywood, as a study for shape and dimension. A few of us weighed in, arriving at a final dimension of 20" wide and 76" long. Turning to our prized bubinga slab, I found the top dimension in an area running across the middle of the board at a gradual angle, landing on some highly figured center grain. I rough-cut it out using a circular saw and then cut it to final dimensions on the table saw. The curved ends were template-routed and shaped in the same manner as the legs.

Stepping to the horizontal drum sander, I began the process of smoothing the top. With grain as wild as we found in this board, I recommend a drum sander rather than a planer — simply to avoid tearout. The sanding process continued with a random-orbit sander and was completed by a sanding block with a cork backing. It was a long, slow process, but working with wood this beautiful is its own reward.
Finishing Up

With the leg set and the top sanded, it was time to apply the finish. On the ash legs and rails, I used an ebony-colored oil stain. Once it was dry, I applied two coats of polyurethane. For the top, I used two coats of tung oil, flooded on liberally and then polished off. I followed that with three hand-rubbed beeswax applications. When I was done, the wood glowed with warmth and color.
Next, I installed the top using three pocket-hole joints on each of the end and center rails. I drilled the outer two joint holes double wide, to accommodate wood movement in this solid top. Simple yet elegant may be an overused phrase in this Ikea-world of minimalist design, but in the case of this sideboard, I think it is an understatement.


Keep the inspiration coming!
Subscribe to our newsletter for more woodworking tips and tricks