Video: DIY Desks Anyone Can Build
In this video, Chris Salamone will be demonstrating how to build two DIY desks.
The first is an extremely simple DIY Woodworking project, that anybody can tackle with a limited set of tools. The second can also be built using only a few tools, but is more challenging as it incorporates more complex angles and geometry, covers building drawer boxes, tapering legs, and more woodworking techniques.
You can find more great projects and techniques from Chris Salamone at his website.
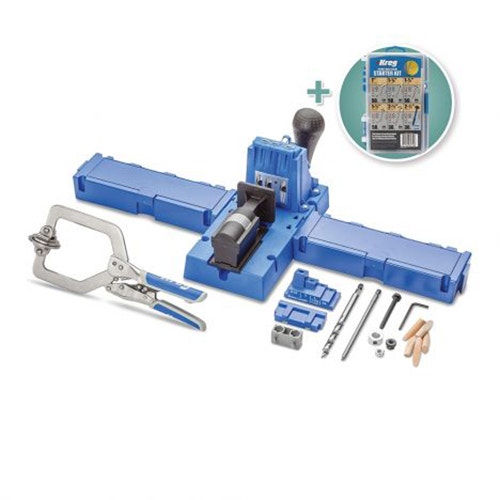
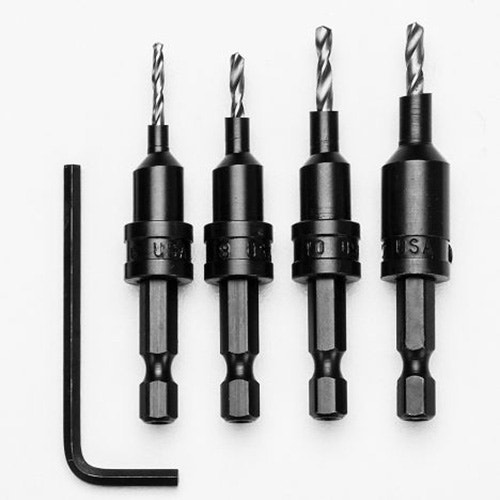
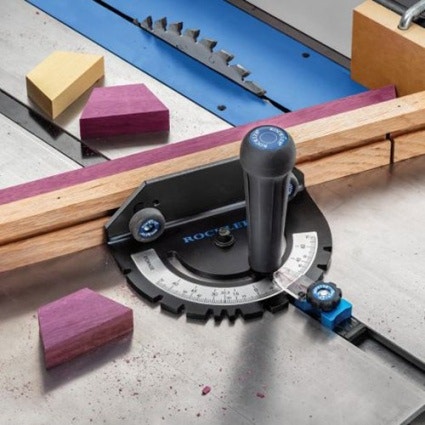
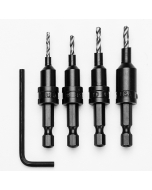
Featured Tools:
Chris Salomone: Today, we're going to build two different and complete DIY desks. Well, actually three, but this one, we'll just talk about and then building a separate video because it's too long to include, so two desks. This one does sit two people. I guess that's kind of like three desks. All right, settled. We're building two desks that sit three people on Foureyes. Wait, I think we already showed the title screen. Okay, so the first desk is going to be really simple. Actually, let me explain the situation.
Like I'm sure a lot of you right now, we have an increased need for desks due to the pandemic and the fact that our second grader is distance learning. I wanted to build something that ticked the following boxes.
It needed to be useful, obviously, cheap, have the ability to see two people, my wife and my kid, and be temporary, hopefully. Here's what I came up with. The desk uses one sheet of Baltic birch plywood, which costs about $65. That said, you could use any plywood that you want and then this tool chest that cost me another $129. $194 for a two-person desk isn't bad but if you think a little deeper, the desk is actually quite a bit cheaper than that. That's because I use Baltic birch plywood all the time. Mostly for like cabinets and carcasses and that sort of thing.
Because I'm leaving the panel so big, I'm going to be able to use like 95% of this when we're done using it for a desk. I'll be generous and say that 10% of it was wasted so $65 that means $6.50. As for the tool chest, I'm definitely going to be able to use that once we're done using it for the desk. In fact, I've already got a space for it, but let's just say that I didn't want it. I took a look on Craigslist, just to see what something like this would go for. It's basically brand new. It looks like I could probably sell it for about $80.
Let's say that I take a $50 loss on that, let's call it $10 between my plywood, sandpaper, screws, all that stuff. $60 for a two-person desk is about what I'd be at and that's pretty good. All right, now let's actually build it. We'll start off by cutting our three large panels to size. If you don't have a way to make these cuts, you could actually have the fine people at the lumberyard do this for you with their panel saw. Here are the dimensions for those pieces. If you do that, one thing to be aware of is that when you tell the person to rip it in half, they're probably going to set it up to cut out 24 inches.
Assuming that their blade is an eighth of an inch wide, that'll result in a piece that's 24 inches wide and a piece that's 23 and seven-eighths of an inch wide, which isn't the end of the world but I'll let you decide how much you want the person on the store to hate you. Assuming that you want to DIY it or DY it, I guess the other one is redundant, what you'll do is set up a long straight edge to rip the entire length of the plywood at just shy of 24 inches. Splitting the plywood into as closest to equal hops as you can.
Remember to factor in the distance from your base plate to the blade on your circular saw when you're setting up your straight edge. Now, we can set aside the half that it'll be the top. With the other piece, we need to cross-cut two pieces at 28 and three-quarters of an inch long. You can set this up the same way that we did with the first cut but if you have a large square, now might be a good time to utilize it. To attach our two leg panels to our top, we're going to clamp them together and then just use some screws.
You don't need to be nearly as picky as I'm being. If you want perfect screw placement, here's a diagram that shows what I did on each end. With that on marked out, I'm going to drill some pilot holes with this bit that'll also countersink by screws. You can pick up one of these from rockler.com or again, you can be less fancy. Now, I'm going to sand the pieces, paying extra attention to making sure that I round over all of the sharp edges. I'm not going to be putting any finish on this one since I want to be able to reuse these panels later.
As you can see in this shot, this thing is super wobbly at this point. The next thing I'm going to do is hold my tool chest next to one of the side pieces to measure the distance between the underside of the top and the top of the tool chest. Then you can cut a few strips to fill that gap or if you want to get fancy, make a U-shaped piece like this. Honestly, that's about it for this one. The only thing that I did was make this little plate that I'll screw to the back for some cable management. Basically, I can hook up whatever I need to and then use some zip ties to keep them looking clean.
All right, let's move on to the intermediate DIY desk. This is one of those projects that you could do with a limited set of tools and say a drill, a sander, some clamps, and either a track saw or a table saw, and one sheet of plywood. I'm going to use both a table saw and a track saw to try to show you how to make the various types of cuts using either. Furthermore, if you're using a track saw, you can use a traditional kind, or something like the ACS, which is essentially a track saw on a table, which really helps with speeding up some of the setup times and just kind of makes things a little bit safer.
Either way, regardless of what tools you're using, the first step is going to be breaking down your sheet of plywood. I started by making two partial cross cuts, 19 inches deep at 24 inches from one end and 34 inches from the other end. By the way, you can use a circular saw instead of a table saw or track saw as well, which I assumed you assumed. Next, I'll cut these pieces free and then really, we're just going to work our way through cutting out a bunch of rectangles.
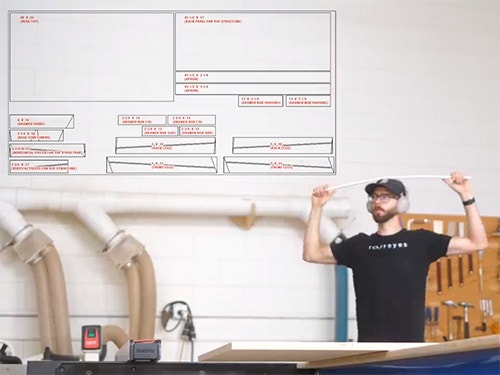
You can do this however you'd like but the only important thing would be to just leave each piece slightly oversized for now, so that you can refine them after. Here's an image of their finished sizes if you want to pause and write them down. Here's a better image. We'll go into more detail on some of these when we start working on. The only extra thing to know for now is for these two pairs of oversized rectangles which will become the four legs eventually. We're going to laminate them together into two rectangular chunks.
Once those have dried, we can start cutting those out. The first thing that you want to do is cut your blocks into rectangles the following sizes. The red pieces are the front legs and the blue pieces are the back legs. Actually, the length dimension doesn't really matter right now so that's just the shortest that they can be. Just make sure that you leave him long for now. All right, so in this shot, you can see that, for example, on the front leg, we need to cut an angle at 20 degrees. We can go ahead and do this on our table saw with a crosscut sled or a miter gauge or using a track saw or even a miter saw.
Either way with that cut, next we'll measure out 30 and five-eighths of an inch from that cut and then make another cut at the same 20-degree angle. Now, we've got a parallelogram. Now, we can measure and mark out the taper that we want to cut. On one end, I'll mark out an inch and a half, and then on the other, end three and a quarter inches. I like to draw out the taper just to help me visualize things but you don't technically need to. Really, the only important marks would be to transfer the marks on both ends down across the thickness of your piece and make sure to keep track of which side of the line your blade should go on.
To make the taper cuts on a table saw a tapering jig is ideal, but if you don't have one, another option is to make a quick sled. To do that, I'll grab a piece of scrap plywood, lock my fence in position, and establish a clean edge. The position of my fence doesn't really matter. All that matters is that I don't touch it from now until I'm done cutting all of my tapers. Next, I'll clamp my workpiece to the sled so that the offcuts are just hanging off the edge that we just established. Then I'll take a few more pieces of scrap and screw them to the sled to keep the piece in position.
I usually like to do two along the edge of my workpiece, one at the back of the workpiece, and a few more to create a bridge like this which will act as a clamp. With that, I'll set up, I'll cut my first leg. Now, I'm going to take the offcut and flip it around 180 degrees and take another pass to make the other leg. There you go, two identical legs. Next, we'll need to repeat the same step of making a parallelogram, marking out the taper, and cutting them on the sled for the back legs. Here are the dimensions for that piece.
Let's say that the measurements were 17 and 24 inches and your dados were a quarter of an inch deep. Well, you know that your distances were 17 and a half inches and 24 and a half inches, so technically, out of plywood, you could cut your center panel exactly that big and you'd be ready to glue up. That said, I wouldn't. I'd cut it slightly undersized so that it doesn't get in the way during the glue up, and that would be that.
In reality, you should cut out both parallelograms first and then make the sled for your tapers, rather than having to reset things up multiple times. To do it with the track saw, you don't need any jig. A lot of the concepts are largely the same. I'm going to explain it in a quick animation, just to give you a different look. You'd, again, start off by cutting your piece into a parallelogram. Then you'd mark out the taper that you want to cut and line up your marks with the grooves in the tabletop or drawing out the line here would actually be useful because you could just line that up with the track.
Either way with your piece position, clamped down a fence to reference that position and make your first cut. Now again, you can flip the off-cut around 180 degrees and make the second cut. Again, you'd end up with two identical legs. We're not done with the tapers just yet, actually only halfway as we still need to make four more pieces, which will become the sides for our top assembly, which by the way I should mention is totally optional. I'm including it because my kid's going to be the one using this desk.
I think that'll be useful to store some items and to keep his pencils and stuff from falling off but for an adult, maybe not as useful. You can make that decision. If you do choose to include them, here are all of the dimensions that you'll need and the process is exactly the same. The next step is to cut the stretcher pieces that'll connect our two legs together.
To do this, I'm going to set my pieces up like this so that I know that the tops are coplanar and then I'll position the bottom legs, 25 inches apart. Then I can mark out where I need to cut the stretcher to match the inside angles of each leg. You can cut both of these pieces to be identical, but when it comes to attaching them, remember that we're making legs that are mirror images of one another. Since the legs are two pieces thick, but the stretchers are only one piece thick. Just keep track of that.
Next, I'm going to put together the leg sub-assemblies as well as the L-shaped assemblies for the top portion. I'm going to use glue and dowels to do this.
To assemble the rest of the desk, I'm going to use a mixture of pocket screws and regular screws. Since it's hard to tell exactly what I'm doing, let's cut to a quick animation. I put two pocket holes on each end of my two apron pieces. Those will connect our leg's sub-assemblies together. I also put about six pocket holes on the inside face of each apron, along the top edge that'll eventually be used to go into the desktop. Next, we'll connect our drawer box housing pieces, and this one will get screwed into the side of the leg sub-assembly.
The other one will get attached through the back of the front apron. Each of these is also going to get a few pocket holes on the inside top edge to attach to the desktop. We'll also put some pocket holes in our privacy panel, as well as the back panel for the top piece. Once we have the desktop on, we can attach the top piece with a few screws through the underside of the desktop. Back in the real world, to help me position things, I'm using a few business cards as spacers and then just clamping and screen together. No glue.
Finally, with all of my pieces put together, I can put the tabletop on, but before I do that, I'm going to cut a bevel along the front edge and both sides. Then I can go ahead and make my drawer box. We're going to keep this super simple. I'm just doing butt joints and glue. I'm going to cut a bottom piece that's oversized and glue it on as well. I like that. Let it sit for about five minutes before I clamp it up so that it doesn't slide around. Once it's dry, I can sand it flush and start attaching my hardware. Before I do that, I'm going to strike a line three eights of an inch from the edge.
Eventually, all reinforced the joints with some screws here, as well as, through the bottom. We'll do that after the hardware is on so that we can make sure it doesn't interfere. For the drawer front, I decided to cut this angular piece, but if you think that it's funky, you could make it a rectangle. To attach it, we'll just do a few screws through the inside of the box and into the backside of the face.
All right, let's back up for a second to talk about the finish. Obviously, you can use anything that you want, but for Baltic birch plywood and especially for a desk for my kid, I like water-based poly. Rather than waiting until the very end, I like to finish pieces as I go before I assemble things, just because it's easier to get to them. For pretty much everything, I put on two coats of finish, then lightly sand it with three 20-grit sandpaper, put on another coat, and then aggressively rubbed it with a brown paper sack after it was all done.
Just to remove any little dust bits that found their way into the finish. That's a total of three coats on everything except for the top, which got an extra one or two coats. Leave me alone. Take a walk, mister. Take a walk but not in front of the camera. For the drawer foot, I had this yellow paint, paint matched to match the yellow of this wall control panel that I installed on the back panel. You guys might be used to seeing these things in my shop and they're super useful, but I've never used them on a project like this.
With all the little shelves and accessories that you can get for them, I'm sure that they're going to be equally useful. Plus, I think they just look cool. The last thing that I wanted to do was make a handle for my drawer front. I looked through my scrap, but I didn't really see anything that I liked. I opted for a piece from my half inch stash instead. After getting it all shaped, positioned, and ready to attach, I decided that I didn't like it. Actually, it was purely aesthetic anyway, since the easiest way to open the drawers by grabbing it from the underside.

Keep the inspiration coming!
Subscribe to our newsletter for more woodworking tips and tricks