Video: Making a Leaning Wall Shelf
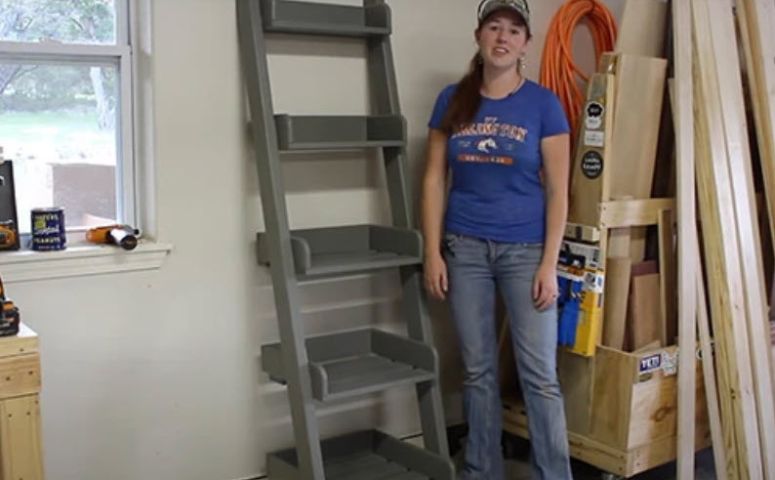
In this video, April Wilkerson creates a simple and functional leaning wall shelf.
This easy-to-build wall shelf project uses two legs and a wall to support it. It's a great, simple project for storage in a tight space.
You can find more great projects and techniques from April Wilkerson at her website.
Featured Tools:
April Wilkerson: It is pretty difficult buying a house and figuring out what to build first like right off the bat because there are so many things right now that I need and that I want, but I have decided on the first project for the house. I'm going to be building two decorative leaning ladder racks. They're good as decoration for knick-knacks, but they also can be functional in just about any space, and that's really what I'm going for.
I started this project off by going to the mitre saw and cutting all of my pieces to size according to my cut list. I do have a full set of plans if you're interested in making your own. That includes the material shopping list as well as the cut list. Now I'm using a mitre saw, but if you don't have one, then using a jig saw would work just as well. Once I had all of the bottom and back slats cut, then I started cutting the boards that will make up the sides.
To give these just a little bit of a more aesthetically pleasing look, I went ahead and rounded over the front edge. You can use something like a protractor to get this curve. However, I typically just grab something that's round in my shop that has the radius that I'm going for. In my case, I grabbed a roll of tape. I repeated this on one board in each pair. Then I would take the pair over to my bandsaw and cut them both at once, making sure to keep them lined up so that they would come out identical.
Now if you don't have a bandsaw, then of course a jig saw will do the same job. Once all of the corners were cut, I brought out my belt sander and gave each board a few passes just to smooth it out a little bit before taking it over to the router table and rounding over all of the edges. If you don't have a router table, then of course this step is not necessary, but if you do, it does soften up the overall look.
Next, before assembly, I gave all of the boards a quick sanding using my palm sander, but then I moved to joining things together using the help of a right-angle jig to make sure that I was getting the arms nice and square with the back. Next, I flipped the shelf upside down and started adding on the slats, first attaching the very front slat, then attaching the very rear slat. On all of these, I pre-drilled with a countersink to prevent splitting.
To make lining of the remaining slats easier, I cut two spacers to use. However, you could always eyeball it. I am pretty guilty about doing that actually. On some of the smaller shelves, the very back slat needed some trimming, so I would get the front ones in place, mark where the back slat needed to be ripped to, cut it up with the table saw, and then secure it in place.
Now, on to making the legs. The legs are actually made from a simple two-by-four. I grabbed the same roll of tape in order to make the radius on this front edge just so it will match the shelves and grabbed a speed square to trim the back of it just so that it's not a point resting against the wall but just a flat smooth surface.
Again, since I have a bandsaw, I used it for cutting the two-by-four. I gave both of the legs a nice sanding and then filled in any imperfections using joint compound since I'm going to be painting mine. Once I let that joint compound dry, I came back with a sander to make it all nice and smooth before I started painting. I got asked in my last video why I have brown paper for my outfeed, and it's just to keep it clean while finishing.
All right, next is to start joining all of the pieces together. I first laid the legs against the wall, making sure that both the top and the bottom surface were flat. Then I started attaching the shelves, starting with that very bottom one. I used a two-by-four to act as a spacer just to get it up off the floor, then moved the legs in to where they met flush, clamped them in place, then pre-drilled and countersunk screws to attach each shelf to the legs.
After the very first shelf was in place, I removed the two-by-fours, turned them up on their end and repeated the process. I also used a spacer to space each shelf off the wall equally. Now, it's important, even though I'm using spacers to make sure that each shelf was level before actually attaching it to the legs. You're probably wondering why I left so much unpainted. It's so that I could use glue to attach the shelves to the legs, but of course, glue doesn't do such a good job if the surfaces are painted. I waited until all of the shelves were attached before coming back to finish painting those insides.
Something I love about this project is that it can really go in any room in the house and be functional as well as something decorative. I'm personally going to be putting it in our master bathroom because right now we don't have any place to put any of our folded towels, so this is going to work out great in the meantime before I can get in there and do a nice built-in. I hope that you enjoyed this one. This is just the first project of many for the new home, so I will see you next time.


Keep the inspiration coming!
Subscribe to our newsletter for more woodworking tips and tricks