Video: Nintendo Switch Storage Cabinets
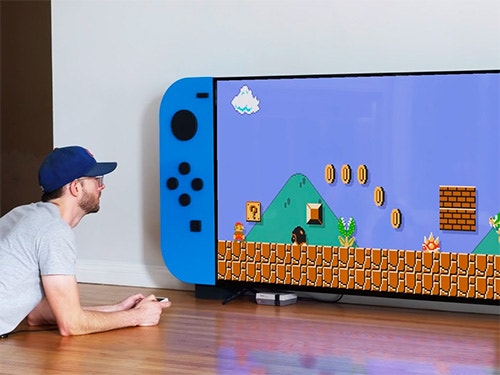
In this video, Chris Salomone makes a pair of cabinets that transforms his TV into a giant Nintendo Switch.
Chris Salomone adds plenty of storage for his video game consoles, games and accessories with this project that turns his TV into an oversized Nintendo Switch console.
You can find more great projects and techniques from Chris Salomone at his website.
Featured Tools:

Chris Salomone: To make this project, I actually started off with the back panels. I know this seems like a weird piece to start with, but those are going to be a sort of anchor point that everything else can be built around. In these shots, I'm cutting two pieces of half-inch MDF into rectangles that are roughly the size that the back panels are going to need to be. Actually, before we go any further, let me cut away to an animation to explain how things are going to come together.
As I said, I'm going to start with the back panel. To determine its size, I measured a joy-con and scaled it up so that it would match the height of my TV. Then I took an extra half-inch off of these three sides and three-quarters of an inch off of this side. Next, I'm going to take another piece of half-inch MDF and use curve cuts to wrap it around the back panel except for this side.
On that side, I'm going to attach a piece of three-quarter-inch plywood, and that's because I want it to be stronger since hinges are going to go in here. Next, I'm going to install three shelves. One of these is going to be fixed and the other two can be removed. Finally, we'll install some doors and decorate the whole thing to look like a controller. We're also going to have to do some base so that this thing can surround the TV, but we'll get to that later.
Now, let's see if we can do all that without messing it up. Back in the real world, I started measuring out in the curves I need to cut on my back panel. Once I was happy with that, I used a jigsaw to cut proud of the line and then sanded it to the line to refine everything. After that was done, I used it as a template to create a second identical panel. Actually, while I was making my template, I started thinking about how this is a weird project to build.
Then that got me thinking too all of the stuff that I built on this channel and how it all fits together. I started forming a Venn diagram in my head, and then thinking about which overlapping segments different past projects would fit into, and what does any of this mean? Is there something to be gained from it? Am I doing things the right way? Should I be doing something different?
Thankfully, before too long, the duplicate piece was done and my mind snapped back to the project. Next, I cut out some oversized panels of three-quarter-inch plywood that are going to become the inside side panels. I use my back panel and two scrap pieces of MDF to mark the exact length that they should be, and then I could cut to my line. Okay, let's get to curve bending.
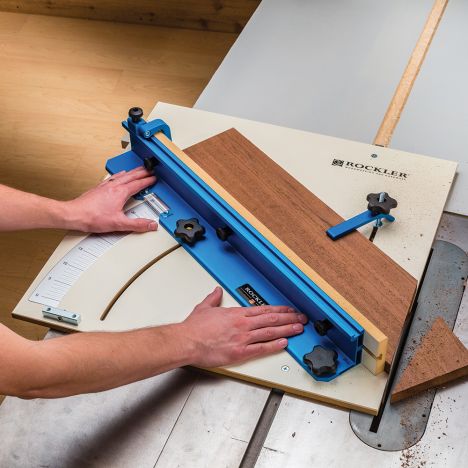
So here I'm finding the exact center of the panel and then marking out where my curve cuts will need to start so that they'll be equally spaced from the center. You'll see why I did this in a minute. Next, I use the flexible ruler to figure out the length of my arc. That way, I'd know where I could stop cutting the curves. Then off-camera, I tested on some scrap until I created a curve that fit just right.
This took a few trial and error approaches, but eventually, I was happy with it. Once I was, I used that test piece to mark out where my curve cuts would end. You're definitely going to want to play around on scrap a lot before you make your final cuts, I had to try out five different blade height settings before I found something that left enough material so that it was thin enough to not snap when it was bent, but thick enough to not tear if that makes sense.
In this shot now, you can see why I did the whole finding the center of the panel thing. Now, every time I reposition my fence, I can make a cut, rotate the piece 180 degrees, make another cut and repeat until I had all of my curves cut. Basically, it's half the amount of readjusting the fence. I should also mention there are online calculators that you can use for determining how many curves you should cut, how far apart they should be, and so forth, but in my testing, the recommendations were too few and it left the corners looking a lot more blocky, so I didn't use them.
Next, I set my fence to 7 inches and ripped the curve cut piece into two strips. I also cut my plywood piece width at the same time, that way they'd all be equal. To attach the pieces, I started off with some glue and a nailer, and this was just to temporarily hold things in place while I worked on the corners. For those, I did basically the same thing, just paying careful attention to keep the corner nice and tight while I nailed things in.
Once that I had dried for about an hour, I trimmed off the excess material. This was a lot easier of an approach than trying to perfectly size the panel beforehand. The last thing to do that day was to attach the three-quarter-inch side panel, again, here with some glue and nails. Then after I had let it set up overnight, the next day I could come back and reinforce everything with some screws.
Honestly, it's probably strong enough with just glue and nails, but I figured an extra little holding power wouldn't hurt. Next, I cut a few more pieces of MDF to size to use as interior shelves. For now, I'm just going to attach one in the center of each of the cabinets with glue and screws. This is something that I always try to do before I attach doors to a cabinet, just because it makes the whole thing a lot more rigid, and it locks the size and shape of everything. Speaking of that, next, I roughed out a few more pieces of plywood that I could use to make the doors.
Similarly to how I made my back panel, next, I'm going to use my actual cabinet to trace a shape onto my doors, and then rough the shape out with the jigsaw, leaving it plenty oversized. Then, I can mount them using the hardware and get everything adjusted and flush trim them again over at the router.
To make some pools, I detached the doors, flipped them upside down, and then use the chamfer a bit to make a little finger hold. Then after a little sanding, I could throw on a few coats of paint.
The next step was to make all of the buttons, analog sticks, and the D-pad. I'd say that by far, the easiest way to do this was by using my X-Carve. That said, it could definitely be done by hand or even just painted on. The only weird thing you might not recognize here is this piece. I'm going to use that as a spacer piece to get the buttons right when I glue things on.
Next, I threw a few coats of paint onto all those little decorations and then I glue them on. While I'm doing that, I'd like to take a second to thank Rockler for sponsoring my channel. Rockler is pretty much my go-to spot for hardware and other things that I need for my projects. Not to mention, they got a ton of really awesome jigs and other tools available, and they're always coming out with new innovative things.
Check them out online or in-person at a store. I'm going to link a bunch of the tools that I use for this build along with some of my other favorites down in the description. Next, I took everything home to figure out how it was going to actually get it to sit next to my TV. I figured that would be easier than taking my TV to the shop. I'm going to start off by building a small box that's going to match the height of the TV stand.
I'm just making these out of some scrap plywood that I had laying around. As you can see in all these shots, it was pretty straightforward. Next, I'm going to rip three long strips, and my idea was that I could set the controllers on top of the box next to the TV, and then use these strips to tie the two together. In this shot, I'm gluing in a few scrap pieces of MDF, and this is what the removable shelves can sit on top of.
They aren't really adjustable, but if I ever need to store anything tall, I can just take them out. The most enviable and simultaneously confounding thing about Nintendo has to be just the way that they conduct themselves. Whereas Microsoft and Sony seem to be always going back and forth in a never-ending arms race for technical spec superiority, Nintendo is happy to meander along doing things its own way. I wonder, is that because they know they can't compete when it comes to things like graphical prowess? Or is it because they just want to focus their efforts on advancing gaming in other ways? I don't know. But in a way, it's not unlike building things on YouTube.
What I mean is, I'll never be as well-versed as Bob, as entertaining as Jimmy, or as fearless as April. I'll never be as good at planning out every little detail as Ishitani is, or as good at not planning them out like Mike and Ben are. I could go on and on making an unending list of an unlimited number of shortcomings that I could judge myself on, or I could focus on the one thing that I am the best at, the area where I do have an unfair advantage, and that's being myself, sexy legs and all. All right. See you in the next one.
Keep the inspiration coming!
Subscribe to our newsletter for more woodworking tips and tricks