Video: Not Your Ordinary Workshop Tour
In this video, David Picciuto gives a tour of his workshop and discusses the process he used to design it.
David Picciuto spent five months building his workshop. This tour will give you an overview of the shop and his decisions on electric, insulation, carpet flooring, drop ceilings, dust collection, noise reduction and new tools!.
You can find more great projects and techniques from David Picciuto at his website.
Featured Tools:


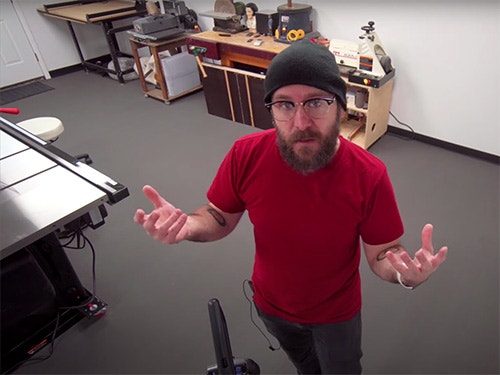
David Picciuto: Today we're going to give you a shop tour of my brand new shop. This is going to be a long one so we're going to make this as quick and punchy as possible, let's begin. We moved this past summer, and so I moved out of the basement shop to this detached garage.
This past year I inherited my father's home, it's where I grew up as a teenager and I auction off that home which helped fund this garage and the new tools. Every day that I walk in here, I am reminded of what he has done for me. The previous owners would park their cars in here but when I saw, I had a vision of what I wanted, bright white clean look, place that would induce creativity, build a place that had video and sound production in mind.
It also needs to be energy-efficient and it also needs to keep the sound in so I'm not disturbing my neighbors or my wife. First thing that we did was Eric and I tore out the walls this summer. That way we could have new electricity, new insulation, and new drywall. My good buddy Jack came over to install the sub-panel. We had to run from the main panel of the house out here.
We installed the panel low, keeping with the clean, white look so I didn't want it at eye level. After all, you don't need to access the panel very much or at least you shouldn't. We have 48 of these 110 outlets installed all the way around the shop, they're all doubled up so we have one side going to one circuit breaker, the other side going to another circuit breaker so I can plug a tool into one, and a dust collector and the other and it doesn't trip the circuit.
These are 20 amp outlets, I just have 15 amp outlets installed but if I ever get a tool that requires 20 amp, all I got to do is swap out the receptacle here. We do have three of these 220 outlets installed for some of the bigger tools. If you are building your shop from scratch, you might want your outlets up higher so you can access them, I wanted mine down low so I don't see them at all, I wanted nice, clean walls.
All the outlets around the walls, they are all for the dedicated tools that are sitting on benches and they will be hidden, the only outlets where I need to access frequently are over at the bench, that's where I'm plugging in the jigsaw and the router and those other tools. All the ones around the walls, those are dedicated for tools. If I need access I can get there it's just not visible.
I also wanted outlets in the floor underneath my bench and over at my table saw, that way I wouldn't have to run cords on the floor or up into the ceiling. To do so, the contractor had to cut the concrete where we ran conduit in the grooves and then report the concrete overtop of that, so that electricity is coming back from the wall. For heating and air conditioning, I had a local HVAC company come out and install this mini-split and this is made by Fujitsu.
When we moved into the garage, the attic only covered half the space. The contractor finished out that attic to build it all the way down and now I have plenty of storage up above. Having this attic allows me to put in a drop ceiling, and this drop ceiling allows me to use these LED lights to light up the shop. We tried to evenly light the shop as much as possible so I don't have to change the exposure as I'm moving through different areas of the shop.
When we record videos in here, we have our camera on manual. We have a manual white balance and a manual iris and a manual shutter, we never change anything and this makes filming and editing so much easier. The ceiling tiles, these aren't just ordinary drop ceiling tiles, these are the super high-end very reflective tiles, and they're also sound-dampening tiles. They're extremely thick, and they're super bright.
Having a drop ceiling in here, allows me to do a couple of things. I can install more lights if I want to, I can install speakers, I can put vents up there, this gives me a lot of options. I wanted a ceiling in here to help control some of the sound and the reverberation. These ceiling tiles are meant to keep sound in, so once again I'm not disturbing the neighbors or Kelly, and up above that there is even more insulation to keep the energy in here.
The only part of the ceiling that still needs worked on, is behind the the wall, as you can see the insulation is up there. There's hole in the insulation right here that allows me access to the attic. Eventually, I'm going to drywall this and still leave a spot to access the attic. These ceilings are 8' 2'' tall, I wanted to go higher but that would have meant removing the entire attic and moving that up and that would have threw me way out of budget.
The contractor told me that removing that attic and moving it up, was going to remove some of the structural integrity of the building and they would have had to do some special things to brace it. We're at 8' 2'', which is a huge improvement over 6' at the previous shop.
Eric: Oh yeah, I can’t my head anymore.
David: In fact, I'm thinking about installing things so Eric can continue hitting his head. All the walls are insulated with very heavy rock salt to keep the sound in and to keep the energy in. We're also using super thick 5' 8'' drywall, and then painted a matte bright white. I wanted a nice bright white to diffuse some of the lighting in here. Eric, how's the lighting?
Eric: Aces.
David: Aces. The original plan was to build a studded wall right here. This was my background from when I'm working at the workbench and the studded wall would wrap around to this wall over here. This is going to be a closet. I was going to access this closet through the garage door, the big garage door on the other side. We were going to remove the garage door, and then build a couple of doors that would swing out, and then you would access this closet here which would be used to hold wood.
One of the problems with that would have been, you'd only be able to access that closet through the outside. In the middle of the project I changed my mind, contractors love it when you change your mind in the middle of a project. What we decided to do instead, was build this sliding wall, and I can access this storage from inside. The garage door is still there, so it still looks like a normal garage from the outside. The track for the door has been clipped, the door is no longer usable and it is locked down.
I still to seal it off with some silicone and put some insulation behind it because it is getting cold and I can feel the draft coming in. I don't need the bigger garage door. Everything that we make as woodworkers needs to fit through a normal door. I will never work with the garage door open because that would interfere with my studio lights and then we would have to change color temperature, and it would interfere with all of that.
The shop does have one window, but again we have blinds over here because we don't want natural light interfering with our studio lights. There's this main door which leads out to the driveway, we got the security, you ain't getting in here, then we got another door that leads to the side yard, which is covered in snow. I hate snow. Eric seems to think snow is fine in December. Eric is wrong.
These are just regular blank doors on a sliding pocket hole, pocket hole, pocket door track, I got pocket holes on the mind. The doors were not long enough, so I just cut up a door and then glued it to the bottom so it would go the full length. There are six of these door panels, they slide all the way down, and I can access the different areas of the storage closet. I have all these shelving units in here behind the door, this is a mess this is not the future of the shop.
Eventually, when I build all the tool benches, most of these tools are going to move out into the shop into dedicated homes, and this is going to be more of storage for materials like wood and acrylics and whatever else, because right now the panels are a pain as I'm working at the workbench and I need to access something in here, and then close it back up and get to the workbench. I need these tools out in the shop so they're easily accessible.
The sliding wall is not done yet. I need to build a track along the bottom so they're not just flopping all over the place and when you do shut it, they'll line up evenly right now it's just. Let's talk about the wallpaper. Since this wall is my background from when I'm working at the bench, I shoot all my intro and outro videos here, I decided to have a little fun with it and put on this stone wallpaper. When you are in here, when you are in the shop it looks super awesome.
On camera, at certain angles, the light hits the black parts, and it looks gray and it looks green screen. This wallpaper actually doesn't work very well. In my last video, we're shooting the outro, and we have that little mid-century modern console up on the bench here, and Eric was trying to tell me, "Hey this is just blended in with the background I can't see it." I'm like, "Whatever Eric, let's just shoot it." Then when I get to editing, I was like, "Oh my Gosh." It's just lost in the background.
The background is too busy, and it looks weird on camera. Also, the camera tries to focus on the background instead of my face sometimes, which isn't cool. This will be changing very soon. I don't want to do the obvious. I don't want to have a wood paneling, I don't want to paint in a solid color, I want to do something different. I'm thinking some textured wallpaper, maybe with a pattern, but not so busy and not a picture pattern. If you have any ideas, please let me know in the comments down below. I want to do something creative and fun. I am going to add a curtain along the track right here so I can pull it shut on those cold winter days. I can keep some of the cold air out. It's like a two-door entry system.
Then on the hot summer days, I can enter one door, go through the curtain. It keeps the warm air or the cold air where it's supposed to be.
Then also reduces the noise back here with this ugly door. We are going to build a charging station over here. My buddy Jack is coming back later this week, we're going to run more electrical in the wall. I have a place to charge my phone, my camera batteries, and all the drill batteries. All right, let's get serious a moment and talk about the most controversial thing in my shop and that is carpet. I really wanted carpet in my shop. Some people think I'm nuts, some people think I'm a genius.
The carpet that we have in here is the same carpet that you would find in an office. This is the industrial carpet made for high traffic. It's only about that thick. This is easy on the feet. It's great for my bad and my bad feet, especially when you're standing in here all day. It helps with the sound, you walk in, with the combination of the drop ceiling and the carpet. It is dead quiet. It's super peaceful.
You ever walk into a carpeted living room with a bunch of furniture and it just feels peaceful, it feels comfortable? That's because the sound is really dead in there. That's what I wanted and here. These are squares. I don't know if this is going to show up on camera, but this is maybe a 16 by 24-inch square. If I do spill something on this, I can replace them. I'm not worried about getting them dirty.
I have enough extra carpet tiles up in the attic to replace all of them. I also have enough extra ceiling tiles up in the attic to replace all of them. Having carpet was the one dream luxury item I wanted for this shop. Yes, it probably doubles the time it takes me to sweep up the place. If I had a broom and this was concrete, still probably take about seven minutes, but it takes me about 50 minutes to run the vacuum, which the tradeoffs are well worth. It. Having carpet also forces me to think about dust collection even more.
When I buy tools now, I buy tools with the highest-rated dust collection and the carpet allows me to see which tools are the messiest and allows me to come up with creative ideas to keep all that dust and chips contained. We're going to talk about that a little bit later when we talk about the tools.
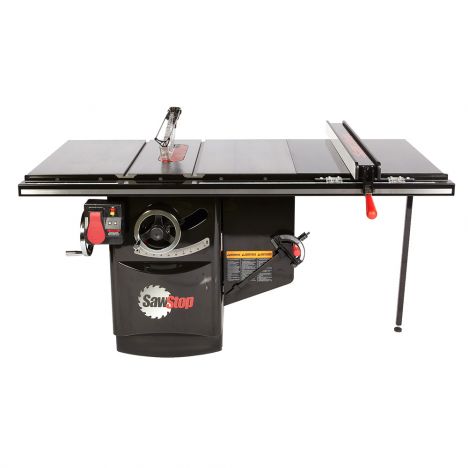
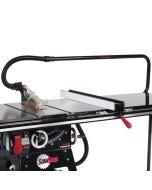
Most importantly is the dust collection with the shop. I want to be able to do this for a long time and I want nice clean air. That dust collection is a work in progress. We got a lot of work to do there yet. Let's start with the main tool in the shop. This is my SawStop table saw. This is the heart of my workshop. This is why it is in the center of my workshop.
Nearly all of my projects go through this table saw one way or another, and this thing is a beast.
As you might remember, I a SawStop at my previous workshop, and this is upgraded. The table size is exactly the same, but what I did upgrade is the horsepower. This is the 223 horsepower SawStop that you can run just about anything you can dream of through this saw. The 1.75 horsepower saw that I had before was perfectly fine. It handled everything that I threw at it, but since I'm in a new shop and I have new upgraded electrical, why not get the bigger model?
Just in case, this is future-proofing in case I need to run some super heavy dense wood through here in the future. The cool thing about this, this has the mobile base. I did not have this at the other shop, the hydro base, and now I can wheel this anywhere I want in my shop, so cool because this thing is massively heavy. Up top, we have dust collection up here as well as the bottom. This is brand new to me. This is the overarm dust collection. This is brand-new from SawStop.
This fits over your piece and traps the dust and sucks it in through here When you don't need it, it easily swings out of the way. Love that really, really good action. This lowers and raises quickly. When I don't need it, I can just push it out of the way. How cool is that? Got the big upgraded fence that moves along nice locks in the position that will not move, cast iron top, cast iron wing, extension table over here. What makes the SawStop table saw so special is not only is its high-quality build, but there is crazy technology in here.
The saw has flesh sensing technology. If you run your finger or any part of your body into the saw, a break slams up on the blade, stops it almost instantly, and then pulls it underneath the table. How crazy is that? This can be one of the most dangerous tools in the shop. This technology is the reason I will never have another saw brand in my shop because I love this. I feel safe around it. It doesn't change the way I work.
I'm still very cautious about kickback and I take safety measures to make sure the wood doesn't fly back at me, but knowing that that flush sensing technology is built into the saw is the reason I have this in my shop, is the reason I purchased one of these saws years ago. I'm going to demonstrate to you how this actually works. I am going to run a hot dog through the blade. Trust me, no animals were harmed in the making of this. This is a veggie dog. Veggie dogs are actually terrible, terrible.
I wouldn't even call it food, but in our house, we do not waste animal-based products. I am going to run this veggie hot dog through the saw with a slow-motion camera so you can see this technology and action. Here we go. Whoa. That's how fast that happens. That is insane. That's the mark on the hot dog. All right. Let's take the blade and the breakout and see what happened. All right. There it is. There's the blade and there's the break. It jams up on the blade and you can see these holes here is what gives away so the blade sticks into the break.
I would have to replace the blade and the break, but it is so much better than replacing your fingers. Am I right? We're going to run counterclockwise around the shop. Everything revolves around the table saw. This is my brand-new workbench. I have a video on making this workbench. There'll be a link to it down below. We're actually shooting a second video, a part two later today on the bench on all the accessories that we're going to add to it.
From there, over here in this corner, this is my Miter station. I have the KAPEX festival miter saw sitting on top of the festival dust extractor. In a few weeks, we are building a table that's going to run the length of this wall. This is going to sit on top of that. It's going to have a lot of drawers for storage and it's going to have a space built-in for the dust extractor. It's going to have the walls so I can do stops for my miter-saw. The reason I have a a miter saw is so I don't have to do all my cross-cuts at the table saw. I can have the table saw fence set up in one position and a cross-cut fence set up in another position and that allows me to work faster. Remember, my goals are different than your goals. I need to work as fast and efficient as possible because we only film one day a week. Eric comes over here on Tuesdays. I need to be ready when he shows up. I don't always come through for him but I need to be ready when he shows up to film so I buy tools that allow me to be more efficient.
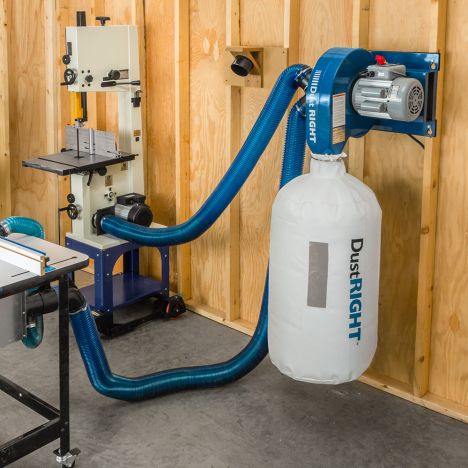
You don't need these bi,g expensive tools. You can do the same thing on smaller tools and you probably try not to work as fast as I am. Moving down here, this is my router station. I have a video on building this router station. It's got dust collection up top and it's got dust collection underneath. The dust collection is going into this router or this Rockler wall-mounted dust collector which currently sits on the floor. I am going to rebuild this. Hey, now. I'm going to rebuild this into the table that's coming out of the miter station so it's one long table.
I'm just going to repurpose this top into that table and it's going to have all the same features and all the Rockler accessories. Moving in this way, this is my lathe which shares a dust collector with the router. The lathe and a carpet, those two things don't go together. You all know that the lathe is a very messy tool. I do have the Rockler dust collector up here which helps quite a bit but as you know chips go everywhere. The plan for the lathe is to remove the base and have the lathe sit on its own bench.This bench is going to have a chip tray built around it that's going to collect most of the chips. Obviously, that's not going to collect everything and you always need to clean up after yourself but that's the plan for the lathe. Maybe someday, I want to get something a little bit bigger because I can't even do a full-sized table leg on this. I can't do a baseball bat on this. Those are a couple of things that I want to do in the future. Probably, get a new lathe. Don't know. I haven't done any research. Let me know what I should get.
Over here in the corner is my JET drill press. As I've said before, it's a great drill press although there's some features on it I don't like. I really disliked the depth stop and the keyed chuck slips a lot on it. Maybe that's my fault, maybe not but those things could be improved. I have it shoved in the corner. It is on wheels if I need to move it out. Again, like the lathe, the drill press is a messy tool and chips go everywhere. I've looked at the dust collectors that go around here and the reviews on them are not so great.
What I plan on doing is building a little corner table that goes back here and this also has a tray that catches all the chips that I can sweep up or vacuum up. That is the plan. Then, there would be storage underneath here for various things and stuff. Moving along this way. Along this wall is going to be another long tool bench that goes almost all the way down and it just gives me more places to work and places to set some of these tools. This right here, this is my old drum sander this. I got a new one.
We're going to talk about that in a second. This one is going to my buddy Bob, is my old workbench. It is currently doubling up as a tool stand for my 12-inch Harbor Freight disc sander and my Harbor Freight spindle sander. As I mentioned before, we're going to build a tool bench that runs all the way down, and then these tools will sit on that. Then, this is actually getting moved into the car garage for various things. Up above there, we have the TV.
Sometimes, I project my notes to the TV but mostly we just use it to play Apple Music, hip hop, old-school metal, hair metal, whatever we want to listen to. Like I mentioned before, there's the heater up there. I got the shop Elvis, got the Jimmy D over here. We're moving along, moving along. This is my brand new drum sander. This is one of those tools that is not necessary but I tell you what, it speeds things up tremendously. I had that old drum sander over there that I'm giving to Bob. This new one is way bigger.
This new one is a lot bigger and I can do a lot more pieces at the same time. It also automatically adjusts the feed rate if it feels like there's too much pressure on. There's some cool features on there. This is the SuperMax 16-32. Then, again, there's another Rockler wall-mounted dust collector underneath there. I don't know if this is going to sit on the bench that I'm building along the wall or if it's going to have its own little stand that pulls out. I think it needs its own little stand that can wheel out for bigger pieces.
Then, over here, this is my Inventables X-Carve, the CNC 3d carving machine. This is the 1000 millimeter version. It's the bigger one. Moving along this is a door to the side yard full of snow. Yuck. New tool time. Over here, this is my brand-new Laguna saw. This is the 14-inch. You might remember my previous saw which was the Grizzly 14-inch. I sold that. Actually, I gave it to my buddy Jack who did the electricity here in the shop. I got this. I can go way bigger on resawing. Look at this, look at this.
I can throw some big pieces of wood in there. This is the 220 version. I have a big 3/4-inch blade in there. This is dedicated just for resawing. Then, to the left of that, I have this little Rikon 10-inch saw. This is dedicated just to cutting curves. You do not need two band saws in your shop but like I mentioned before, I'm trying to work as fast and as efficient as possible, keeping safety in mind, of course. Having two band saws allows me to do resawing and curved cuts without blade changes.
Now, that I have the room for it, this works out great. It really speeds up our video-making process, I have a 3/16" 4 TPI skip tooth blade which is my favorite blade for cutting curves. I think this is going to get moved over to the other wall once I get that tool bench set up because I don't know-- It's not hooked up to any dust collection right now and it doesn't really fit the space. To the left of this is my Glowforge laser cutter. This is sitting on top of my super old outfeed table. This is the first outfeed table that I built.
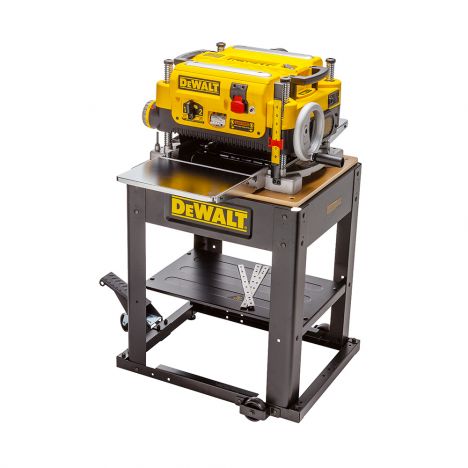
Eventually, the Glowforge is going to go over there. I'm going to put a jointer in over here. I want to get an 8-inch jointer. I haven't done the research. I don't know which one to get. If you have any 8-inch jointer recommendations, let me know in the comments down below. Then, working back over here, this is the electrical panel that we talked about and the door to the driveway. It's snowing.Then, to the right of my table-saw, I have my brand new 16-inch Rikon planer. This thing is huge. It is 220 and it is a beast. This was great for making my benchtop. I wanted a much bigger planer to help speed things up. Previously, I had the DeWalt. Whatever that was, a DeWalt with something X version. That thing worked perfectly fine. I highly recommend that DeWalt planer. It works great for everything that you want to do.
I just wanted something a little bit bigger so I can run multiple boards through it at a time. Like I said, I'm trying to work as quickly and as efficiently as possible. The cool thing about this planer is-- I'm going to have Eric come around. We're going to show off the Helical cutter heads. Inside here, instead of having three knives, there are 18.2 million knives in here and they're all carbide-tipped. This leaves a super smooth finish and is way quieter than a typical planer.
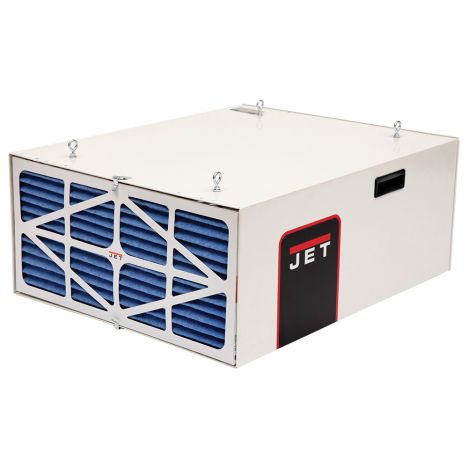
Like I mentioned before, sound output is very important to me. I want to keep the shop as quiet as possible. When these tips get dull, all you got to do is loosen them and you turn them a quarter of a turn and they will last a few years. This thing is a beast. I am loving it. We talked about dust collection for your tools and we all know those dust collectors don't collect the fine dust that gets up into the air. I highly suggest a dust filtration system. I have this JET here which I don't have set up in my shop yet.
A cheaper option than that is just get a $16 box fan with a furnace filter that you can tape on the front and have these throughout the shop. This is going to circulate the air and get that fine dust that's moving around and can get in your lungs and actually cause health problems down the road. We want to be safe. I'm going to strategically place these in the shop. I think I'm going to permanently mount one on the wall here or maybe underneath the outfeed table so it's out here, I haven't decided yet. The bandsaw produces a lot of fine dust that gets in the air, and then over at the table saw, you've seen me in the past at the old shop, I would have one of those fans sitting next to my fence. Now that I had this over arm dust collector that gets in the way. I found that a lot of that fine dust gets back way over here.
I think I'm going to have a fan sit back over here that's going to collect some of that fine dust. Then maybe one on the other side of the room. Definitely want to have another one up here where the spindle sander and the disk sander is because that also produces fine dust that I don't want in the air. It's more important that you collect the fine dust than the big chips. The big chips just make a mess. It's that fine dust that you breathe in and gets in your lungs and you don't want to have health issues down the road.
After all, we want to do this for a very long time. This is the outfeed table for my table saw and since I've upgraded the table saw-- the table saw is actually the same size but it has a mobile base which makes it up higher, and so my outfeed table no longer fits it. To make a brand new outfeed table that has a lip that will catch over and butt up against here. It'll be the exact size, the width of the table saw and it's going to have drawers. I don't like these big doors because what happens is you just store junk in there.
I know drawers can be messy, so my drawers are going to be lined with that foam and it cut out for all the tools. Everything in my shop is going to have a dedicated home. When you have drawers where all the tools have a dedicated home, it makes cleanup so much easier. Eric, follow me around to this other side. Down below where I currently have my dust collector, I'm going to build a little cabinet thing where the dust collector can slide out so I could change the bag. Then probably a little drawer here for some of my table-saw accessories and. Then I'm going to build a little slide over here or somewhere to store my crosscut sled. That's the plan underneath here.
That is my new workshop. What works for me might not work for you. This dream shop was designed for me. When you're designing your dream shop, you'll probably do something a little different. After all everybody has different needs and different goals. I am very much looking forward to hearing what you have to say. I want to know what you like and what you dislike? What other things could I do to improve this? What would you do to improve your shop? Let me know in the comments down below.
I'd really like to reiterate that you don't need all these big fancy tools that I have to make the projects that I'm showing you. Many times you can use something smaller or alternative tools. I buy tools that make me more efficient so I can produce more videos quickly, and of course, safely. It is my job to inspire you and it is your job to be inspired and use what you have. If you're curious to learn more about the tools that I use, I'll have links in the description down below to all the tools that we discussed in today's video.
A couple of other notes about this shop, there is no central dust collection. I did not want ductwork running all throughout, that is why I have the wall-mounted dust collectors spread out throughout the shop and dust extractors and shop backs because I want to keep that nice clean look. I don't want to see ductwork running through my ceiling. The plan, for now, is to keep all the walls nice and clean and bright white. In the future, I'm sure I'm going to start hanging some decor on the wall.
I might start with that wall over there and just flood it with artwork but right now I'm really enjoying the nice clean look. I'm putting this horseshoe up above the door for good luck. When I was a kid my father found this horseshoe in the ground while digging in the yard, he then painted it an orange for Cleveland Browns and it was meant to be good luck, so I have brought it here into my shop.
This is the first thing to hang on my wall. .For now, it's going to be the only thing that hang on my wall in memory of my father who made this possible. It's probably not obvious in the videos but my shop, the floors are really really uneven. It's like a pitcher's mound in the middle and then it all grades out. This was supposed to be a garage floor so when you park your car in here on a snowy day, all that water goes to the edges.
It was actually supposed to grade out to the front but I think they poured it wrong because it's just high up in the middle. Then all my workbenches, all my tools, they all have wedges underneath them to level them out. I would like to thank one of my best friends and good buddy, Jack, for helping me out with the electrical.
Keep the inspiration coming!
Subscribe to our newsletter for more woodworking tips and tricks