Video: Offset Handle Nesting Trays
In this video, Michael Alm makes a set of three nesting trays with offset handles.
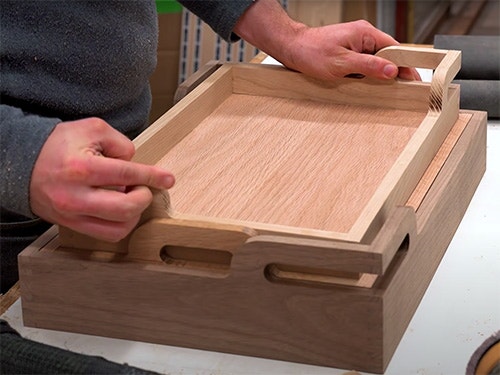
Similar to nesting drawers he has made in the past, Michael Alm builds a set of three 20" x 13" x 4.25" nesting trays that test out his Shaper Origin router.
You can find more great projects and techniques from Michael Alm at almfab.com
Featured Tools:


Michael Alm: If this project looks familiar, it's because I built a very similar version of these offset handle nesting trays about a year and a half ago. I really like this design a lot. I've had a lot of requests for plans for it but I haven't put out plans because honestly, the first set were really just a prototype. I wanted to figure out how to build it out of solid wood because the last ones were plywood and the building methods are a little bit different. I redesigned the trays from the ground up. The main thing that I was looking for was for that nice piston fit. I figured out how to dial it in perfectly. Let's get started.
The plans for this build are free for everyone, thanks to the nice folks at Shaper who sponsored this video. I'm going to be building the project with Shaper Origin, but the plans include templates if you want to make them the way that I did in the first video, or you can use the files on any type of CNC you may have in your shop. The other big announcement is that starting today, projects on ShaperHub are now available for anyone to download. This is awesome. They have tons and tons of build projects that, up until this point, you had to be a Shaper owner in order to access them. Go check out ShaperHub after this video and find loads and loads of free projects.
For the three different trays, I'm going to be using three different hardwoods. I went through the racks in my shop and I found some ash, some oak, and some walnut, and I think they look really good together. One of the keys to making sure that these nest properly is that they are exactly 1/2 an inch different between each tray height. I just double-checked that real quick before I moved on with the milling. Once they were right, I could trim them down to size.
I used a scrap piece of 1/2-inch MDF to set up my fence. I want it to be slightly loose because I'm going to sand it to fit later, and then I can set up to rip the board to thickness. I'm installing a feather board here. This just keeps it nice and tight to the fence, and I do the cuts in multiple passes, raising up the blade until I get to the point where I can split the board completely in two. With the boards roughly to thickness. I could then refine them on the drum sander, get them exactly the same size as that piece of MDF.
The next step is to cut the sides to length, and honestly, this is optional. The CNC files include the cut path to cut them to length properly but what I like about doing it this way is it speeds up the process. The table saw is designed to do rip and cross cuts. A router can do it, but it's not going to be as quick. This will also relieve some strain on the bit, so I'm not cutting through nearly as much material.
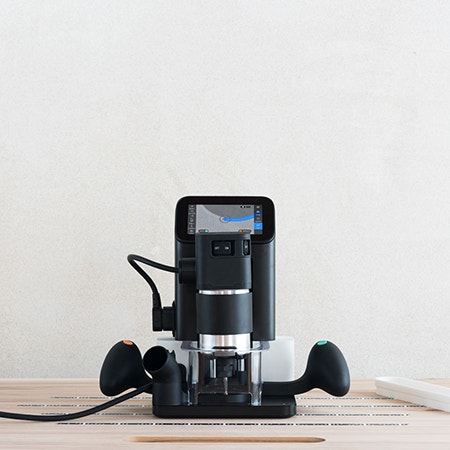
The next step in this build is to bring out Origin and start CNCing this out. I have a full video on how to use Origin, so if you haven't seen that, go check it out. If you're curious about how this crazy contraption works, it's really cool. It's basically a handheld CNC, and there's a bunch of different ways to use it and I'm actually going to be using it in a way that I didn't really show off in the other video. I'm starting off by building a grid, and it's using the domino-shaped tape in front of it to find where it is in space. Then I can go into the ShaperHub website and download the files that I want. It downloads them directly into the machine, which is super cool, and then I just select the one that I want and set it up on the grid.
In this case, I'm just cutting it out of a scrap piece of MDF because I want to make sure that my measurements are right and make sure that I placed everything correctly. It was a good thing that I did because I messed something up. Sorry, I made a mistake. This is set with the bit size on this side of the line, as opposed to on that side of the line. On that side of the line is where I want it, so it's cutting about a bit size wider than it needs to. I got to fix that and then try it again.
After the second test, the workpiece lined up perfectly with the test cut, so I knew I was ready to go. All I need is a couple of pieces of double stick tape to hold it into the jig and now you can see why I wanted to make sure that that piece was exactly the same height as the MDF because I don't want Origin to bump into anything while it's running along the tool path. I'm using a 1/4-inch bit on this, and because of that, I can only go about a 1/4 inch deep with each cut. I'm doing the cut in two passes. This just makes sure that the bit doesn't burn out. The results speak for themselves, super clean cut. With the first one under my belt, I was ready to start batching them out.
I was so excited when I cut the first one out and it worked out perfectly that I totally forgot to cut out the stop dado for the bottom of the tray. I'm going to do that real quick on this tray side and then go back to the other tray side. I'm cutting this out with the 1/4 inch bit still. I just go to a 1/4 inch depth and it's just one run and it's all good, I don't have to go back over it or anything like that. You can see it came out great. The cool thing about this style jig is that it's basically a registration mark. I can just take that piece that I forgot to cut out, re-register it in that panel, and then cut it out again and it's exactly the same.
Another cool thing about setting up a grid on Origin is that you can use that grid over and over and over again. All I did was I took the second file that I needed to cut out and inserted it into the same grid, registered the new piece on the same mark, and it cut out perfectly. The middle tray has a centralized handle, but again, I'm using the same grid, the same registration mark and, again, it makes it really easy to batch these things out super quick. The long side of the middle tray doesn't have any handle elements in it, but it still needs a stop dado track. I registered that in the jig and cut it out.
The middle tray, the smallest of the three is, essentially, a mirror of the outer tray. This is cut out basically the same way as the walnut one was. With all the sides cut out, I decided to shift gears over to the bottom panels. These are going to require a bit of glue-up time, so just to keep things rolling, I decided to do these now. I resawed them down to a little bit over 1/2 inch. I'll sand them down to 1/2 inch later and then I use my Rockler Sure-Foot clamps to glue them together.
With the panels drying, I can go back over to Origin, swap out my bit for an 1/8-inch bit. I'm cutting the finger joints now and I want to make sure that I have little bit of play.
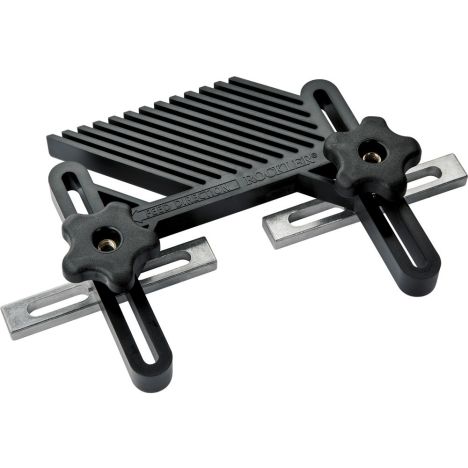
I'm cutting 1/4 inch finger joints, so an 1/8-inch bit allows me to set it in from the line and then cut a final line later. In order to support the materials while I'm cutting them, I'm going to be using the Shaper Workstation. This is their fixturing platform for Shaper Origin and it's a really cool tool that I am just learning how to use. There's a lot you can do with this. You can cut tenons and mortises. Maybe that's something that I'll save for another video. If you're interested in seeing a video just on Workstation, let me know in the comments down below.
Origin has a setting for making box joints and it does all the math for you on the machine, which is super cool. All you have to do is set in what your bit diameter is, the thickness of your material, the width of the material, the total number of pins that you want and it does all the calculating for you. The other thing is that you even incorporate a glue gap which is something that's cool that you can adjust as you need to and it'll take just a little bit off of each pin as it goes. These settings, I've tested out before. This is what worked really well for me on the test cut. I also already set in a grid as as well. I'm just going to lock it into place. I won't need to change this. The only thing I'll have to do is swap out between the A pins and the B pins. As I mentioned before, I'm going to be cutting this in two passes, one is just a roughing out pass and the other one will be the final cut. One cool thing about cutting in grain like this though is that you can cut at full depth. I'm just doing one cut full depth with the 1/8-inch bit and it worked great.
As I went to cut the upper end of the handle, I noticed that I was getting some chatter, some really weird noise. I went and investigated and found that it was just a little bit too springy. The solution for that was just to move the clamp over to that thinner section. This was enough to stabilize the entire piece and I use this clamping setup for the rest of the cuts.
After finishing the roughing pass, I set the offset to zero and then did a final cleanup. The cool thing about this setup is I don't have to change anything on the machine. I just flip the piece over making sure to register the same side and then I can cut away. You can just choose how many pins you cut. Since this one has fewer pins, I just didn't run the full tool path. Switching from the long sides to the short sides, all I have to do on the machine is switch from the A pins to the B pins and then start cutting again. Once again, when I switch from one tray to another it's still the same settings. I'm just paying attention to which sides need the A pins which sides need the B pins and how many pins I need to cut.
Whilst cutting the box joints, the bottom panels had plenty of time to dry so I popped them out of the clamps and start sanding them up.
I then cut the panels to size. I'm cutting these about a 1/16-inch short because I want to add a little bit of room for expansion and contraction. I swapped out my table saw blade for a flat grind blade so that I could cut out the rabbets around the outside of the bottom panels. I'm setting the blade at a 1/4-inch depth and I'm going to be cutting out basically a 1/4-inch by 1/4-inch rabbet. I need the top to be a 1/4 inch to fit into the slot and then the depth is about a 1/4 inch as well. This is a pretty simple way to do it. Just setting it up with a feather board. I do have to do two passes because my blade's only an 1/8 inch thick.
At this point, all the parts are cut so it's just a moment of truth to see if everything fits together.
Remember that first pin that I cut that was a little bit wobbly, left a bit of a gap on the glue-up but that was easily fixed with a scrap piece of walnut. Once the trays were dry, I popped them out of the clamps and sanded them up. They were looking really good, but I had a [chuckles] little bit of a snag. I was hoping that my calculations would be dead on but they ended up being a little bit tight. It was not great. The middle one could fit in, but the center one just wouldn't fit in at all. After puzzling over it for a second I decided to take the trays over the table saw and make them just a little bit smaller.
In the end, I think this is actually a really good way to build these trays. Completely by accident. I was hoping just to nail it on the first go, but this way I could sneak up on the cut and just get it exactly to where I want it so I can get that nice piston fit.
Now that everything is fitted properly, I can start sanding. I don't love sanding but I've got a couple of techniques that help it go by a little bit quicker. I know I need to sand inside of those handles. For that, I'm going to make this little apparatus out of a dowel, some tape, some CA glue, and some really heavy grit sandpaper. I think this is 80 grit. I can then chuck that up into my drill and use it like a spindle sander.
The blue tape lets me hold on to the end of it so I don't scratch up my fingers and the drill allows me to just adjust the power as I need it. I can get those inside curves and those outside curves and remove any burn marks that might still be on there. The last design element to this build is to round over the box joints. This is obviously optional, but I like it a lot because it mimics the interior of the handle, all the rounded edges that are already on there, and it also shows off the joinery. After that, it is back to sanding and getting it ready for finish.


Keep the inspiration coming!
Subscribe to our newsletter for more woodworking tips and tricks