Workshop Rolling Clamp Storage Cart
When pressed for a solution to storing a large amount of clamps, Ian Kirby built this rolling shop cart for his friend.
The old maxim "a place for everything and everything in its place" is wisdom that applies to all facets of our life, but it's essential in a workshop. Whether your workspace is large or small, storing your tools and materials in an orderly and efficient manner not only makes your projects easier to accomplish, but also increases the level of enjoyment you will experience — even if it is only by removing the certain frustration that a poorly organized shop will engender. While the focus of this article is an ultra-simple storage cart for my specific collection of clamps, the principles I used to determine how to go about designing this cart are universal. To prove that point, Woodworker's Journal editor in chief Rob Johnstone had me design and build a storage cart for a more diverse set of clamps (for my friend, Matt). But first, some thoughts about shop storage in general.
Wood Storage
Wood enters the shop in long and wide or narrow planks. Woodworking is the act of converting it into stuff at one end of the spectrum and objet d'art at the other, leaving behind quantities of irregularly shaped pieces of which no two are alike. Woodworkers are notoriously reluctant to part with any piece of it, and without some means of storage the casual observer might be forgiven for mistaking a workshop for a woodshed.
Tool Storage
Unlike the relatively straightforward techniques of tool practice, tool storage poses problems unique to each woodworker and workshop combination. Every shop is a different shape, every inventory of machines and tools is different, and each woodworker has different interests or is at a different stage of development.
For the clamp storage cart diagram and materials list in PDF format click here.
Chances are, we've all seen fancy toolboxes that look like museum showcases, with a place for everything and everything in its place. What you never see in them is a tool essential for making furniture: clamps.
Clamp Storage
Having dug myself into a hole by drawing attention to inherent difficulties of clamp storage, allow me to begin climbing back out on an historical note. During all my early years of woodworking in England, my coworkers and I used just two types of clamps: we called them sash cramps and G-cramps, but from here on I'll use American parlance — bar clamps and C-clamps. You can see that they wouldn't present much of a storage problem. Sash cramps were so-called because they were used by joiners to make window sashes (frames).
I still use the same type of bar clamp today, although I have replaced C-clamps with "fast-acting bar clamps."
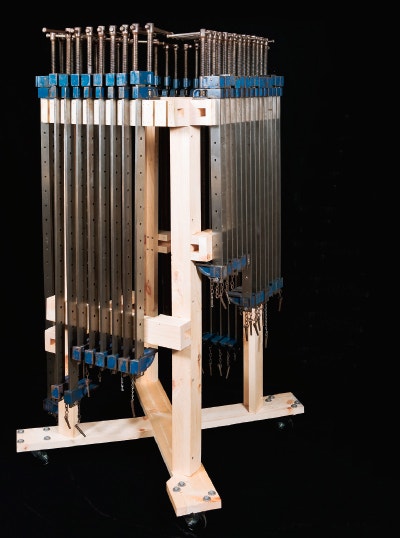
Building Materials
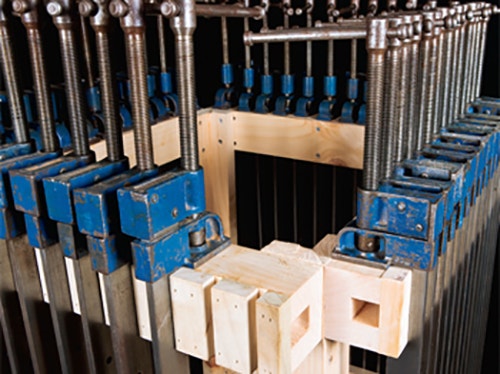
Sheet material makes as effective a tower as a frame, and I happened to have some 1-1/8" thick MDF. Had it been 5/8 CDX plywood, the outcome would have been the same. Matt had some Record bar clamps and, since the company is no longer in business, he won’t be buying any more. To extend his range of bar-type clamps, he had invested in some Rockler pipe clamp heads. They are designed so that the screw handle clears the bench as it turns. The casting that keeps it off the bench is thickened at the foot. I don't know if it was intentional from a storage point of view, but a carrier with a rabbet on the inside provides for easy hanging.
The bar clamps and fast-acting bar clamps hang on four crossbeams.The beams were cut to length and fitted with 1/2" x 3" x 5" plywood pads screwed to each end.The beams were positioned by placing one of each clamp on the MDF at the desired hanging angle. Once the beams were screwed to one side, the assembly was set up on the second side.The two sides were aligned using a purpose-made wooden try square, simply two pieces of wood clamped together at right angles.The blade went from the top side to overlap the bottom MDF by 1/2". Once in position, the pads were screwed in place. The carrier for the Rockler pipe clamps was screwed to one side and the carrier for the quick grip clamps on the other.
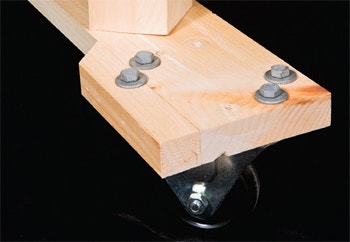
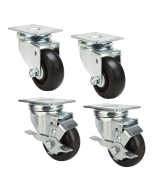
The wheel supports were drilled to accept the casters, one pair swiveling, one pair not, and attached with nuts and bolts. Rather then screw the wheel supports into the edge of the MDF, I opted for a more secure connection by gluing and nailing a softwood gusset across the bottom edge and screwed the supports into that.
Wall or Rolling Rack?
I recall reading an article on workshop organization that said a roll-around clamp rack in a small shop was worthless. My advice is, don't dismiss the idea until you have explored it. I’ll return to the alternatives later, but first I'll present the roll-around rack that I built for my collection of bar clamps.
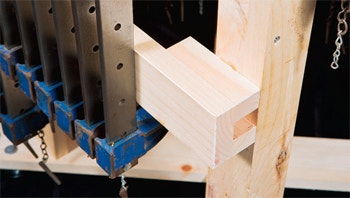
This rack is made from softwood boards I keep for making mockups and other oddball jobs. The stock is 1" thick, but 3/4" would do just as well. The four 46"-long wider uprights are pieces 2-1/2" wide glued and nailed to four narrower upright pieces 1-1/2" wide to form right-angled posts. The posts are held in place by the clamp carriers and kickers, which also act as rails.
My clamps have two different bar thicknesses — 1/4" and 5/16" — each with a different shoe size. This means the carrier rails are two different widths to accommodate the clamp shoes, as are the spacer blocks in which the bars are docked.
In each case, the backboard is 3" wide with a pair of land pieces nailed onto its top and bottom edge. The 1/4" bars need 1-1/16" lands added to the backboard; the 5/16" bars need 1-5/16" lands. The clamps are docked between spacer blocks 3/4" thick, but they are different widths relative to the different sizes of clamps.
The bottom kicker rails are made to the same dimensions as the carrier rails and screwed to the uprights. No spacer blocks are required to hold the clamps apart. The tower is screwed to a frame made of two 4" x 40" crosspieces that are joined by a glued cross-halving joint in the middle. The wheels are attached outboard of the tower for stability with 5/16" x 1-1/2" bolts. One pair of casters swivel; the other pair is fixed.
I learned the hard way that, unlike the swivel casters, the two non-swivel casters must be mounted parallel to each other aligned with one side of the tower. An additional piece is glued and nailed to the ends of two crosspieces to accommodate this requirement.
The method for storing my bar clamps is common to all bar or pipe clamps: they rest on their moving heads held laterally by spacer blocks. The amount of space required to hold your collection is easy to calculate and is the same whether you use a tower or a wall. Simply measure the casting and the amount of space required between each shoe.
Other Clamp Storage Options

As I said, my C-clamps have been replaced by fast-acting bar clamps. It so happens that they have "natural storage" in my basement shop in the form of herringbone braces, an early method of stabilizing floor joists. The clamp arm sits securely on a piece of angled 1" x 3". The clamps are above the workspace but readily within reach.
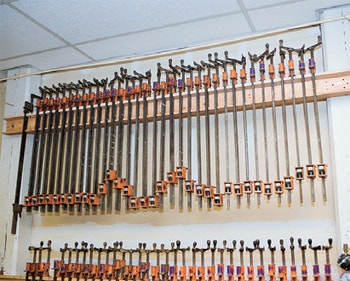
While that solution is sufficient for me, it is unique to my situation. In my larger professional shop, we store the large collection of traditional pipe clamps on wall racks. In a large shop setting this makes perfect sense, as most of the large machinery is located in space to accommodate our production and workflow. In smaller shops, it is my experience that wall space is precious and that machines are often located on the wall. It is for that reason that I take a contrary view to the earlier expressed opinion that a rolling clamp cart is impractical for the small shop. Experience tells me that the opposite is true.
Storage of spring clamps and band clamps is less of a problem because their size is small enough to fit in a drawer or bin. Generally, I find these to be of little use to a furniture maker, but they’re essential for a musical instrument or model maker.
Expanding Clamp Varieties

While I still have my C-clamps, I have in practice replaced them with fast-acting bar clamps, a product not available in my youth. And that is a good example of "new" clamp styles that are being developed all the time. These newer styles of clamps do bring with them a whole new set of storage challenges.
As they migrate into your shop, I suggest that you take the time to figure out their place and put them there. Remember the old maxim ... it will serve you well.
Keep the inspiration coming!
Subscribe to our newsletter for more woodworking tips and tricks