How to Make a Twelve-piece Puzzle
This fun little project puts together a few different woodworking techniques and only takes an afternoon to make.
Kids today are excited by ultrarealistic video games and 3D movies that take them into virtual worlds. But, put a classic picture puzzle in front of these junior cyber wizards, and they might just do the same thing we did when we were their age: dump it out and start shuffling the pieces together. There's something about an old-fashioned puzzle that can still captivate kids, especially if you start them young.
For the Puzzle Exploded View and Materials List, click here to download the PDF.
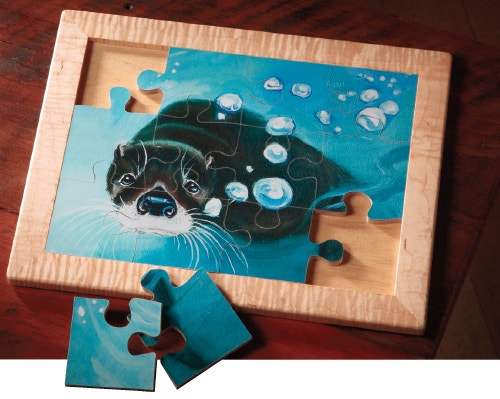
This beginner's puzzle is sturdily made and simple enough to keep a little one engaged but not frustrated. We're using the otter image shown here by permission; it's from a book titled Saving Squeak: The Otter Tale, by Jennifer Keats Curtis (Schiffer Publishing, 2010 ISBN 978-0-7643-3588-4), it was illustrated by Marcy Dunn Ramsey.
Applying the Puzzle Grid and Face Image
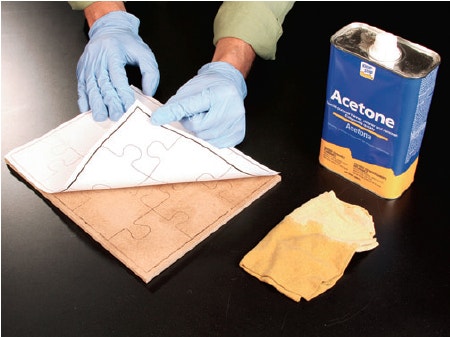
Quarter-inch-thick MDF makes a good substrate for the puzzle pieces, because both faces are tempered and smooth and there's no risk of splinters. Cut an 8-1/2" x 11" blank (piece 1) to shape. The basic process to prepare the puzzle pieces for cutting involves applying the puzzle grid to one face and the main image to the other. Your first inclination might be to spray-mount or glue them both in place, but I'd like to suggest a different approach. If you affix the puzzle grid paper to your substrate, you'll probably want to sand it off when you're finished. That’s a tedious and unnecessary job. All you really need is the outline of the shapes anyway, and here's how to get it: Print out the grid using a laser printer. Then, position it print-side down, and wipe the back of the paper liberally with acetone. The solvent will release the black toner onto the MDF and transfer the grid. If you have an ink-jet printer, you can accomplish the same result using special inkjet transfer paper (available from craft stores or online) and ironing the printout with a household iron set to high heat.
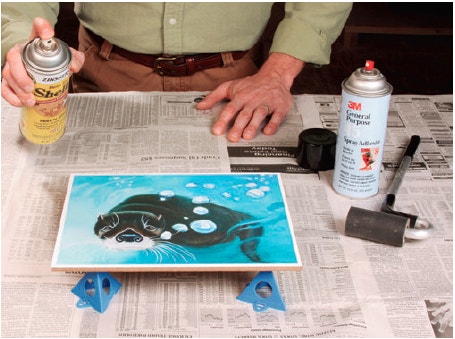
With the grid applied, flip the puzzle blank over and mount the face image. I used spray adhesive, but you could also brush on a thinned washcoat of white or yellow glue. Flatten the image with a J-roller or a piece of scrap wood wrapped in a towel. When the adhesive cures, spray aerosol shellac over the face to seal in the image and stiffen the paper fibers. It will help prevent tearout during the cutting stage. I applied three light coats.
Trim the puzzle piece blank to its final size of 8" x 10-1/2" now.
Cutting Out the Pieces

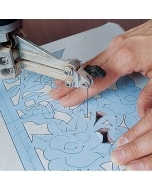
Ragged edges are the enemy of these puzzle pieces, so I took two preemptive measures: First, I drilled a tiny hole in the center of a large piece of scrap plywood to act as zero-clearance support around my scroll saw blade. Stick this backup board to your saw table with a strip of double-sided carpet tape.
The contours of these puzzle piece shapes certainly aren’t intricate fretwork, but I still selected one of the finest-tooth blades available for my saw. It left clean, crisp edges on both the top and bottom faces of the pieces — exactly what I wanted. Instead of cutting the puzzle pieces out one at a time, I sliced off a row of four from the larger blank and cut the row apart. Just bear in mind that it's more important that your puzzle pieces have smooth, flowing edges than that they follow the pattern grid exactly. Keep the puzzle stock moving through the blade in one continuous operation, and don’t stop. Hesitation can lead to rough edges.
Making the Frame Parts
The puzzle's frame consists of a base piece of plywood or MDF wrapped with rabbeted and mitered rails. Cut your base (piece 2) to size. I made mine about 1/32" larger in length and width to provide a slightly looser fit around the puzzle pieces when they are assembled. Sand the faces of the base up to 180-grit.
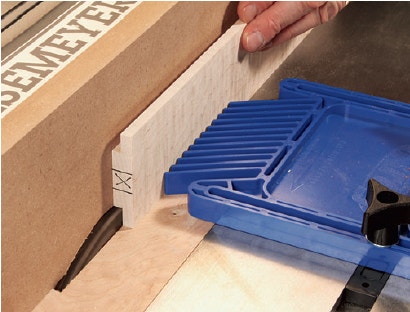
The long and short frame rails (pieces 3 and 4) are only 1/2" thick and 1" wide, and they require a 1/4" x 1/2" rabbet to fit around the base. That’s not a lot of stock between you and a spinning dado blade. So, I made my rails from wider material for safety and ripped them free. To prepare the saw for milling the dadoes, I buried my dado blade partially into a sacrificial fence clamped to my saw's rip fence. Raise the blade to 1/2" and extend it 1/4" out from the fence. Install a featherboard in the infeed side of the blade to keep the rail stock pressed firmly against the fence when you make your cuts. I also used a thin push stick engaged in the shoulder of the rabbets to feed the wood over the blade. After rabbeting, cut the rails to final width.
Fitting the Mitered Rails
When it comes to fitting mitered corners, no matter how large or small, I wish I knew some magic tricks. I don't. My method is to make a few test cuts on scrap to dial my miter saw carefully to 45°, then mark and cut the pieces one at a time. I tend to work my way around a frame so I can cut and fit each joint in sequence. The last corner is never easy, but make the fourth rail a hair longer than needed, and creep up on the final joint with your miter saw or with a disc sander.
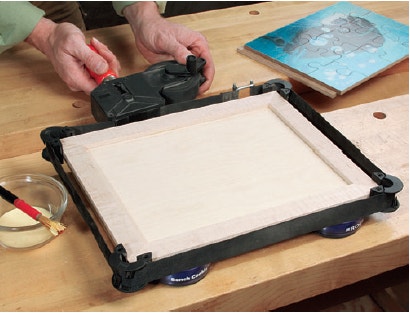
Spread glue on both the rabbets and the edges of the frame base, and install the moldings with clamps. I have a small band clamp with corner fixtures that make this job a whole lot easier! I clamped up the entire assembly at once and adjusted the corner fixtures as needed until the joints closed properly.
Finishing Things Up
My puzzle's frame stock is curly maple. To "pop" the figure, I sanded the wood up to 400-grit and wiped it with boiled linseed oil. It really accentuates the depth. Once the oil dried, four coats of spray lacquer wrapped the project up. Now, all I have left to do is give this puzzle away ... that is, after I assemble it a few times myself.


Keep the inspiration coming!
Subscribe to our newsletter for more woodworking tips and tricks