Shop Sandpaper and Abrasives Shelving Organizer
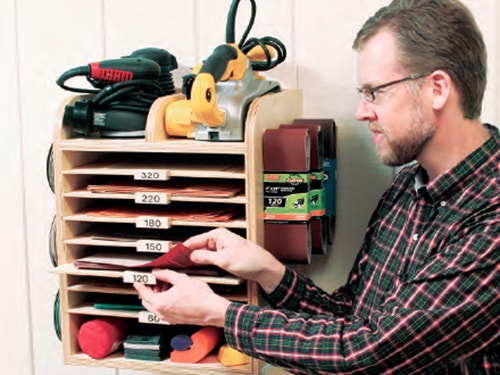
To keep different grits and types of sandpaper organized in your shop, this simple shelving unit fits perfectly.
Chalk it up to laziness, but I used to keep my hodgepodge of sandpapers in an old Girl Scout Cookies® carton. When I finally got tired of scrounging through that jumbled mess, I designed this all-in-one organizer. It has pegs on the sides to hang six different grits of 5" sanding disks and 3 x 21 belts. Seven pull-out trays work well for stacking flat sheets. There's room on top for storing two or three sanders and a cubby down below for sanding blocks and other supplies. I mounted a hacksaw blade to the lower right side for tearing full sheets into smaller pieces. Drive a few screws through the back to hang this project on the wall.
For the Sandpaper organizer Diagrams and Materials List, click here.
If you've got a box full of mismatched abrasives like I had, here's how to build this easy organizer for your shop.
Making the Carcass
After the design was agreed upon, I began by selecting lumber for the seats, the component that literally holds the chair together. When you have a whole tree's worth of lumber, that task is a bit daunting. The surfaced 8/4-boards (2"-thick) that would compose the seat blanks needed to be more than 8" wide so that I could glue up the blank to a minimum of a 17" wide piece.
As these seats are one of the main visual components of the chair, I took great care to select stock that had attractive grain that would be complemented further as I shaped the chair seats. Cut the pieces to 18-1/2" lengths and then glue up the seat blank, taking care to align the pieces as perfectly as you can. After the glue cures, cut them to the exact size, and then sand them flat, up through 220-grit.
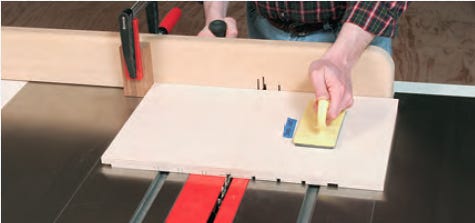
Start the project by making the side panels (pieces 1). Cut two plywood blanks to overall size, and use a 3/4"-wide dado blade to mill rabbets along the inside bottom and back edges. Reset your dado blade width, as needed, and plow dadoes for the top and the seven trays. I milled these slots using a long fence attached to two miter gauges, with a stop block to index all of the cuts.
Once the joinery is done, fire up your band saw to round over the top front corners of the sides, then move to your drill press to bore the nine through holes for the disk and belt pegs (pieces 2 and 3). Cut the pegs to length, and glue them into place.
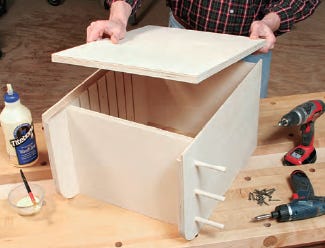
Rip and crosscut the top, bottom and back panels to size (pieces 4 and 5). Sand all the project parts up through the grits to prepare for a glue-up. Now bring the sides, top and bottom together with glue and clamps, locking the joints with a few brads. Before the glue completely sets, drop the back panel into its rabbets and attach it with glue and countersunk screws. Cut and install the divider (piece 6) on the top panel. Place your sanders on the shelf first, to find the best spot for the divider. Secure it permanently with screws driven through the back panel and up through the top.
Building the Trays
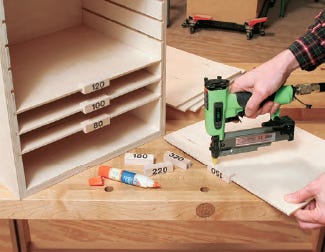
Cut seven trays (pieces 7) to shape from 1/4" ply and sand them well. I fashioned the tray pulls (pieces 8) from one long scrap of hard maple. Plow the tray groove along the length of the full strip before crosscutting the seven pulls to final size. I labeled each pull for a different grit using 1/2" sticky-back numbers available at office supply stores. Then I covered the numbers with packing tape to protect them. Glue and fasten the pulls to the front edges of the trays with brads or pin nails.
You're now ready to apply a few coats of your favorite finish to the project. When it cures, fasten the hacksaw blade (piece 9) — teeth pointing up — to the case with a couple of screws. Install two thin washers behind the blade first to create a gap for slipping the sandpaper into place.


Keep the inspiration coming!
Subscribe to our newsletter for more woodworking tips and tricks