Using a Nearly Natural Finish
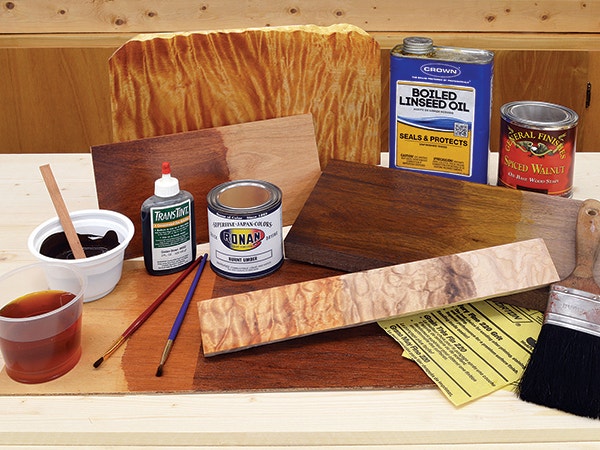
Our finishing expert demonstrates some great tricks to make your inexpensive wood look high-class.
Clever chefs have tricks to "upgrade" cheap or less desirable cuts of meat. Similarly, adept finishers have tricks to upgrade cheap, or less attractive, cuts of wood. With subtle coloring you can enhance the figure in curly or quilted maple; add richness to gray, steamed walnut; introduce mahogany's subtle dark bands to lauan or meranti; and pass red alder off as aged cherry.
This is not about simply staining wood from light to dark or beige to cordovan, but rather giving it a gentle nudge toward something a bit classier. Want to give it a try? Grab some scrap wood and experiment with some of these restrained but effective coloring techniques.
Oil of Olé!
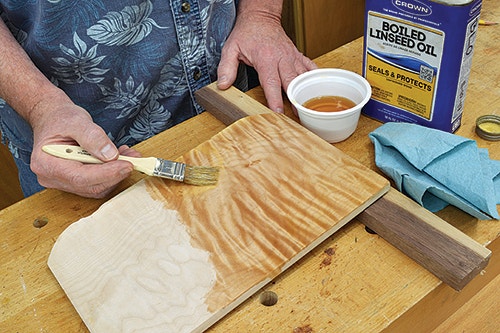
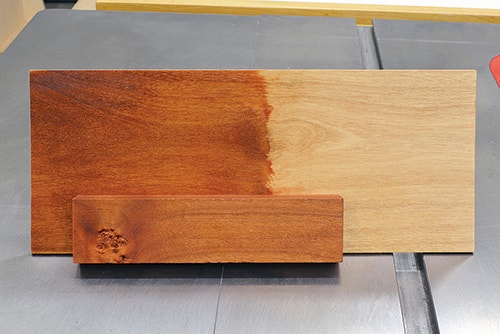
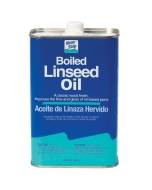
Figured maple is beautiful in its own right, but you can really make it stand up and cheer with a bit of color in the curls. You might already be doing this without realizing it, since shellac, oil varnish and polyurethane, lacquer and Danish oil are all more or less amber. However, for a more dramatic way to pop the grain, go with boiled linseed oil.
While we don’t call oil a stain, its amber color works just like one. Flood the wood with oil and keep it fully wet for 15 minutes, adding oil when and where it gets absorbed. Wipe all the oil off and let the wood dry two days before continuing with your chosen finish.
To Dye For
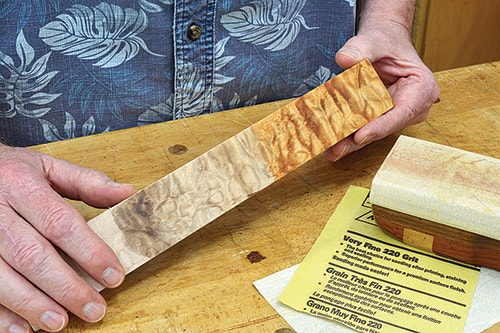
For even more pronounced contrast, or when you want a color other than amber, try this trick, which also works great with burls. Mix a water-soluble brown or black dye and flood it onto the figured wood, wiping it off immediately and thoroughly.
Let it dry overnight, then sand the surface aggressively with 220-grit paper until all the dye is out of the lighter patches. It will, of course, remain in the end grain areas, giving you well-defined contrast. Add a second, lighter, contrasting color dye, such as a light amber, to make it look aged by the sun.
Into the Pale
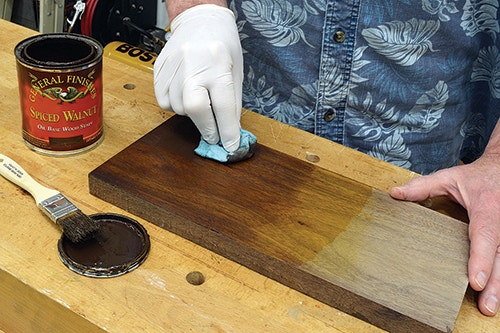
"Hate that gray? Wash it away" went an old ad for hair color, but it applies to steamed walnut as well. In order to utilize both heartwood and sapwood, walnut is sometimes steamed to disperse the color throughout. Sadly, it often all ends up a fairly uniform, dull, purple-gray color. You can fix that.
Flood the surface with a moderately weak yellow orange or red-orange dye, which will add a lovely golden glow to the wood while killing the gray. It should end up just a bit too bright, at least for realistic-looking walnut.
Let the dye dry and seal the wood with a thin coat of dewaxed shellac. When that’s dry, stain the wood with a 100% pigment stain in chocolate brown, or whatever color you prefer. As you wipe off the excess pigment stain, you will notice two things: that the dye shines through with a golden glow; and that the pigment both blends it and, by collecting in the pores of the walnut, intensifies the wood's grain pattern.
Want to take the original dye on walnut a step further? Try adding random alternating bands of weak reddish and purplish dyes to mimic varying growth ring colors. Or add pigment with a dry brush, as in the mahogany technique below. The key is to be understated enough to look natural, so no one can tell you added color. Got sapwood streaks? You can use dye, in more robust colors and concentrations, to blend sapwood to match the adjacent heartwood.
Great Impostors

A similar two-step color scheme helps red alder look like more expensive cherry. Again, start with a very weak amber dye for the background, but this time we won't seal the wood before the second color. Instead, wash the dyed alder with either a weak red-brown dye, or a weak pigmented wiping stain to impart overtones of reddish brown.
Perhaps my favorite coloring technique is dry brushing, which lets you highlight the pores of wood selectively to make meranti or lauan look more like expensive mahogany. Use a water-soluble dye if you need it to add background color. If not, soak the surface with water in order to raise the grain. Open pores and the slightly rough surface that results are more conducive to picking up color from the brush.
Choose a Japan color that matches mahogany's darker color bands, and thin it just a tiny bit with mineral spirits. You'll want it the consistency of very heavy cream. Daub a blob of color onto scrap cardboard and scrub just the very tips of a springy China bristle brush through it. Scrub until the spot is just shy of completely dry and the tips of the brush's bristles are dirty with color.
With a light, glancing stroke, brush the color onto the wood in patterns that copy the darker areas of mahogany. Add grain sweeps or bands, or simply intensify grain where you feel it's needed. I'll often start with Van Dyke brown, then switch to a reddish brown or even cordovan for the second or third color application. Use the alternate colors to go between your first bands, or partially overlap to impart a gradual blending of color.

Each bristle of the stain-loaded but almost dry brush will impart color only on the pore it hits, leaving a broken band of color similar to the dots in old style rotogravure printing. It's as if you went in and carefully added an arc of color to the edge of each pore.

Make sure the brush is not too wet, though, or you'll get dark streaks instead of easy-to-hide dots. Initially, the color will look very dramatic as it is applied, but you'll notice that it blends and lightens once you add a coat of clear finish over it.
There you have it: a tidy bag of tricks to give nature a boost, for when the wood in your hands doesn't quite live up to the image in your mind.
Keep the inspiration coming!
Subscribe to our newsletter for more woodworking tips and tricks