How to Prepare Wood for Finishing - A Free Video from the Center for Furniture Craftsmanship
In many opinions, the surface preparation of the components is the most important aspect of furniture making. What people see, and feel, in the end is the surface of the wood. Surface preparation and finishing go hand in hand; lack of preparation will lead to a bad finish.
This video was produced for its free video library by The Center for Furniture Craftsmanship in Rockport, Maine. The Center is a nonprofit, international woodworking school dedicated to providing the best possible education in wood craftsmanship and design.
How to Prepare Wood for Finishing with Tim Rousseau
In this video, Tim Rousseau, an instructor at the Center for Furniture Craftsmanship, demonstrates how to prepare a surface of wood to prepare it to take a finish. There are a variety of methods and approaches to surface preparation.
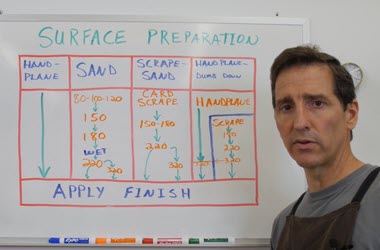
The first thing to consider is what surfaces can be prepped after gluing versus surfaces that will be hard to access after gluing together. It is important to know which tools work best based on the size, shape and types of wood. And depending on which finish that will be used, what level of grit to sand to; with a film finish or heavy topcoat, sanding doesn't need to go above 220, but a close to the wood type finish, like an oil finish, would benefit at 320 or higher.
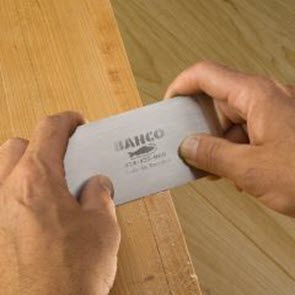
First, clean and prepare the work surface so not to scratch the components, it is good to have padded surface as well. Make sure the components are flat and check for defect areas. Card scrapers are great for difficult areas, dings or grain change, and can also bypass all the coarse sanding without tearing grain out, like on figured wood.
It is great to hand plane narrow components because it is faster and smoother than sanding and the hand plane will be as wide as the component. Hand planed surfaces do not need to raise the grain. A Random Orbit Sander is bad idea not only because it is slower, but it is also harder to keep narrow pieces at correct dimensions. With bigger boards, a larger hand plane can be used, and can still finish sand the board with a very high grit to get to a very even surface.
If the components were sanded versus planed, use a clean damp cloth to lightly raise the grain. About a half hour later sand at 220 and higher. After sanding, vacuum the pieces before applying finishes.
Check out the video above for a step-by-step walk through of how we prepare wood for finishing at the Center for Furniture Craftsmanship.
Related Product Categories


Keep the inspiration coming!
Subscribe to our newsletter for more woodworking tips and tricks