Jointers and Combination Machines Take Many Roles in the Shop from Cutting Wood for Joints to Planing
A jointer can be a handy tool to have in your shop for creating perfect butt joints and repairing cupped and twisted lumber. Many woodworkers agree that, after a table saw, the number one piece of shop equipment is the jointer. One look at the versatility of this workhorse and it’s easy to see why.
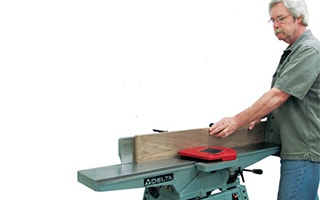
4" benchtop jointers, like this one from Delta, are best for smaller jobs and shops that don't have a lot of space for a jointer. The machine’s primary function — in fact, the one it’s named for — is creating ready-to-glue edges on workpieces. A jointer does this the same way a hand plane does, by cutting away high spots on the lumber. With each pass over the blades, high spots are gradually milled away until the edge is a single, continuous plane.
The jointer's main usage in the shop will be to create square, flat edge joints which is especially helpful when making large panels. However, a jointer does this far more efficiently than a hand plane in three key ways: It’s faster; it creates an accurately leveled edge over a lengthier area; and a jointer’s fence makes this edge perfectly square to one face of the stock.
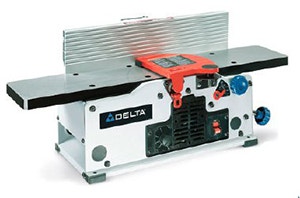
6" stationary jointer machines, like this JET model, is the standard for most jointers on the market, perfect for almost any job. An argument could be made that a table saw can also create square edges, but those edges are rarely glue-ready. Likewise, a router can also create a jointable edge, but that method requires a lengthy setup to get it right. A jointer beats both, hands down.
Beyond the Joint
One of the key uses of your jointer will be taking warped or cupped boards and flattening them out. Because most means of working boards require starting with one square edge, the jointer is the logical first stop when milling project lumber. Before ripping a board on the table saw, for example, it’s essential that one edge hug the saw’s fence. Once one edge is squared on the jointer, you’ll be able to rip the opposite edge perfectly parallel to the first and do it more safely. Just as a table saw can’t give you perfectly parallel edges if one edge isn’t already square, a thickness planer can’t give you a perfect face unless the opposite face is already true and flat. A cupped or twisted board won’t feed properly through a planer; a freshly planed face may be parallel to the opposite side, but you may find that it follows the same twist as the other side. Again, turn to your jointer to get this first face dead flat. As with edge-jointing, feeding a board’s face on your jointer attacks the high spots of a cupped or twisted board first, gradually flattening the face. Then, once that face is perfectly flat, you can head to the planer and get a second flat face perfectly parallel to the first.

Machine Combination machines, like this one from Rikon, add a 12" planing blade beneath the joiner bed for additional usage in the shop. Combining these two techniques on a jointer turns stock preparation into a powerful one-two punch: You get that dead-flat face, followed by a jointed edge that is exactly 90 degrees to the face. Every other method of stock prep performed after that will register on one or both of those two surfaces, ensuring accurate results.
More than a Pretty Face

For planing, outfeed table is set level with the blade while the infeed table is raised or lowered to control the amount of material removed. If it ended there, a jointer would be indispensable in most shops, but it also performs a few other tricks. Need a rabbeted edge? You can get it with a rabbeting bit on your router or by mounting a stacked dado blade set on your table saw — both of which can be time-consuming. Or, you can cut rabbets quickly using the built-in “rabbeting ledge” found on just about every jointer made. Move the fence to the side of the bed with the ledge, fine-tune the placement according to the stock thickness and required rabbet depth, and then just lock it down. Make multiple passes just as you would when edge jointing to quickly form your rabbet. Similarly, for chamfered edges on stock just tilt the jointer fence. Multiple passes easily and quickly create edges of just about any angle. Sure, you can do that on a table saw, too, but these edges are perfectly smooth and ready for glue-up if that’s the goal — and that’s a nice goal!


Keep the inspiration coming!
Subscribe to our newsletter for more woodworking tips and tricks