Showing a completed glued-up dovetail joint

The dovetail joint may be the most agreed-upon symbol of fine craftsmanship. The layout of the joint's basic components — angled pins that mate with bird-like tails — can add a stylish decorative element to many projects.

As strong as they are beautiful, dovetails are also popular because of how useful they are for building a wide range of carcass, drawer and frame projects from solid wood. They're held together with just glue and wedging action, yet dovetails stand the test of time and abuse.


Dovetail joinery, while not as old as the mortise and tenon techniques, is still ancient. The reasons that it has remained popular are several. First and foremost is that dovetails are a solid and reliable woodworking joint. If they are well-made, the combination of a large area for glue coverage associated with the mechanical quality of the joinery provides a durable and long-lasting joint.

The first reason dovetail joints are popular is the visual rhythm of the repeating tails and pins are simply pleasing to look at. If you are making dovetails by hand or with a more sophisticated jig system like the Complete Dovetail Jig, the pattern can be varied to accentuate the beauty of the joint.

The second reason dovetail joints are popular is their strength and durability. Most of us have opened drawers on an antique piece of furniture and have seen dovetails where it is clear that the glue has broken down...but the joint is still holding together. A butt joint or dowel joint would have fallen apart, but not the dovetail joint.

The third reason that dovetails remain highly popular is the assumed complexity of the joint implies quality. For many woodworkers, mastering the construction of a hand cut dovetail is a goal that seems out of reach. For that reason, using a router and dovetail jig is very much in the sweet spot of home shop woodworkers.


Parts of a Dovetail Joint


Detail drawing of the parts of a dovetail joint

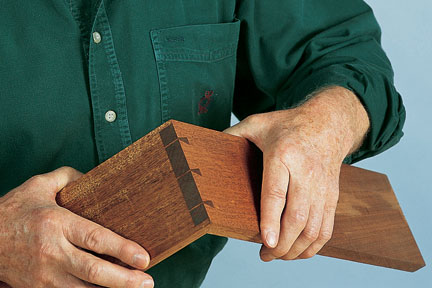
Dovetail joints consist of an interlocking and snugly fitted series of pins and tails. All the tails are cut into one piece of wood, called here the tail piece. Typically, the completed tail piece then serves as a template for marking and cutting the pins in the pin piece. The joint pictured is a variation of a typical through dovetail that is dressed up with a mitered corner.


Types of Dovetails: Through and Half-Blind

Drawings of through and half-blind dovetail joints

Dovetails take two principle styles. Through dovetails, a classically hand-cut joint, have both pins and tails that show through on the adjacent surfaces of the joined parts. These are the easiest types of dovetails to saw and chisel manually, and they can also be machined with a router and dovetail jig or even cut partly using a table saw or band saw with the aid of a shop-made jig. They are useful for a variety of carcass and frame-joining applications. Typically, the tailboard of the joint is oriented toward the most visible side of the project where the distinctive dovetail shape will be most prominent.


Half-blind dovetails feature tails that stop short of the face of the pinboard, so the pin-and-tail pattern only shows from the side of the joint. Half-blinds are great for drawers when you want the strength of the joint but don't want the joinery to show on the front of the piece. Some woodworkers cut them with saws and chisels, but they are more routinely routed with a templated jig.


There are other dovetail styles, such as houndstooth (a complex through-dovetail variation), double-lap and secret miter dovetails for more advanced woodworking. But if you can master basic through and half-blind forms of the joint, they'll probably serve you well for practically every dovetailed project you'll ever want to build.


Hand-Cut Dovetail Joints

Rough cutting dovetail pins with coping saw
Cutting dovetails by hand is a rite of passage for many woodworkers. While it's a challenging skill to develop at first, there's no question that hand-cut dovetails are achievable by any woodworker who is willing to be patient and meticulous about the process. The old adage of "practice makes perfect" certainly applies here, too.

Before the time of electric power tools and continuing to today, dovetails have been cut by hand.


Using large mallet and chisel to clean dovetail tailboard
Typically, the tailboard pattern is laid out first and the angled cuts are made with a fine-toothed backsaw. Then the waste in between each tail is removed with a coping saw and cleaned up with a sharp chisel.

The process involves marking out either the pin- or tailboard (which comes first is often debated) with a gauge and a knife or pencil, then sawing the angled interfaces and removing the waste with a coping saw and chisels. The mating board is marked using the cut board as a template, then sawed and chiseled to fit.


Marking knife cuts laying out tailboard pattern for dovetail joint
The tailboard pattern then becomes a template for scribing the exact locations of the pins on the mating workpiece. Here, the pinboard is clamped beneath the tailboard. A sharp knife transfers the tail pattern.

The ease of cutting dovetails manually will depend on your willingness to work carefully and practice often. And when you finally achieve a piston-tight fit, the gratifi cation is very sweet indeed!


Machine-Cut Dovetail Joints

Cutting dovetails with hand tools is a noble goal, but there are a plethora of fixed and adjustable-template jigs on the market that can make either through or half-blind dovetails achievable for any woodworker. Using them typically involves steering a router that is set up with a dovetail router bit or a straight router bit in between the template jig. Dovetail jigs do require patience to fine-tune but can deliver excellent results.


Click to Learn More About the Rockler Complete Dovetail Jig


Setting up Rockler dovetail jig to cut halfbind dovetails
This dovetail jig from Rockler uses interchangeable "fixed" templates to mill either half-blind dovetails (being routed here) or through dovetails. The template sets a single joint pattern and cannot be changed.

Leigh d4r dovetail jig being set-up for routing dovetails
Other dovetail jigs, such as this Leigh D4R, feature adjustable fingers that enable you to rout either a regular pattern of pins and tails or vary their spacing for a more customized joint design.

Four varieties of router bits for cutting dovetails
Some dovetail jigs require proprietary router bits with integrated bearings that follow the dovetail templates (left two in photo). Or the jig's templates may interface with guide bushings instead and use standard router bits.