How to Make an Arts & Crafts Calendar Frame
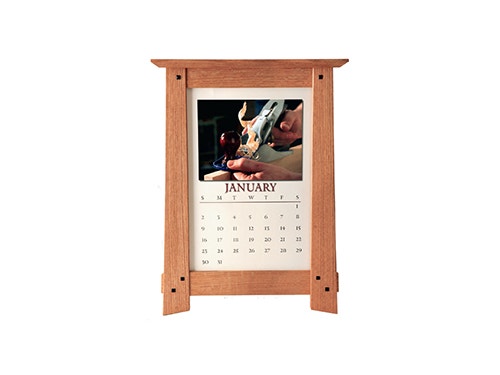
This design of this quartersawn white oak calendar frame was ten years in the making, but makes a perfect small project in just about any shop.
I started this Mission style calendar frame about 10 years ago, sort of. It began when a friend gave me a calendar with original artwork from Wolf Creek Printery. Knowing that I was a furniture maker, he only gave me the calendar, no frame. That was the first calendar frame I made — walnut, if I remember correctly.
For the Calendar Frame Diagrams and Materials List, click here to download the PDF.
Since then, I figure that it took me 10 years, a hundred calendar frames and the availability of rare-earth magnets to find my perfect attachment method for my calendar frame back panel. I use a piece of 20-gauge sheet metal and attach it using eight 1/2" rare-earth magnets. It works wonderfully, needs no tools, is easy to remove and has no moving parts (no levers to turn or screws to remove).
After completing a project for a close friend, I decided that this was the opportunity to try my new method and show my appreciation for the commission. He is fond of the Arts & Crafts style and needed a calendar for his workshop.
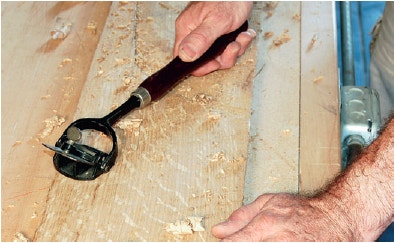
After I designed the frame, I started the project by making a material list and selecting the lumber. I had a couple of 5/4 roughsawn quartered white oak boards left over from a recent kitchen project, and all I had to do was determine which sections of the boards had the most figure. To do this, I used an old Stanley #70 box scraper. This is a great tool, and I routinely take it with me to the lumberyard.
Next, I surfaced and dimensioned all the parts, paying close attention to the different thicknesses of the stiles, rails and top cap. I kept the stiles square and parallel at this point and waited until all the joinery was completed before tapering the sides and cutting the angle on the bottom edges.
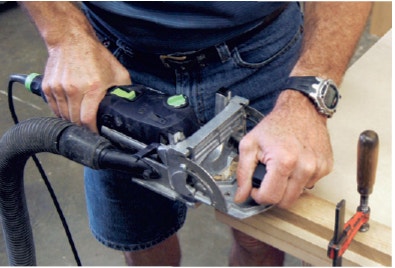
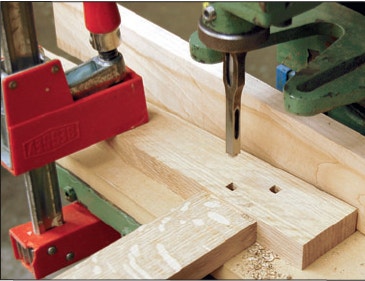
The four joints in the frame consist of two through-pinned mortise and tenon joints and two floating tenon joints. I used my Domino mortising machine for the floating tenon mortises and used a hollow chisel mortiser for the bottom rail mortises.
First, I mortised the top rail and its matching mortises in the stiles with the Domino. Next, I positioned the stiles on the mortiser and mortised for the through tenons, chopping them halfway on each side to minimize any deflection in the chisel or discrepancies in the straightness of the mortise.
The Oliver's mortising chisel was slightly dull, and the mortise edges were a little ragged. To fix this, I used a very sharp cutting gauge to pare the edges and inside faces of the mortises. Now I was ready to raise the tenons.
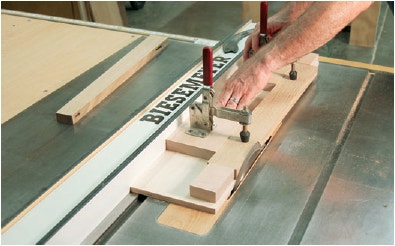
I cut the tenons on my Hammond Glider printer's saw. The saw is from the 1960s and is the most precise machine in my shop. It has a sliding table that rides on twenty 1/2" ball bearings and is smooth and accurate. After determining the length and width of the tenons, I started by cutting their shoulders. Next, I mounted a tenon jig onto the Hammond's sliding table and finished the tenons by cutting their cheeks and sides.
Knowing that I would be making more frames in the future, I decided to make a dedicated taper jig. I chose to make the taper cuts on my table saw using a newly sharpened blade as this minimized the final sanding of the edges. When that task was done, I trimmed the ends of the stiles to approximately 10° to add a nice detail.
While I could have used faux pins that would have been 1/8" or so deep, I decided to use long ebony pins that would provide a mechanical lock in addition to the glue. I dry-assembled the frame and stepped back to the mortiser. I used a 5/16" mortise chisel and set the mortise depth so that it would pass through the tenon but not through the back side of the stile. The ebony that I used for the pins came from my supply of old piano keys.
I cut the ebony pins to 5/16" square and about three inches long. To shape the ends of the pins, I set the miter gauge to 20° and formed a "dome" on one end, then I flipped it over and cut the other end. I returned the miter gauge to 90° and cut the pins to length. With the joinery cut and fitted and the pins made, my next step was to taper the sides of the stiles and to cut an angle on their bottom edges.
The last task prior to sanding and gluing was to rout a small, 1/16" chamfer on all the front edges. I did not chamfer the back edges, but I did lightly sand them to remove any edge sharpness. I also chamfered the ends of the through tenons. That done, I sanded all the parts with 220-grit sandpaper. Because of the pins being proud of the surface, the through tenons and the inside corners, I needed to finish-sand prior to glue-up.
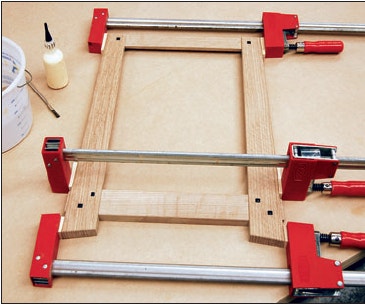
Even though this frame is small, it does present a couple of clamping challenges. First, I had to deal with the tapered stiles, which meant that I had to make angled clamp pads and second, I could not clamp directly over the through tenons. What I did was to use two clamps, one on each side of the through tenon. This method allowed me to see the fit of the tenon and gave me access for cleanup of the excess glue. Once the frame was clamped tight, I tapped the ebony pins in place with a mallet and a small block of wood.

I gave the fresh glue joints time to dry overnight, then got started the next morning by setting up a router for the two rabbet cuts. I needed one rabbet for the glass, calendar and 1/8" hardboard assembly and another for the metal back panel. The rabbet for the metal back was routed first so that the bit’s bearing would have a surface to ride against (the screw holding the bearing on would have hit the edge of the larger rabbet if I had cut it first). For the second rabbet, I carefully measured the thickness of the calendar set, glass and 1/8" hardboard assembly. After I had this measurement, I routed the rabbet to that depth plus 1/32". You do not want this rabbet too deep or too loose. If the rabbet is too deep, the calendar will be loose, or if it is too shallow, the metal back will not sit tight against the magnets. When I finished routing, I squared up the corners of the rabbets with a sharp chisel.

With the machining completed, I was ready to order the 1/8" glass and metal back panel and drill the holes for the magnets. For the back panel, I took the frame to a local supplier of sheet metal and, while I waited, they cut and fitted a piece of 20 gauge steel. I used 3/8" diameter magnets with their corresponding cups. This step did require very accurate measurements and drilling. Ideally, you want to drill the holes about 1/64" less than the magnet assembly. This will ensure that the metal back will lay on the magnets and not on the rabbet face.
Now I was ready to finish making the top cap. I set my table saw's blade to 35° and cut the bevels on the cap. The cap was then centered on the frame and glued directly to the top rail. Before I glued it on, though, I sanded it, working up to 220-grit sandpaper.
Finishing Up

I used an oil stain and two coats of lacquer for the finish. When spraying, be careful not to fill the magnet holes with lacquer, as that would make it difficult to install the magnets (I put cotton balls in the holes when spraying). After the final coat had dried, I rubbed out the entire frame with fine steel wool, then I buffed the surfaces with a clean cotton cloth. While I was spraying the frame, I also sprayed a light coat on the metal back panel. The metal back was fairly clean, and all it required was a light sanding with an orbital sander.
The frame was finished and I was ready to install the magnets, drill the back of the stiles for a wire-hanging system and insert the glass, calendar, hardboard and metal back panel. The 1/8" glass received a good cleaning after I took the sharpness off the edges with my diamond honing stone (I used a 2" x 6" diamond honing stone with water). Next, the calendar assembly went in along with the metal back and, finally, I attached a length of wire for hanging the frame. All that was left was to wrap a ribbon around it and deliver it to its new home.


Keep the inspiration coming!
Subscribe to our newsletter for more woodworking tips and tricks