Eight Tips for Routing Cabinet Doors
A few simple pointers will help you achieve better results with your cabinet door projects.
Cabinet doors aren’t difficult to make at the router table, but the process isn’t foolproof, either. As with most woodworking techniques, an ounce of planning is worth at least a pound of workpieces you won’t have to re-make if you do things correctly the first time. Here are eight tips to keep in mind.
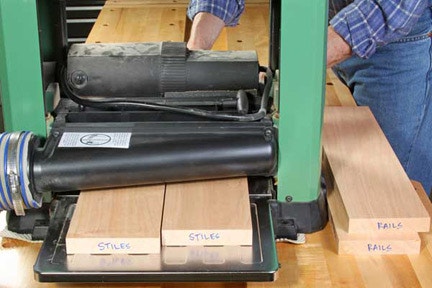
1. Plane your door frame stock to final thickness during the same planing session. Rails and stiles on a cabinet door frame are always the same thickness. Any deviation in thickness between these parts will produce mismatched joints — especially if you are making your doors with cope-and-stick joinery. So, be sure to plane all of your door stock to thickness at the same time to ensure uniformity. It's also a good idea to make up more stock than your material list calls for so you’ll have extra material for milling some test pieces. Mark the ends of your door stock in some fashion to account for all of the frame stock you need to make.
2. Measure cabinet door openings carefully. If you are building doors after making the cabinet carcasses, measure the actual carcass openings to verify the final sizes of your door rails and stiles. Remember that cabinet door stiles extend all the way to the top and bottom of a door, and the rails fit in between the stiles. For "inset" style cabinet doors that fit inside face frame openings, here's how to determine the rail length: The overall door opening width minus the width of two stiles plus the length of the rail joinery equals the length of the rails. (Once the door frames are assembled, you’ll still need to trim the doors slightly smaller to create a reveal inside the face frame.) If you are using a cope-and-stick router bit set to create the door joinery, the length of the stub tenons will be equivalent to the door joinery length, so measure their length on your coping bit. When making "overlay" style cabinet doors where the doors overlap a face frame or frameless cabinet box, remember to include the total amount of overlap when figuring both the stile and rail lengths.
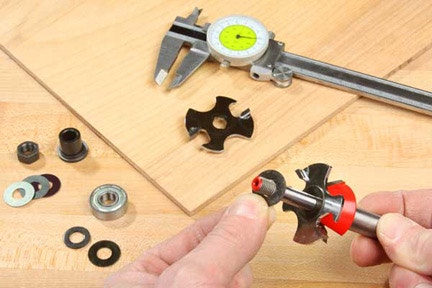
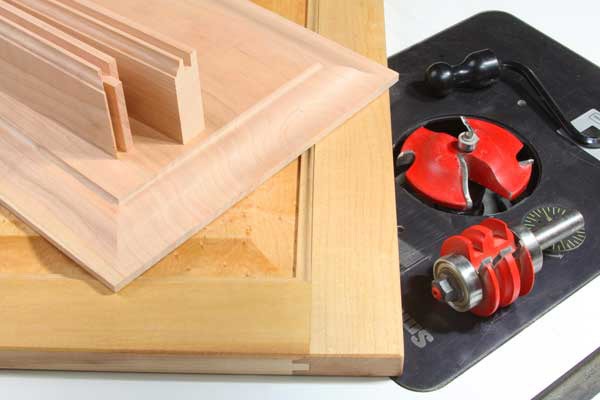
3. Adjust the slot-cutting width, if possible, when building doors with glass or plywood panels. Some cope-and-stick bit sets are now made to be adjustable so you can vary the slot width for the door panel opening. This is helpful for making glass-panel cabinet doors or when using plywood with a thickness that’s less than 1/4 in. Check the instructions that come with the router bits to see if they allow for slot adjustment. You may need to add or remove washers between the slot cutters, or it might require replacing the slot cutters with an undersized cutter set. Make these adjustments before routing any of the rail and stile joinery. Both the coping and sticking cutters will require modification, since their mirror profiles must match.
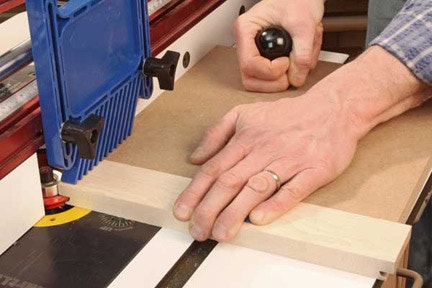
4. Cope the rails first. Here’s a tip for convenience more than a hard-and-fast rule. If you start your door joinery by coping the ends of the rails prior to making the sticking cuts, both edges of the rails are still flat and square. At this point, you can use a flat-edged backup board to support the rails when making these cross-grain coping cuts. Just rotate the rails end-for-end to cope them, and the backup board will prevent tearout. Any tiny splintering that might occur will be removed when you make the long-grain sticking cuts in your next step. When alternating from one cope cut to the other, remember not to flip the rail over, or the cope cut orientations won’t match. Just turn the part around to make the second cut.
5. If coping comes second, use a mated backup board to prevent tearout. Sometimes, you may end up cutting the sticking profiles on the inside edges of the rails and stiles first, before coping the ends of the rails. No problem. But now, unlike Tip #4, only one edge of the rails can be coped against a flat-edged backup board. The other rail edge has the sticking profile — and here’s how to accommodate it: mill the cope profile all along a fresh edge of your backup board. This way, you can mesh the sticking profile of the rails into the coped edge of the backup board to support it and produce a clean cope cut without tearout.

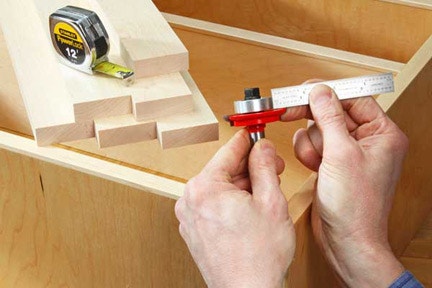
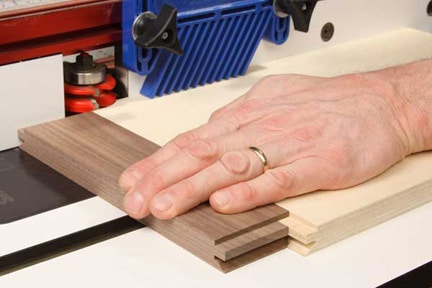
6. Use a routed workpiece to set up the matching joint cutter. Don’t measure. Cope-and-stick corner joints form an exacting fit. Let’s say you’ve coped the ends of the rails, and now you’ve switched to the sticking cutter. Don’t measure to find the correct cutter height; instead, use the coped profile you’ve already cut as a “setup block” for dialing in the sticking cutter. In the photo, we’re aligning the stub tenon of a coped rail with the tenon slot-cutter on the sticking bit. Once these profiles are lined up, the sticking bit is properly set. But, be sure to make a test cut first before milling all of your door frame parts.

7. When raising door panels, cut across the grain first, then along the grain. Cutting across the grain of a door panel with a raised-panel bit can produce splintering at the exit corner of the cut. The way to correct this tearout is to plan for it. Start with both cross-grain cuts on the ends of the panels, then proceed with the two long-grain cuts. The long-grain cuts will clean away any end-grain tearout at the panel corners. Never start with the long-grain cuts.

8. Raise panels in stages, a little at a time. Panel-raising is an aggressive milling operation that removes a lot of material. The bit is substantial and heavy. In order to work safely and produce clean results, mill the panel in a series of passes, shaping it progressively and removing no more than 1/16-in. of material with each round of passes. Don’t attempt to cut it all away at once. Depending on the style of panel-raising bit, you may be able to raise the bit gradually before making each round of milling passes. Or, you can set the bit at its full profile height and then expose a little more of the cutters by shifting and re-locking the router table fence. You will have to use this second approach if your raised-panel bit has an integral “back cutter” feature. It won’t allow the cutter to be raised incrementally without ruining the edge profile.


Keep the inspiration coming!
Subscribe to our newsletter for more woodworking tips and tricks