Make a Tough Worktable Top
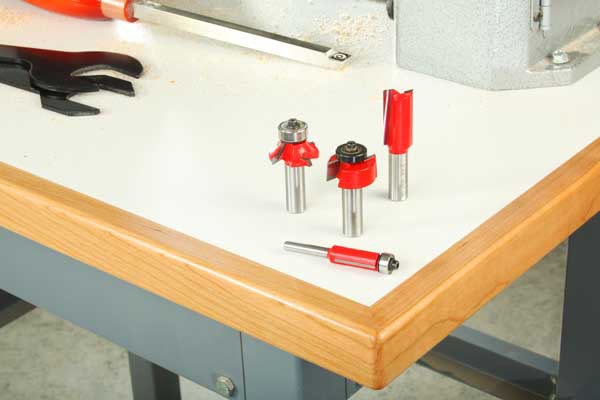
Build this sturdy top with four router bits and home center supplies.
Durable, easy-to-clean worktops are useful all over the workshop — for your router table, a finishing or assembly table, cabinetry ... even outfeed surfaces for your table saw or band saw. The approach for this project provides the flatness and economy of MDF, plus the durability of plastic laminate and solid-wood edging. You can make a worktop like this in a weekend to any custom size you need.
Step 1: Determine the overall size of your worktop, and subtract 2 in. from this length and width to arrive at the size of the MDF substrate for your project. Cut one piece of 3/4-in. MDF to these proportions. Then, cut a second piece about 1/2-in. larger in both dimensions. Spread a thin layer of glue evenly over one face of both pieces, and sandwich the substrate together. The oversized piece enables you to assemble these MDF sheets without needing to align their edges perfectly during glue-up. When the glue dries, install a piloted flush-trim bit in your handheld router, and set the bit depth so the pilot bearing will roll along the "finished size" substrate. Flush-trim the oversized piece to match it. Be sure to wear a respirator when routing the MDF, as the process produces copious fine dust.
Step 2: Measure and trim a piece of plastic laminate about an inch larger than the substrate in both length and width. (NOTE: Sheet laminate is often available at home centers in the countertop department. White is a good color choice, as it will make shop tasks and setups on your worktop easier to see.) You can cut plastic laminate safely at the table saw, but make sure your saw's rip fence clamps down tightly against the saw table to prevent the laminate from slipping underneath while cutting it.
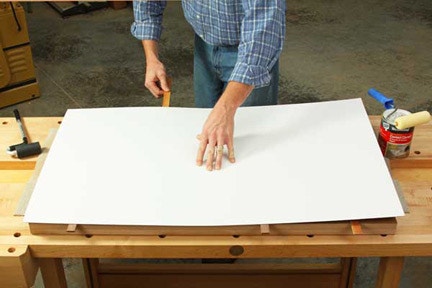
Step 3: Spread a thin, even layer of contact cement onto the top face of the substrate and the back side of the laminate, using a small foam paint roller. Wait until the cement dries to the touch. Once it does, lay strips of thin scrap material or dowels on top of the substrate to act as spacers for positioning the laminate. Without them, the laminate will bond permanently to the substrate on contact; if that happens, repositioning is impossible. Carefully lay the laminate into place on the spacers, checking for an even overhang all around. Then, pull the center spacer out and press the laminate down against the substrate. Remove the remaining spacers, working from the center to the ends of your worktop and pressing the laminate down as you proceed. Then, use a J-roller or a piece of scrap wood wrapped in a cloth to roll or rub the laminate surface and improve the cement bond. Be careful when working near the edges of the laminate to avoid cracking the overhangs.

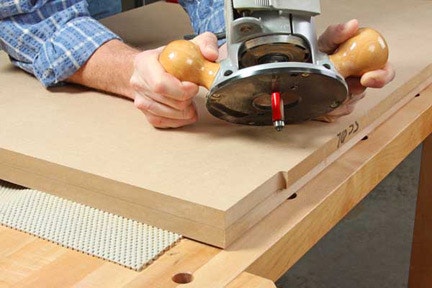
Step 4: You can proceed to trim off the excess laminate immediately with a flush-trim bit in your router. Set the bearing so it rolls along the substrate edges, and feed the router counterclockwise around the blank to remove the excess material.
Step 5: The edges of your worktop will be protected with solid wood; a hardwood such as maple, oak or cherry will offer the most durability, but even a softer wood such as poplar or pine can work, too. Measure the thickness of your worktop blank (MDF plus laminate), and rip four long strips of edging to this width from 3/4-in.-thick stock. Make your edging strips 4 to 6 in. longer than necessary.
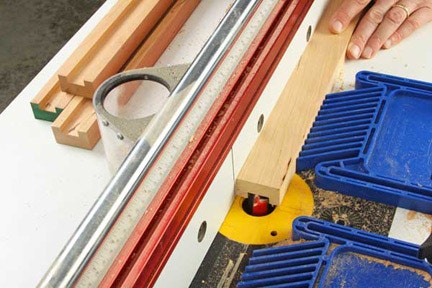
Step 6: Install a 3/4-in.-diameter straight bit in your router table, and adjust the fence to rout a centered groove along the face of each edging strip. Raise the bit 1/8 in. above the table. It's a good idea to install at least one featherboard, or preferably two, on either side of the bit to press the edging firmly against the fence as you rout them. Make the first pass on each strip, then raise the bit to 5/16-in. Run the pieces again to bring the grooves to final depth. Then, flip each strip end-for-end and run it through the bit one more time to ensure that the grooves are exactly centered on the strips.
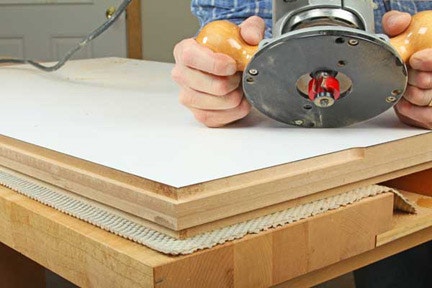
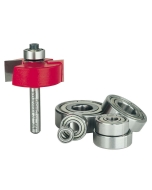
Step 7: The edging grooves will fit over a tongue that you'll rout around the worktop blank next. First, chuck a rabbeting bit in your router, and install a bearing on the bit that will restrict its cutting width to 1/4 in. Lower the bit carefully so its cutting depth matches the width of the walls on either side of the grooves you cut in the edging (you can use the edging as a reference when adjusting the bit). Feed the router counterclockwise around the worktop's top and bottom faces to cut the tongue to shape. It should measure 3/4-in. wide and 1/4-in. tall.

Step 8: Now it's time to miter cut the ends of the edging and install it. Assemble the edging on one corner of your worktop at a time, cutting only the mating miters and checking their fit. Dry-fit the four edging strips in place and test your clamp setup, to ensure that all four miter joints and the edging seams will close properly. Then glue and clamp the edging, one strip at a time, spreading glue along the grooves, tongues and over the faces of the miters.

Step 9: When the glue dries, ease the sharp edges and mitered corners with a roundover bit in your router. Start by routing the four mitered corners across the thickness of the worktop, then ease the long edges and ends that remain. Rout away the waste in several passes of increasing depth.

Step 10: Plane, scrape or sand the edging flush with the top and bottom faces of the worktop. Smooth the solid-wood surfaces by sanding up to 180-grit, then topcoat the wood with your finish of choice. Mask off the edges of the laminate first to keep it clean. Polyurethane's durability is a good choice for this application; apply two coats to both the edging and the bottom MDF face.
Now your new heavy-duty worktop is ready for installation and years of service to come!


Keep the inspiration coming!
Subscribe to our newsletter for more woodworking tips and tricks