Video: Making Raised Panel Doors With A Table Saw
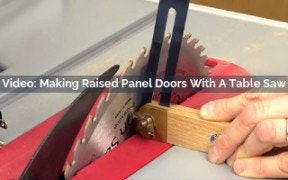
Learn how to make a raised panel door using cuts from your standard table saw. We'll show all the small steps you'll need to make this project a breeze.
Skill Builder Video
Making Raised Panel Doors With A Table Saw - Video Transcript
Speaker: In this video I'm going to show you how to make raised panels like this using a table saw in a standard combination blade. For standard rectangular raised panels, all you really need is the saw blades you already own and you don't need a big table saw either. I'm going to use this Jobsite table saw from saw stop for the entire technique. There are a couple of other things you're going to need for raising panels and one of them is a tall surface for your rip fence. Why? Because the process of raising panels involves sawing them vertically against the rip fence. In a standard rip fence like this just isn't tall enough to add much vertical stability.
If your fence already has holes in it, you could just screw or bolt a piece of flat scrap right to your fence or you could build a tall fence like I've done here. It's just an 8 inch wide piece of plywood with a thicker block of scrap screwed to that. I'm going to use these universal fence clamps from Rockler to clamp it to my rip fence at the appropriate time. You're also going to need a tall feather board to help press panels against the fence when you saw them.
Now the first step in raising a panel is knowing how big the panel needs to be and the best way to land on those dimensions is to make your cabinet door frames first. That's what I've done here with this mocked up frame that I made up my router table with a rail and style bit set. Now the style cutter is going to cut slots all the way around the frame for your panel.
Measure to the bottoms of the slots both width wise and length wise, then subtract one-eighth of an inch from the width of the panel so that it has room to expand and contract inside the frame. You can make the length of your panel fill the full depth of the slots because the panel isn't going to expand the contract lengthwise. Now grew up a panel of flat square stock and plain the panel down to 5/8 inch thick. For most rail and style router bit sets a 5/8 inch thick panel will sit in it slots in the frame and be flush with the rails and styles, that's what you're aiming for. Then trim the panel to its final dimensions. Next you need to lay out the filled area of your panel. The size is really up to you, so let your own sense of proportion be your guide. Typically, these beveled areas are between an inch and a half and two inches wide so I'm going to go with an inch and 3/4 here.
Use a combination square or a similar layout gauge to draw four layout lines around the panel to mark the field area. Now head to your table saw and raise the saw blade about 1/8 inch above the table. This will create the shallow shoulders around the field area then set the rip fence so the blade will cut just to the waste side of your field layout lines. Make two shallow cross-grain cuts and to long grain cuts to create a grid of the field area.
Use a push stick or push pad to keep the panel pressed firmly against the saw table and rip fence when you make these cuts. Now we've got the field area of our panel defined, next we need to set the angles for sawing the beveled edges around those. To do that, draw an angled line that connects the bottom of one of your shoulder cuts out to the edge or end of the panel and make the thickness of the panel at the edge match the width of the slots you've already cut in your doorframe parts.
Set and lock a bevel gauge to the same angle you just drew on your panel, then raise your saw blade to full height and tilt the blade until it meets the bevel gauge flush. Lock the blade to this angle. We're ready to make some final saw adjustments, so we can cut our four bevels. With your tall fence installed on your rip fence, adjust your blade height so the top of the teeth just intersect your bottom shoulder curve.
Then slide your rip fence over, so the inside face of the blade just intersects your beveled layout line and lock the fence. Here's a few more setup notes. You can see that I've clamped this long piece of scrap to my panel to ride along the top of my tall fence and act as a runner when I push each of these cuts through and I'm going to reclamp that scrap to the panel for each of the four bevel cuts and here's why.
When you push these cuts through, if your saws throat plate has a wide opening around the blade, the panel could become narrow enough along the bottom that it could dive right down into the slot ruining the cutter even kicking the panel back. This runner keeps the panel out of trouble, it also provides more bearing support for the cuts than these narrow edges when you push them through. I'm also going to install this tall feather board right beside the blade and above it to help me keep the panel pressed tightly against the tall fence when I make each of the four cut. Notice that it won't come in contact with a blade or trap any of the off cuts as I make them. You're all set to make the first bevel cut, start your saw and feed the panel through pressing it against the fence.
Be sure to position your hands above the feather board at all times. When you're done with the first bevel cut, clear away the waste piece, reclamp the runner and cut the other end of the panel. Repeat the process the same way to make the two long-grain cuts. Straight off the table saw, there's no question that your raised panels are going to need some cleanup work with hand tools.
You may have some burn marks or blade swirls to remove, you want to smooth the bevels and you may even need to thin out the edges of the panels to fit the doorframe stock better. That's easy enough to do with a block plane or other small smoothing plane or a sharp cabinet scraper. I suggest you start on the end grain bevels, planing in toward the center of the panel so that you don't break out these fragile corners and then switch to the long grain bevels.
Now your goal when fitting the panel to the doorframe stock is for the edges of the panel's to fit in their slots snugly, but all the way to the bottom, that will give your panel some room to expand and contract across the grain when it needs to. That's really all there is to it. Raised panels made entirely on the table saw. It's a fun and easy technique and one more way to get your table saw to work even harder for you. Good luck with your cabinet doors and thanks for watching.
-
-
 Rockler Miter Fold Dado Set PlusSpecial Price $283.99 Regular Price $379.99 Save $96.00Out of stock
Keep the inspiration coming!
Subscribe to our newsletter for more woodworking tips and tricks