Scrap Cutting Board Project

Make a handy cutting board. This project makes a great gift and it's a perfect way to use up wood scraps.
This cutting board project is a perfect gift and a great way to use less-than-perfect odds and ends in your scrap bin. In this case we turned some hard maple and walnut cutoffs into a useful kitchen cutting board with handle and drip channel. We used two strips of 1/4-in.-wide walnut sandwiched between a piece of brown-colored maple and two pieces of white maple to form an attractive lamination.
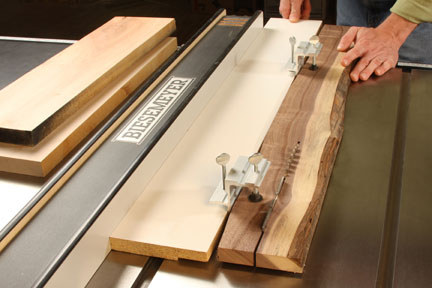
Step 1: Rip and joint your cutting board stock straight and flat. Waney-edged, crooked or otherwise "defective" scrap wood might end up in the burn pile unless you can figure out how to safely rip it straight and true. For our project, we used E-Z Jointer Clamps to make a simple straightedge cutting jig. By attaching the aluminum clamps to a piece of straight stock, a second set of thumbscrews enable you to grip your scrap wood and rip it on the table saw using the first board as a straightedge. If your cutting board stock is thicker than 3/4 in., leave it overly thick until after the glue-up is completed. Provided the final blank isn't wider than your planer's capacity, you can plane the lamination flat and smooth after the glue dries.
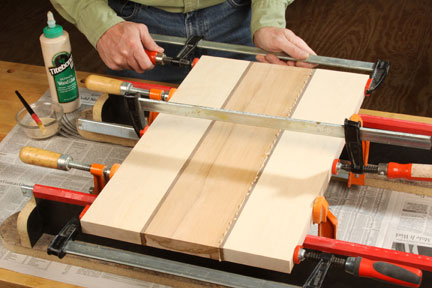
Step 2: Obviously, cutting boards are exposed to a fair amount of water when in use. Choose a waterproof glue, such as a modified PVA, epoxy or polyurethane to carry out the glue-up stage of your cutting board. When forming a multi-piece lamination like this project, it never hurts to glue the pieces together in several smaller subassemblies. That way, you can let the subassemblies dry, then join them in one final "wet" glue joint. It reduces the hassle of having too many slippery joints to keep aligned when tightening the clamps. We created one assembly of light maple, walnut and dark maple, and a second glue-up of walnut and white maple. Once those dried, we brought them together to create the full blank. The cutting board shown here measures 13 x 18 in.
Step 3: Remove the clamps and scrape off any dried glue. Run both faces of the blank through your planer for a final clean-up pass, if the stock thickness allows for it.
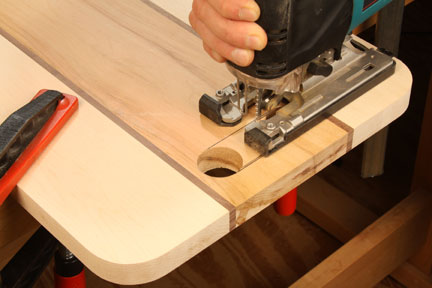
Step 4: Round the corners of the cutting board at the band saw or with a jigsaw. We chose 1-1/2 in. radii for these corners. Sand the cuts smooth. Our cutting board also has a handle cutout that measures 1 3/8 in. wide and 4-1/4 in. long with rounded ends. If you choose to do the same for your project, use a Forstner bit in the drill press to bore two holes for the ends of the handle, then remove the waste in between with a jigsaw. File or sand the inside of the handle smooth and even. A spindle sander or sanding drum in the drill press are good options for this task.
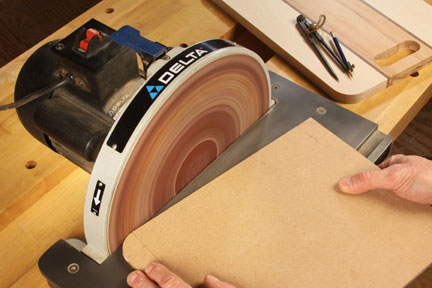
Step 5: Our cutting board includes a shallow, rectangular drip channel to keep draining water or meat drippings off the counter. To mill the drip channel, we'll use a plunge router, guide collar and 1/2-in.-diameter core box bit guided around an MDF template. Our template measures 10 in. x 12-1/2 in. with 1-1/2-in. rounded corners. A disc sander makes quick work of shaping them.
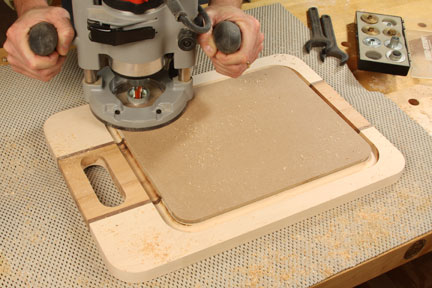
Step 6: Mount the drip channel template to your cutting board blank with strips of double-sided tape, and press it down firmly. Install the core box bit and a 5/8-in. O.D. guide collar in the base of your plunge router. Set the cutting depth for a shallow first pass, and feed the router counterclockwise around the template. Repeat the process in several deepening passes until the drip channel is about 1/4 in. deep.
Step 7: Sand away any burns and bit marks from the drip channel, then sand the faces of the blank up through the grits to 150.

Step 8: We eased the inside edges of the handle cutout, as well as the top and bottom edges of the cutting board, with a 3/8-in.-diameter roundover bit. Shape these edges in multiple passes to minimize burning and tearout. Feed the router clockwise around the handle cutout, then counterclockwise when easing the board's outer edges.
Step 9: Sand the routed edges to smooth their transitions. Give the entire project a final sanding with 180-grit sandpaper.

Step 10: It's a good idea to give your new cutting board a food-safe topcoat to seal the wood from moisture and make it easier to clean. Salad bowl finish is one option, but we chose a blend of mineral oil and beeswax (you can also use paraffin) that's easy to make and apply. Mix wax shavings into a small amount of oil, then warm it in the microwave until the wax softens. Continue to add shavings until the mixture achieves a soft-butter consistency. Rub it onto the wood with a synthetic abrasive pad, and buff the surface smooth with a soft cloth. Store the extra finish in a sealed container so you can renew your cutting board's surface whenever necessary. Just reheat it, and it's ready to use.


Keep the inspiration coming!
Subscribe to our newsletter for more woodworking tips and tricks