All categories
Page 18 - Learn Woodworking Tips with Rockler
-
 Categories: Woodworking JoineryNovember 02, 2022As you may have discovered, there are many ways to build a drawer box. What's your favorite? Whatever it is, your method of choice almost certainly reflects the importance you place on durability, aesthetics and last but not least, getting done fast.Read more
 -
Categories: Tool ReviewsNovember 02, 2022Rather than juggling with all the different power sanding options on the market now, our author has laid out the options he looks for when buying a new sander.Read more
-
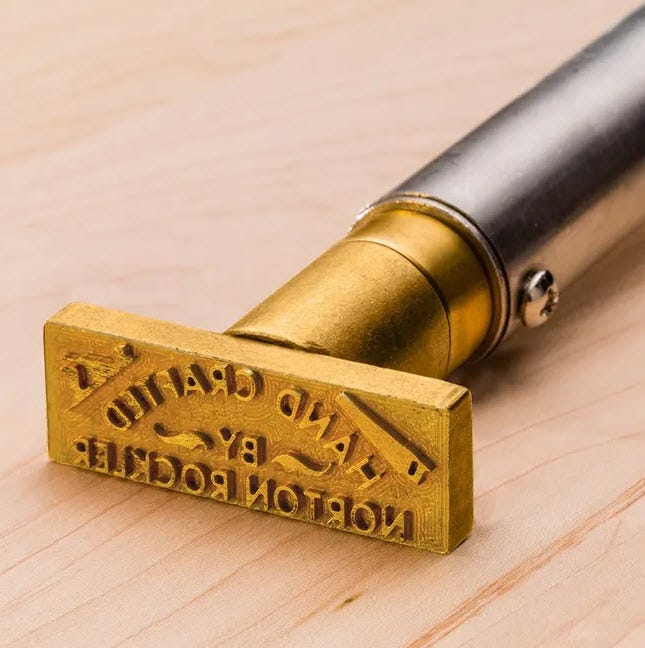 November 02, 2022Woodworking branding irons are a popular tool among woodworkers and crafters looking to add a personalized, professional touch to their creations. These tools work by heating a metal stamp with a custom design, often featuring a logo, name, or unique symbol, and pressing it onto wood to create a lasting, burn-mark impression. Typically, branding irons can be heated either electrically or by using an open flame, and they come in various sizes and styles to suit different projects. Electric branding irons offer a consistent temperature and are quick to use, making them ideal for high-precision work and repeatable branding. Flame-heated options, on the other hand, give the user flexibility, as they can be heated with a simple propane torch or over a fire.Whether you’re a hobbyist or a professional, using a branding iron is straightforward and creates a rustic, handmade aesthetic that resonates with customers. It's an effective way to mark wood products, from furniture and cabinetry to small items like coasters or cutting boards. With the rise of handmade and artisan goods, branding irons allow creators to add that final touch, leaving a memorable, branded mark on each piece.How To Use A Branding IronThe process of branding wood is simple, but it does take a little bit of practice. To use a branding iron, you’ll first heat it until it reaches the proper temperature (this will vary depending on the wood type and iron style). Once hot, you press the branding iron firmly onto the wood surface for a few seconds, allowing the heat to burn the image into the wood. Then, remove the branding iron carefully and inspect your work. If done correctly, you’ll be left with a clean, even mark that will stand the test of time.Tips for Using Woodworking Branding Irons- Wait for branding iron to heat up completely before branding.- Lightly dampen branding location on project with water.- Try to locate brand over same species of wood. Different wood species can burn at different rates.- Hold brand in place for 3-5 seconds. Harder wood species often require longer burn times.- Make test brands on scraps of same wood species to determine optimal length of burn time.- Use an alignment jigto ensures a straight, square brand, every time.!Read more
 -
Categories: Routers and CNCsNovember 01, 2022Is horsepower a meaningful measure of a router's performance? In truth, it may not be the best.Read more
-
Categories: Maker Videos and ProjectsOctober 31, 2022In this video, David Picciuto uses a laser to carve a three dimensional skull prop that he fills with modeling clay.Read more
-
October 28, 2022Here are some common finishes with simple guides to their appearance, durability and application.Read more
-
 Categories: Tool ReviewsOctober 27, 2022Sanding that's fast, efficient and fun? Maybe not fun, but Festool's sanding RO sanders definitely make things easier.Read more
 -
Categories: Tool ReviewsOctober 26, 2022The Magswitch jig is a compact, easy to install fixture designed to be used in conjunction with a shop-built jig.Read more
-
October 26, 2022Build this Lathe Tool Sharpening Station to streamline your tool sharpening workflow. Designed with Rockler's new Rock-Steady Shop Stand Kit (32"W x 20"D x 32"H) as its framework, I can roll it over to my lathe easily, so sharpening will only be a few steps away from the action. Its worktop has an aluminum facing to protect against sparks, plus six holes and a long slot for storing the lathe tools I'm either sharpening at the moment or using while I turn. Two 4"-deep drawers have racks of semicircular holders that can stow a big collection of short or long lathe tools between uses. And a closed cabinet below that can store other turning accessories too.Read more
-
Categories: Woodworking ProjectsOctober 24, 2022Creating custom picture frames for friends and family is a great gift giving project that's sure to please even those difficult to shop for gift recipients.Read more
-
Categories: Maker Videos and ProjectsOctober 23, 2022In this video, Michael Alm creates a Murphy Bed with built-in side table, LEDs, and more.Read more